How to Paint a 3D Model for Multi-Color Printing


A multi-color print is only as good as the color map. If the red is supposed to stop at the edge of a fin, one stray triangle on the next layer schedules a whole filament swap, a purge tower, and a longer print. Painting that map inside Bambu Studio or OrcaSlicer works, and it also locks the colors inside one slicer project on one computer.
The PrintPal 3D Model Painter does the same job in a browser tab. Load an STL, OBJ, 3MF, GLB, GLTF, or PLY, paint with the filaments you own, and download a 3MF that Bambu Studio, OrcaSlicer, and PrusaSlicer open with every region already on a filament slot. Painting is free and stays on your machine. Saving the file asks you to sign in with a free PrintPal account.
The five-minute version
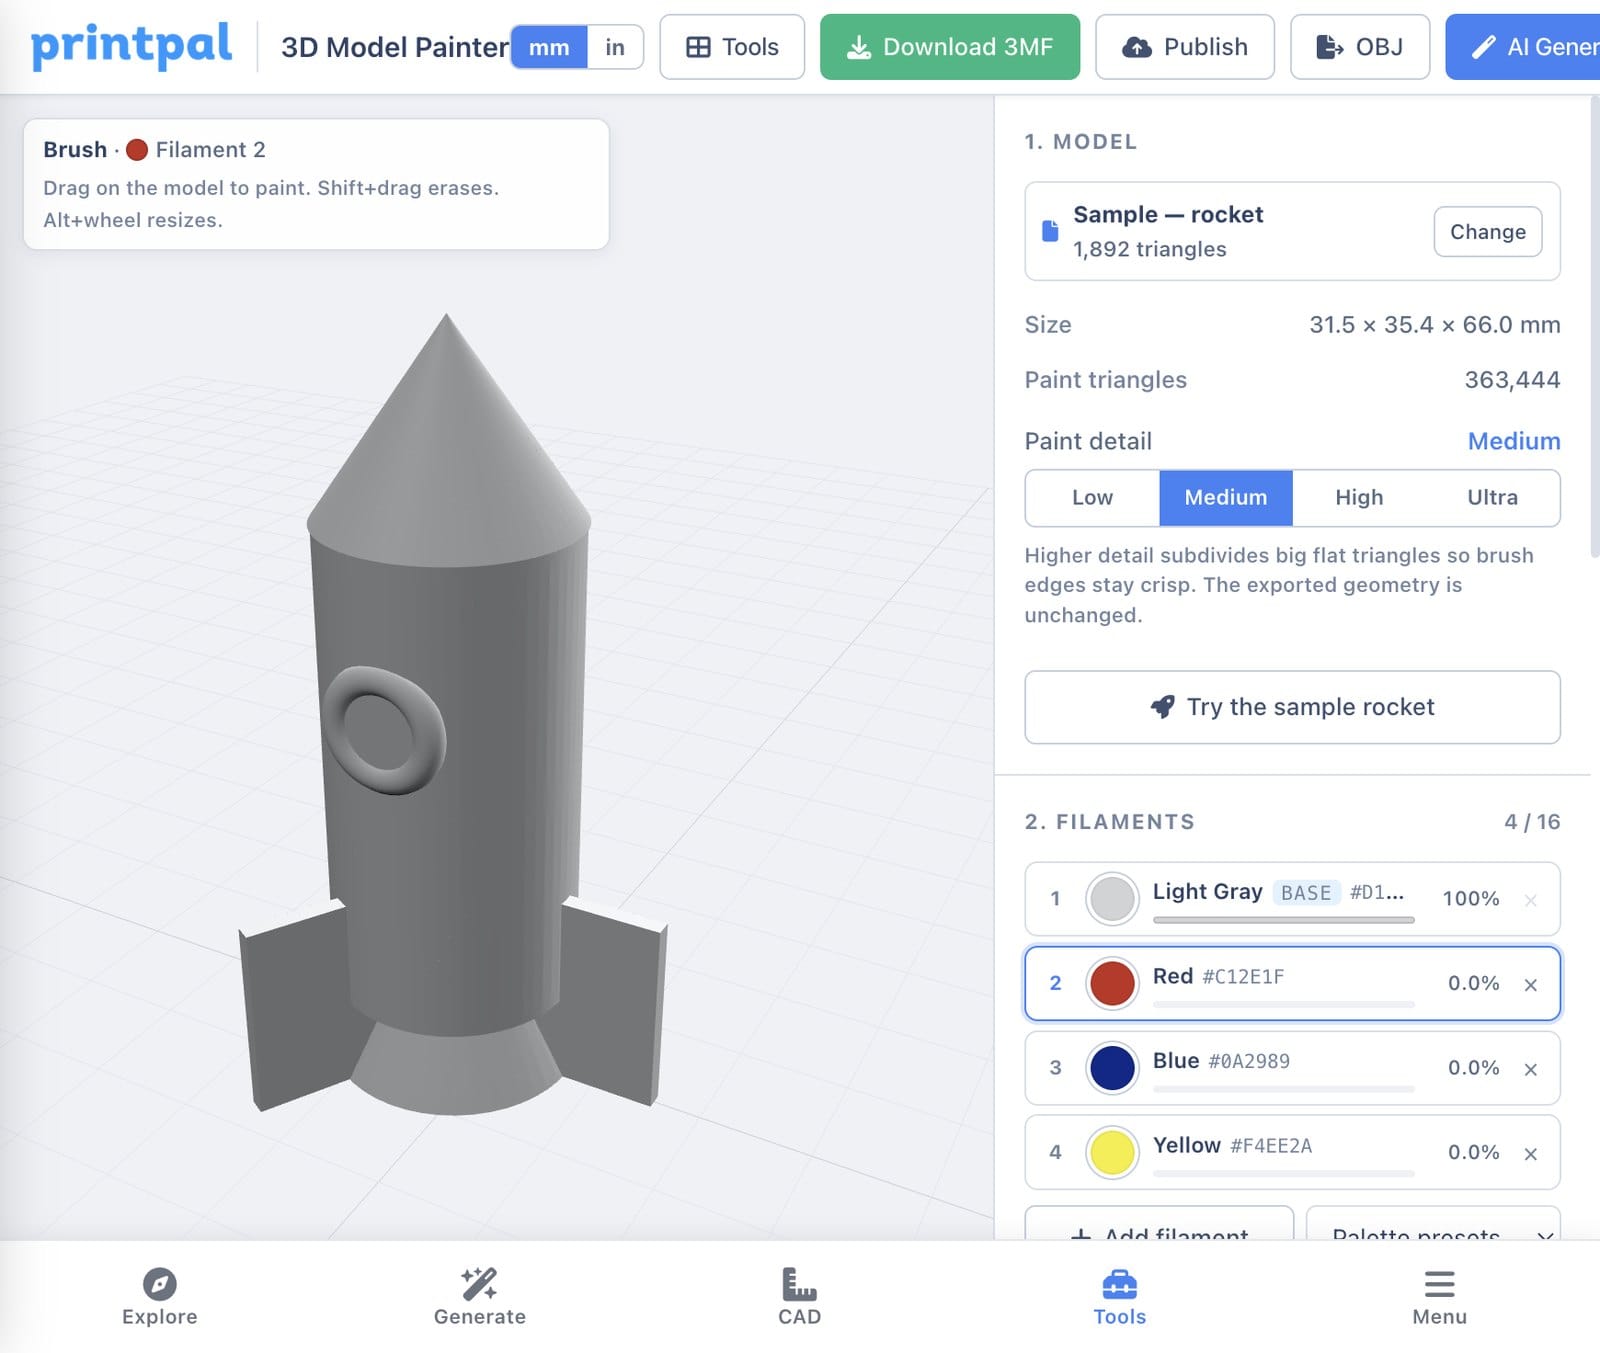
- Open the 3D Model Painter and drop in the file, or click Try the sample rocket. A 3MF that was already painted in Bambu Studio, OrcaSlicer, or PrusaSlicer opens with its colors and its palette.
- Set the filaments. Filament 1 is the base color, so the whole model starts there. Add slots (up to 16) and pick a preset — Bambu PLA Basic for a 4-slot AMS, an 8-color set, Matte, primary, pastel, or grayscale — or click a swatch and match the spool on your shelf. Keys
1through9switch filaments while you paint. - Paint the big regions first with Smart fill. Hover: the preview lights up every face that stays inside the edge angle (30° by default). One click colors a fin, an ear, a letter, or a flat panel. Lower the angle if the fill jumps onto a neighbor. Turn on Stop at existing color edges once a region is done.
- Use the Brush only where the shape has no hard crease. Bucket recolors a whole region you already painted. Height paints a horizontal band upward from the click, which is the right tool for a two-tone base or stripes. Click Merge specks before you export.
- Download 3MF for Bambu Studio / OrcaSlicer. Leave Also embed PrusaSlicer MMU paint data on if you might open it in PrusaSlicer too. In the slicer, map each slot to an AMS or MMU position and slice.

Which paint tool to use
Smart fill (F) is the default for almost every model. The fill spreads across neighboring triangles until the angle between two faces is sharper than the edge angle. Embossed text, lugs, and fins usually light up as one piece. Ctrl or Cmd plus the scroll wheel changes the angle without leaving the model.
Brush (B) is measured in millimeters and only paints faces turned toward the camera, so a thin sign does not bleed through. Paint through thin walls paints both sides. Shift-drag erases back to filament 1. Alt plus the wheel, or [ and ], resizes it.
Bucket (G) repaints every connected triangle that already has the color you clicked. Tick Also stop at sharp edges to keep it on one face. Height (H) paints a band upward from the click, which is how you make a two-tone base without wrapping a logo around a curve.
Triangle (T) paints one original triangle. Pick color (I) selects the filament under the cursor. Move view (V), dragging the empty background, or holding Space rotates the model without painting.
Paint detail (Low through Ultra) subdivides big flat triangles so brush edges stay round. The exported mesh geometry is unchanged. Only the color segmentation carries the extra detail. If a brush edge still looks stepped on a huge low-poly plate, raise the detail.
Color each separate part assigns a different filament to each disconnected shell, largest first. A rocket with separate fins, or a badge with raised letters that are their own shells, gets a first pass in one click. Then bucket-fill anything that landed on the wrong spool.
Merge specks finds islands smaller than the speck size (1 mm² is a sensible start) and gives them the color of whatever surrounds them. One leftover triangle can add a filament change to a layer.
What the 3MF actually contains
The Bambu / Orca download stores per-triangle paint_color, including the split tree for brush edges, and writes your swatches into the project settings. With the Prusa checkbox on, the same file also carries mmu_segmentation for an MMU3 or a multi-tool XL. OBJ and GLB keep vertex colors. STL cannot store paint.
How to keep the purge tower small
Every layer that contains two colors triggers a filament change. A few habits matter more than the brush size:
- Put color changes at different heights when the design allows it. A two-tone base made with Height range purges less than a checkerboard.
- Run Merge specks. Stray triangles are expensive.
- Match the swatches to the spools you will load. The slicer still lets you remap slots on import, and an honest preview saves a wrong-color print.
- Smart-fill the geometric regions, then brush only the places with no crease.
- Turn on Stop at existing color edges before you refine next to a region you already like.
A photo texture on a GLB is a different job. This painter colors regions of the mesh. To reduce a texture to a handful of filament colors first, use the AMS Color OBJ Converter. A flat image that should become a layered lithophane belongs in the Filament Painter, which swaps filament by height instead of by face.
If the mesh itself is broken — holes, flipped faces, a scan with millions of triangles — fix that in the Mesh Repair tool before you paint. Painting a non-manifold shell just bakes the problem into a prettier file.