Design and 3D Print Your Own LEGO-Compatible Bricks

A 3D printer plus a browser is now all you need to design and produce your own LEGO-compatible bricks. No CAD experience, no LDraw or Bricklink Studio learning curve, no install.
The PrintPal Brick Builder is a free online brick designer built for FDM 3D printing. Snap calibrated LEGO-compatible bricks together in 3D, pick colors, tune the clutch (the snap-fit tightness) for your printer, scale up to Duplo-size if you want, and download a ZIP with one printable STL per unique brick plus a LEGO-style PDF instruction booklet so anyone can rebuild what you designed.
Quick Start (6 Steps)
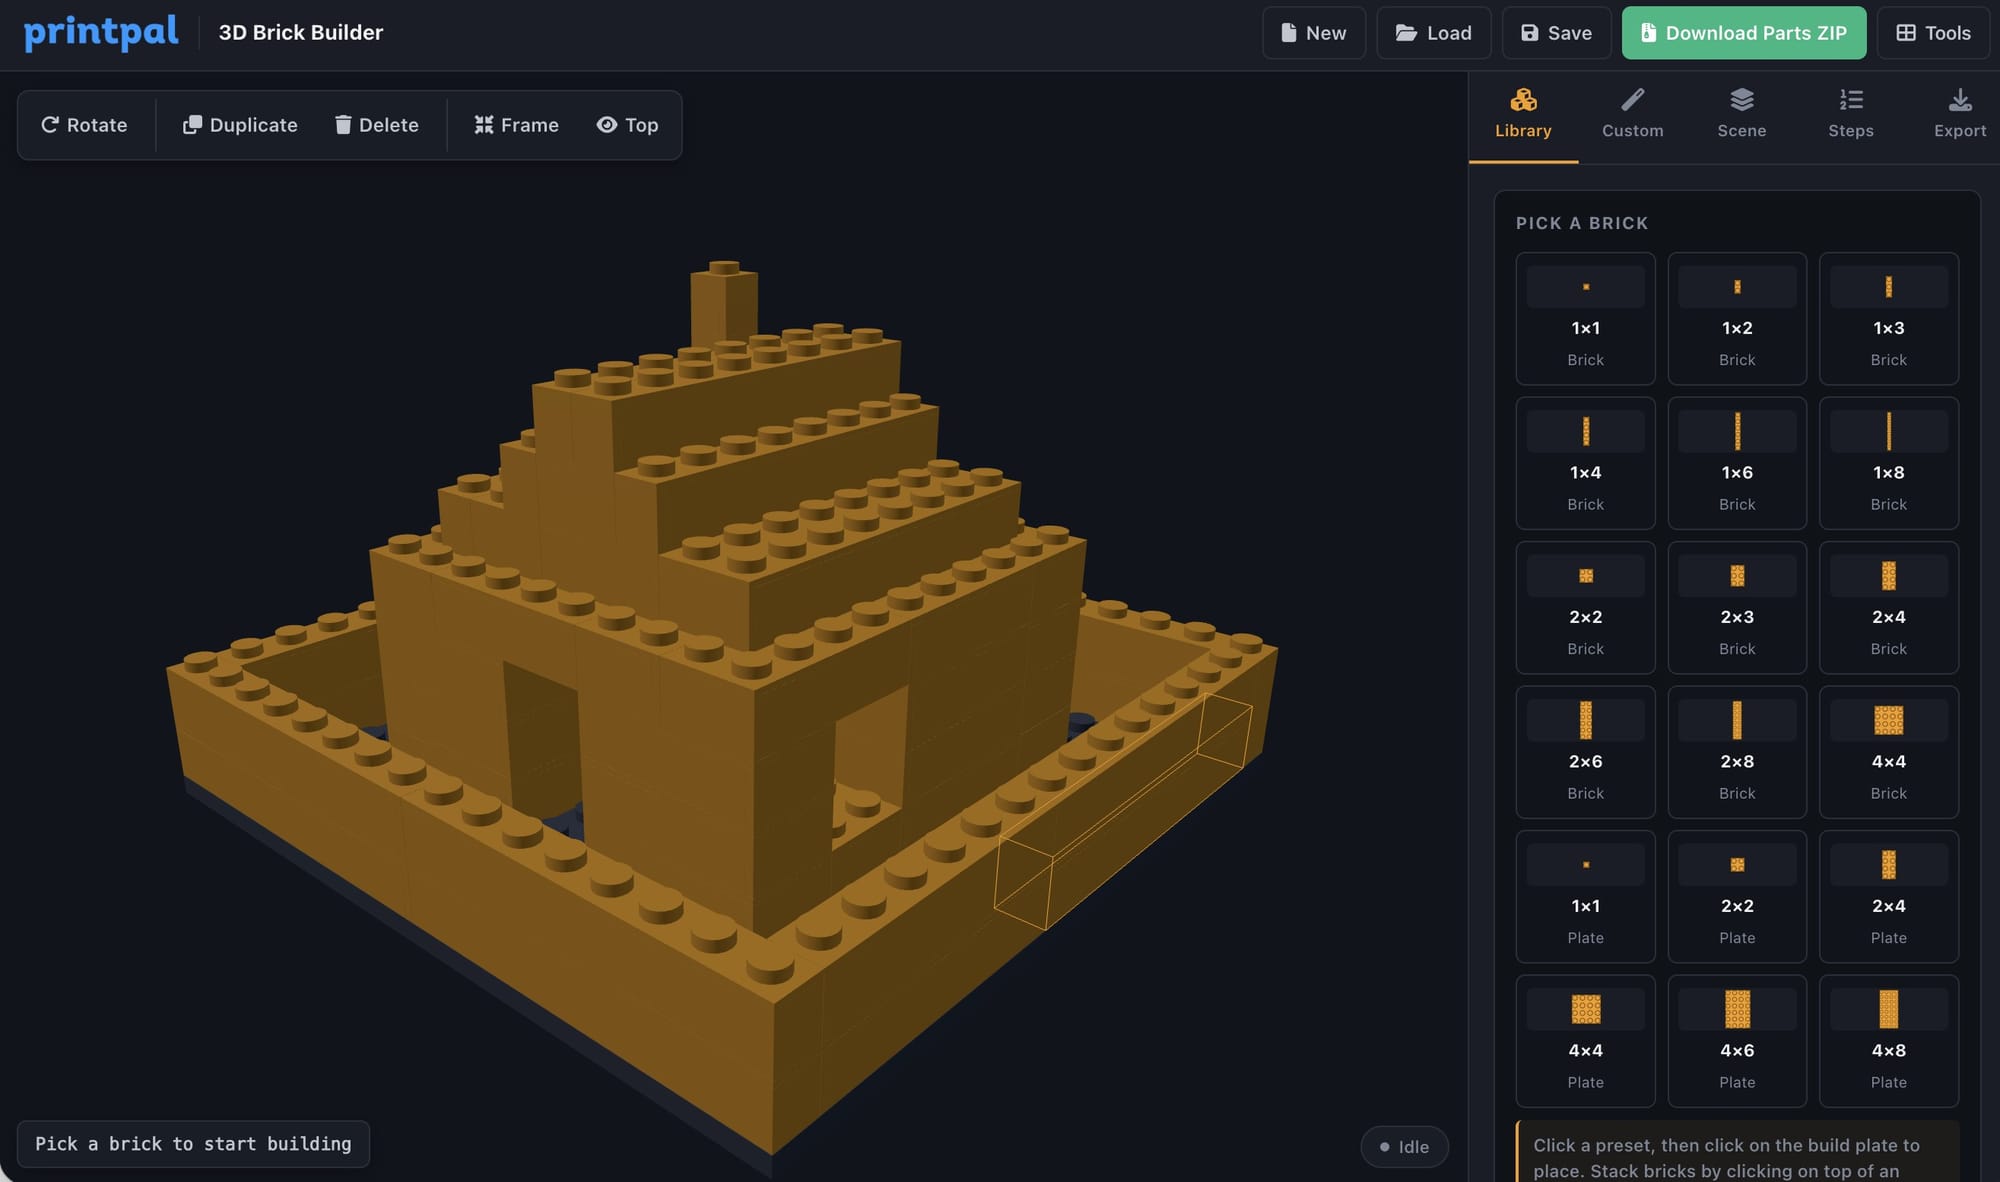
- Open the Brick Builder and log in. The build plate loads, an active 2x4 brick is preselected, and the camera frames the scene.
- In the Library tab pick a brick (1x1 through 2x8 bricks, plus plates and tiles). The active brick is highlighted with an amber border.
- Pick a color from the swatches at the top of the Library tab.
- Click anywhere on the build plate to place the brick. It snaps to the 8 mm stud grid. Hover before clicking to see a translucent ghost preview, and press R to rotate.
- Click an existing brick to select it (rotate, duplicate, or delete from the floating selection toolbar). Click an existing stud to stack a new brick on top.
- When you are done, switch to the Export tab and click Download Parts ZIP. You get one STL per unique brick shape, plus a LEGO-style PDF assembly booklet.
Print, snap together, done.
The Five Tabs
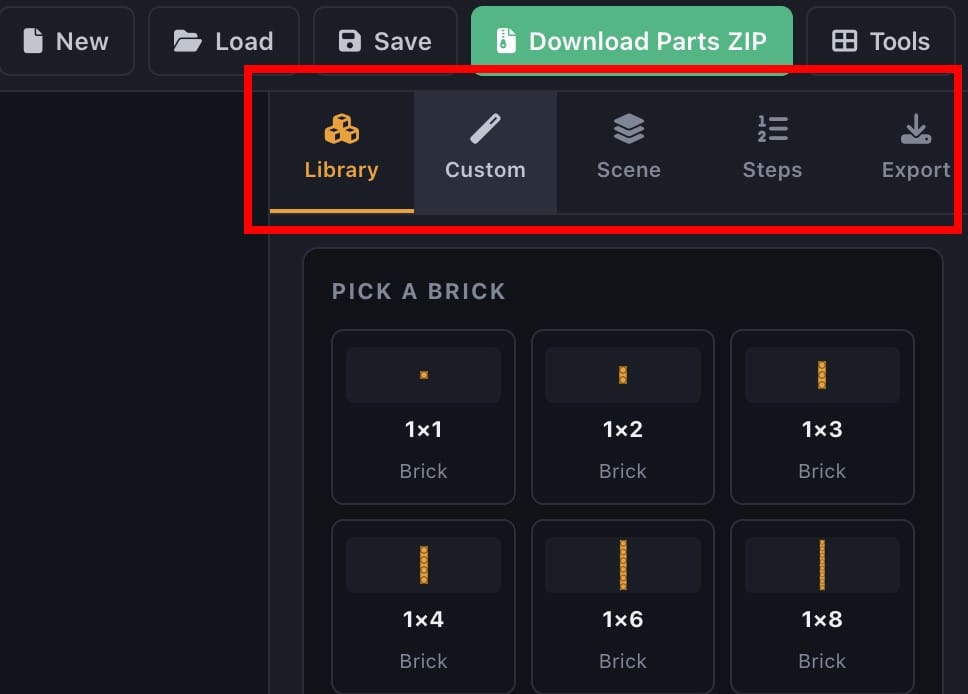
Library
Preset LEGO-compatible bricks at standard sizes (1xN, 2xN bricks at 1, 2, and 3 plate heights, plus plates). Click a card to make it the active brick, then click on the build plate to place it. Color swatches sit above the cards.
Custom
Type any width, depth, and height (1 to 16 studs wide, 1 to 16 deep, 1 to 6 plates tall). The Custom tab is where you build truly bespoke parts: a 2x12 baseplate, a 1x6 plate, a 4x4 brick, anything.
Scene
Brick count, plate visibility toggle, frame-all camera shortcut, plus selection tools when a brick is selected. Use it for housekeeping, not building.
Export
The control room. Three sections sit here:
- Brick Scale (100% to 200%, default 130%). Scale every brick up proportionally. 100% is true LEGO size, 130% is somewhere between LEGO and Duplo, 200% is full Duplo-feel. Tolerances and clutch ridges stay constant in mm so the snap-fit feels the same at any scale.
- Clutch Fit (Standard, Tight, Extra Tight, default Standard). How tight the snap fit is. Standard is calibrated for well-tuned FDM printers. If your bricks fall apart after printing, bump to Tight. If your printer over-extrudes, stay on Standard.
- Download buttons for Parts ZIP, Combined STL, Save Project (
.bricks.json), and Load Project.
Steps
A built-in step-by-step assembly viewer plus a downloadable LEGO-style PDF booklet. Each step shows the cumulative build with the new brick highlighted, and the PDF is auto-bundled inside the Parts ZIP.
Brick Scale (and Why 130 Percent is the Default)
True LEGO-size studs are about 5 mm in diameter. On most FDM printers that is right at the edge of what a 0.4 mm nozzle resolves cleanly. The default Brick Scale of 130% bumps the studs to 6.5 mm, the brick spacing to 10.4 mm, and the wall thickness to 1.95 mm, all of which print noticeably better and feel chunkier in the hand. They are still LEGO-system compatible with each other; they just are not compatible with real LEGO at that scale.
For real-LEGO interoperability, set Brick Scale to 100%. For full Duplo-feel pieces (great for toddlers, classroom STEM kits, or large display models), use 200%.
| Scale | Stud Pitch | Best For |
|---|---|---|
| 100% | 8.0 mm | Mixing with real LEGO bricks |
| 130% (default) | 10.4 mm | Best clutch fit on a 0.4 mm nozzle, chunkier feel |
| 150% | 12.0 mm | Display models, kids' hands |
| 200% | 16.0 mm | Duplo-style, classroom and toddler builds |
Print Settings
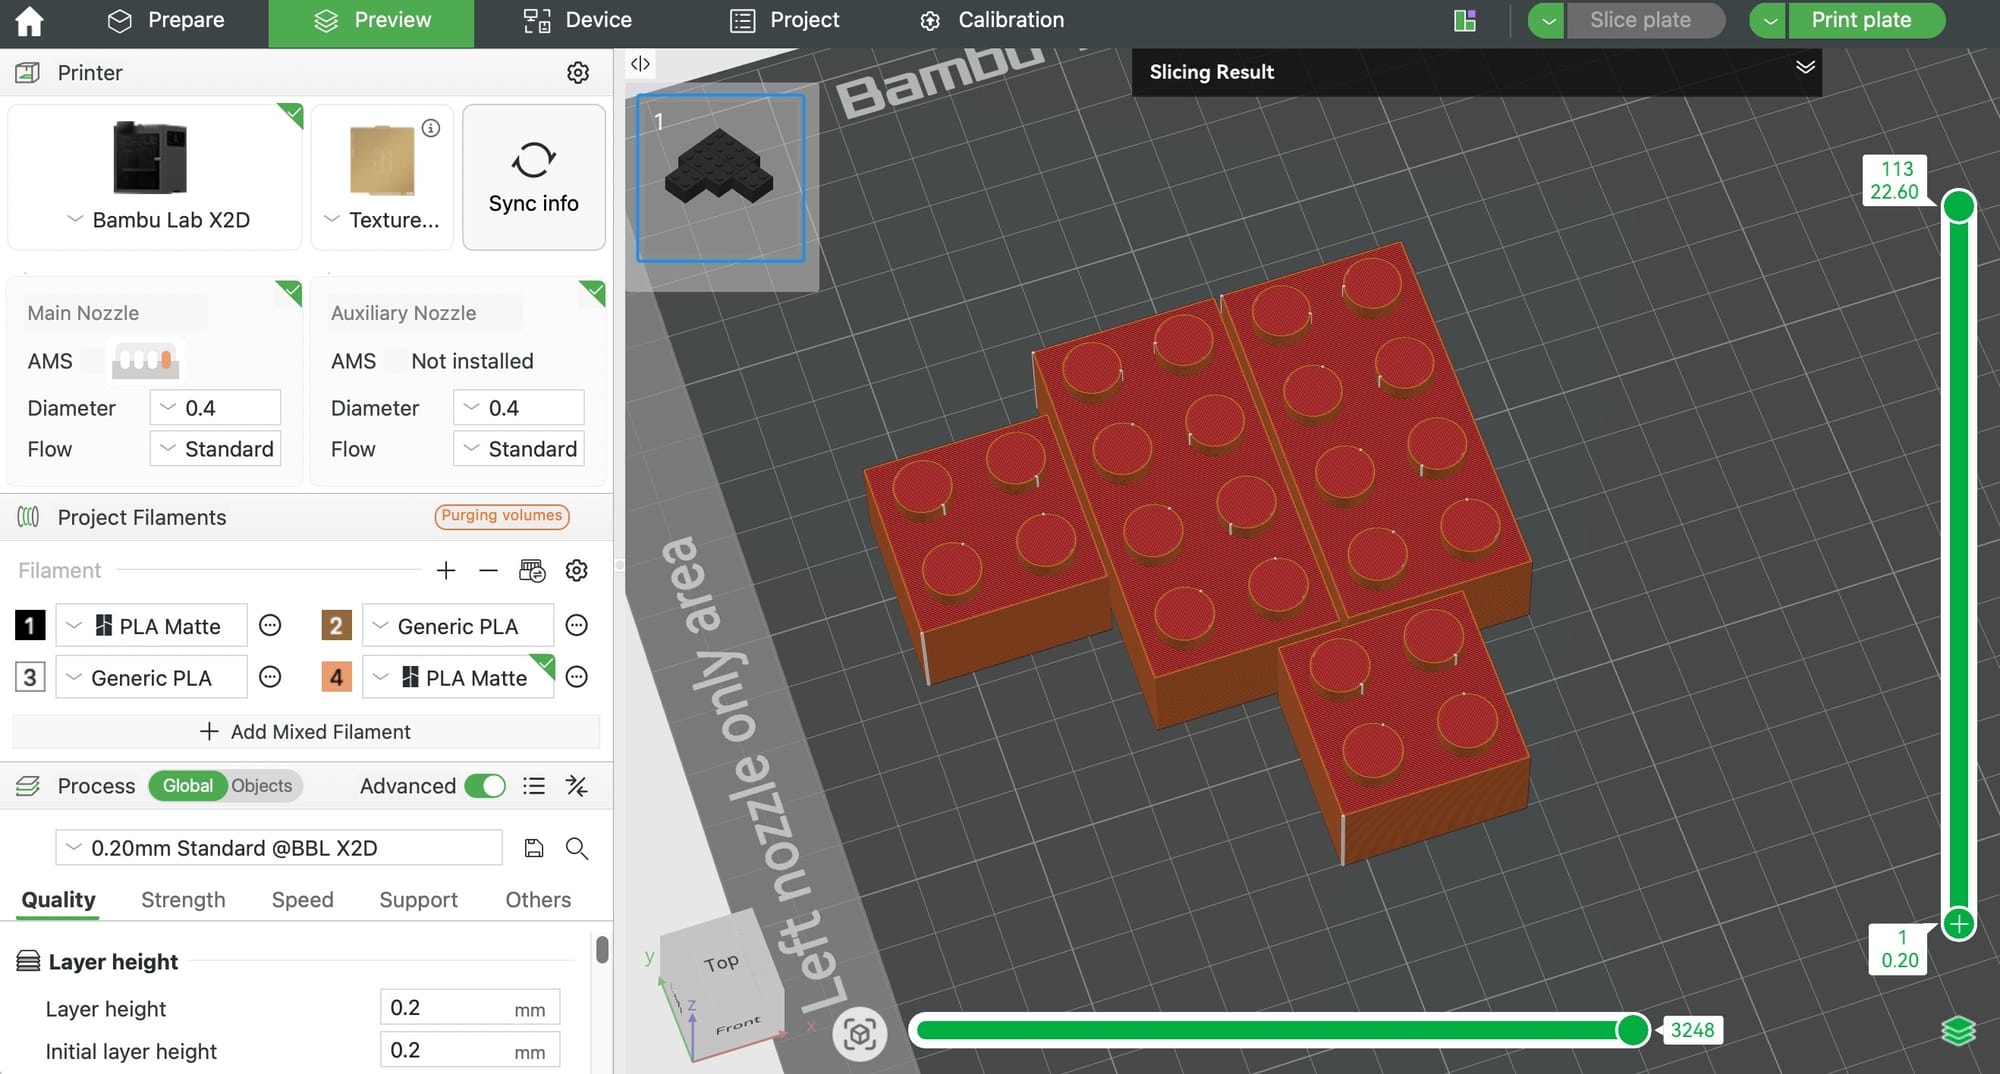
| Setting | Value |
|---|---|
| Material | PLA (best clutch and dimensional accuracy), PETG (more durable, slightly looser fit), ABS (closest to real LEGO feel, tricky to print) |
| Nozzle | 0.4 mm (standard). 0.2 mm if you want true 100% scale to print cleanly. |
| Layer height | 0.16 to 0.20 mm |
| Walls | 3 to 4 perimeters (the clutch ridges are wall features and need integrity) |
| Infill | 20 to 30% gyroid or grid |
| Top / bottom layers | 4 of each |
| Orientation | Studs up, flat on the bed |
| Supports | None needed (1.7 mm stud overhang prints clean) |
| Brim | Optional, recommended only for 1x1 and 1x2 bricks |
| Print temp (PLA) | 200 to 210 C, slightly cool for sharper studs |
For very small parts (1x1 bricks), enable a brim and print 4 to 6 at a time so each gets adequate cooling between layers.
The PDF Instruction Booklet
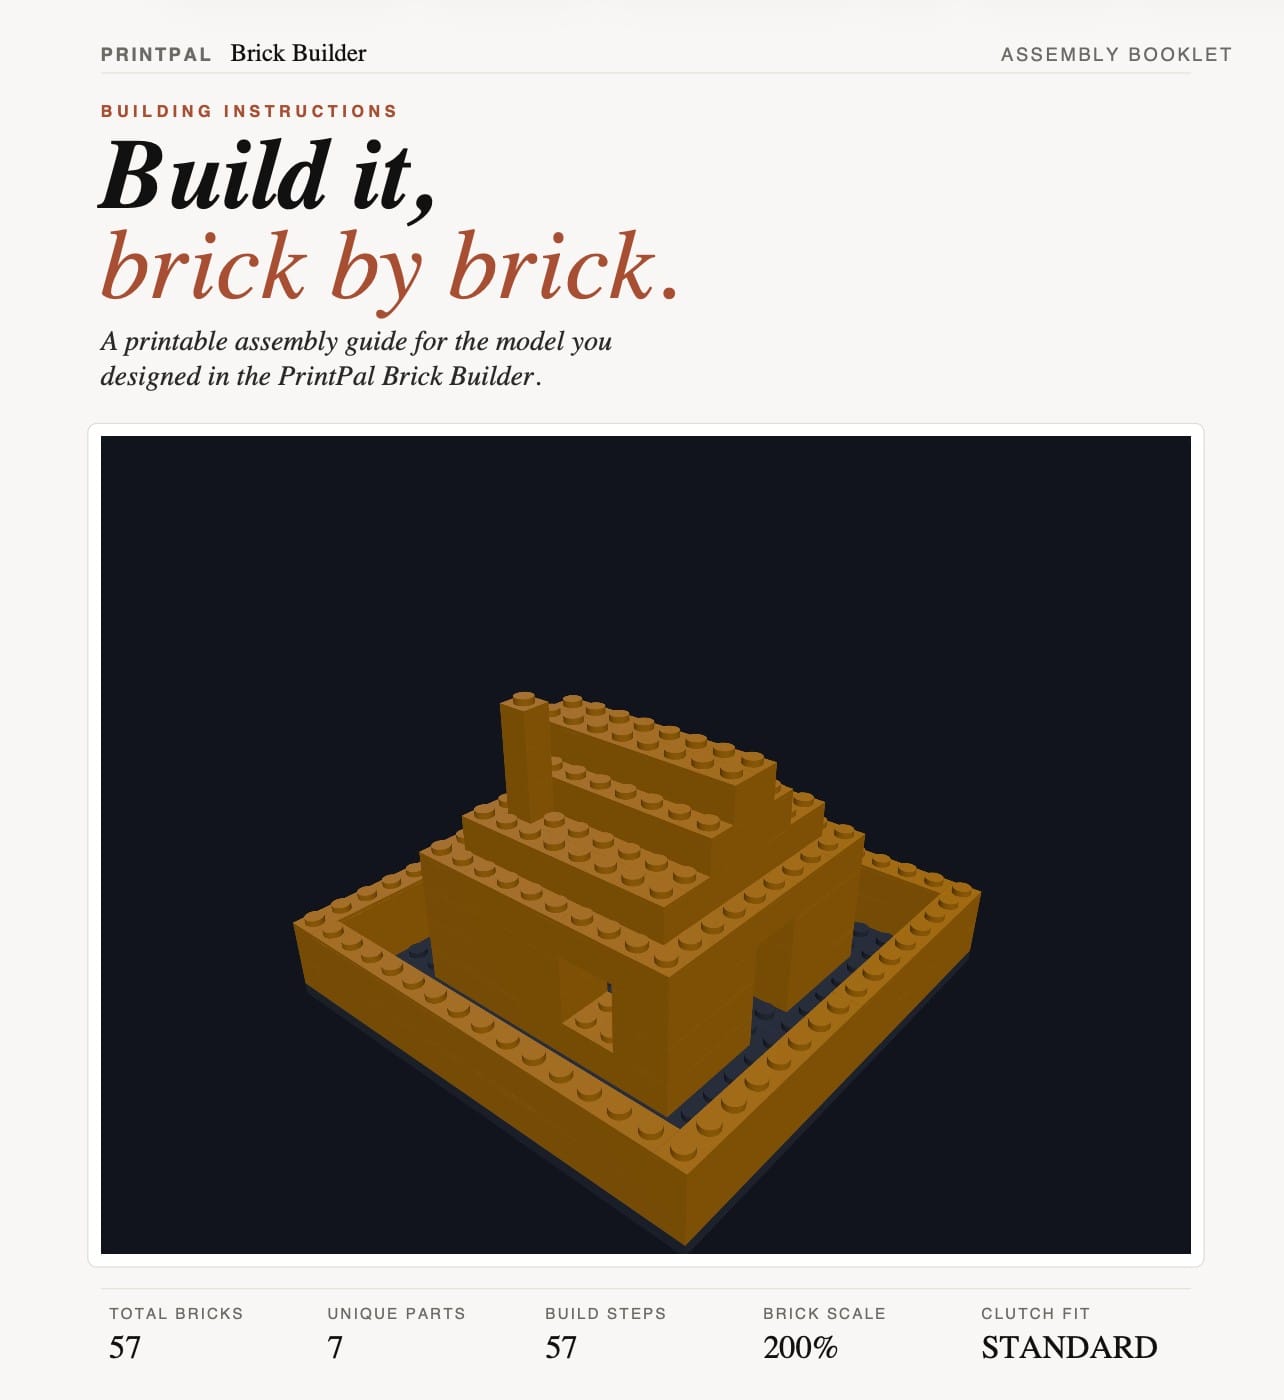
When you click Download Instructions in the Steps tab (or just download the Parts ZIP), the Brick Builder generates a multi-page PDF that mimics a real LEGO booklet:
- Cover page: hero render of the finished build, total brick count, unique parts, build steps, your scale, and your clutch setting.
- Parts list page: every unique brick rendered in 3D, with color, mm footprint, and quantity needed.
- Step pages: 4 steps per page, vertical strips. Each strip shows the step number, a small "PLI" callout of the brick being added (with x1 quantity badge), and the cumulative assembly with that brick highlighted.

The PDF auto-bundles into the Parts ZIP, so when you share a build the recipient gets both the STLs and the booklet in one download.
Save and Reload Your Project
Every change auto-saves to your browser. Refresh the page and your build comes back. To share a build or move it between devices, click Save Project in the Export tab to download a .bricks.json file. Anyone can drop that file back into the Brick Builder via Load Project and continue editing the exact build, including all colors, scale, and clutch settings.
Project Ideas
Custom name plaques in studded letters · LEGO-compatible architectural minifigure scenery · custom Duplo replacement parts · classroom STEM building kits · escape room props · LEGO-style trophy bases · gift sets sized for big-toddler hands (200% scale) · brick bookends · modular display plinths for figurines · personalized brick portraits · MOC accessory parts your real LEGO collection is missing.
No Brick to Start With?
If you want a fully designed model rather than starting from scratch, the PrintPal AI 3D Generator can produce a print-ready STL from a text prompt or a photo. Print that alongside your custom bricks for a hybrid build (a brick-built castle with a 3D printed dragon mascot, for example).
FAQ
Is it free? The tool is free to use. Saving and exporting STLs requires a free PrintPal account.
Are the bricks actually LEGO-compatible? At 100% Brick Scale, yes, by design. Studs, wall thickness, anti-stud tubes, and pin diameters all match LEGO-system specs (8 mm stud pitch, 5 mm stud diameter, 1.5 mm wall, 6.5 mm tube outer diameter). At 130% and above, bricks are compatible only with each other, not with real LEGO.
Will my prints actually snap together? Yes, on a tuned FDM printer. The wall clutch ridges and calibrated stud diameter are the secret. If they fit too loose, switch from Standard to Tight in the Export tab and reprint.
Why are the bricks bigger than LEGO by default? 130% is the default because it is the sweet spot for FDM print quality on a 0.4 mm nozzle. Set Brick Scale to 100% if you want to mix prints with your real LEGO collection.
File formats? The tool exports a ZIP of binary STL files (one per unique brick), an optional combined STL, and a .bricks.json project file. Every slicer (Bambu Studio, PrusaSlicer, Cura, OrcaSlicer) can open the STLs.
Can I use this in a classroom? Yes. The tool is browser-based, requires no install, and the 200% scale plus a chunky clutch fit makes the printed bricks safe and durable for kids and STEM education. Great for a 3D printing curriculum.
LEGO Digital Designer (LDD), Bricklink Studio, and LDraw? The Brick Builder is a lightweight browser-based alternative. It is not feature-equivalent to those (no minifigures, no specialty parts library), but it focuses on what those tools cannot do: producing FDM-printable STLs with a working snap fit out of the box.
My printed bricks are too tight. Drop Clutch Fit from Tight or Extra Tight to Standard. If they are still too tight at Standard, calibrate your printer's flow rate (you are likely over-extruding).
My printed bricks are too loose. Bump Clutch Fit to Tight, then Extra Tight. Try a slightly cooler print temp (5 C cooler) for sharper stud detail.
Can I make plates and tiles too? Yes. Use the Custom tab and set the height to 1 plate (the equivalent of a LEGO plate) or 1 plate with no studs (for a tile). Standard plates are also in the Library tab.
Summary
| Goal | Action |
|---|---|
| Design custom LEGO-compatible bricks in your browser | Brick Builder |
| Print bigger bricks for toddlers or classrooms | Export tab, Brick Scale 200% |
| Tighter snap fit on prints that fall apart | Export tab, Clutch Fit set to Tight or Extra Tight |
| Hand someone a printable build with instructions | Export tab, Download Parts ZIP (PDF booklet auto-included) |
| Continue editing a build later | Export tab, Save Project then Load Project |
| Generate a 3D model from text or a photo | AI 3D Generator |
| Browse other free tools | All PrintPal tools |
Design, snap, scale, export, print, build.