10 Bambu Studio Tips for Stronger 3D Prints

Most failed functional prints do not break because of bad filament. They break because of bad slicer settings. Bambu Studio ships with quality-focused defaults that look great but leave real strength on the table. If you are printing hooks, brackets, tool handles, RC parts, or anything that has to survive the real world, these 10 settings will make your prints dramatically tougher without switching printers or filament brands.
These tips work on every Bambu Lab printer including the A1, A1 Mini, P1P, P1S, X1 Carbon, and H2D. If you do not have a functional part to test these settings on, free browser tools like PrintPal let you generate custom brackets, hooks, organizers, and other parametric designs as print-ready STLs in under a minute, no CAD skills required. Grab a part there, then dial in the settings below.
1. Print Orientation Matters More Than Any Setting
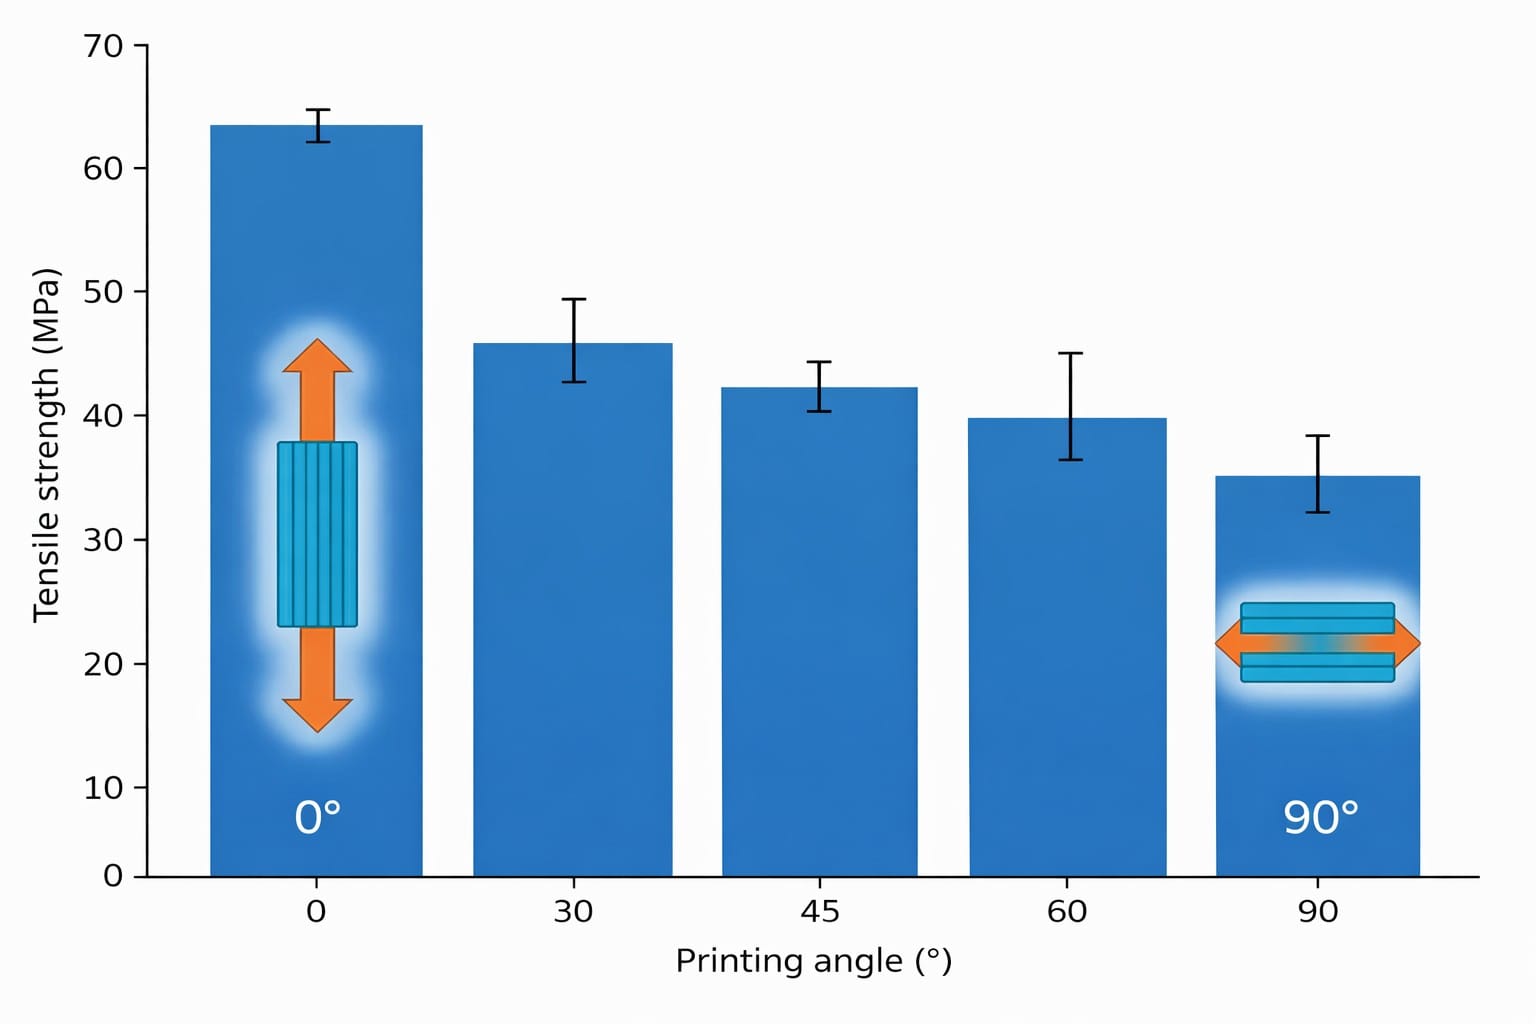
3D prints are always weakest between layers. A part that is rock solid when pulled sideways can snap in half when pulled along the Z-axis. Before you touch any slicer setting, rotate your model so the main load direction runs across the layers (XY), not between them (Z).
For a hook, print it lying down so the pull points across layer lines. For a bracket, orient it so bending stress runs across the print, not up through it. This single change can easily triple the strength of the same part.
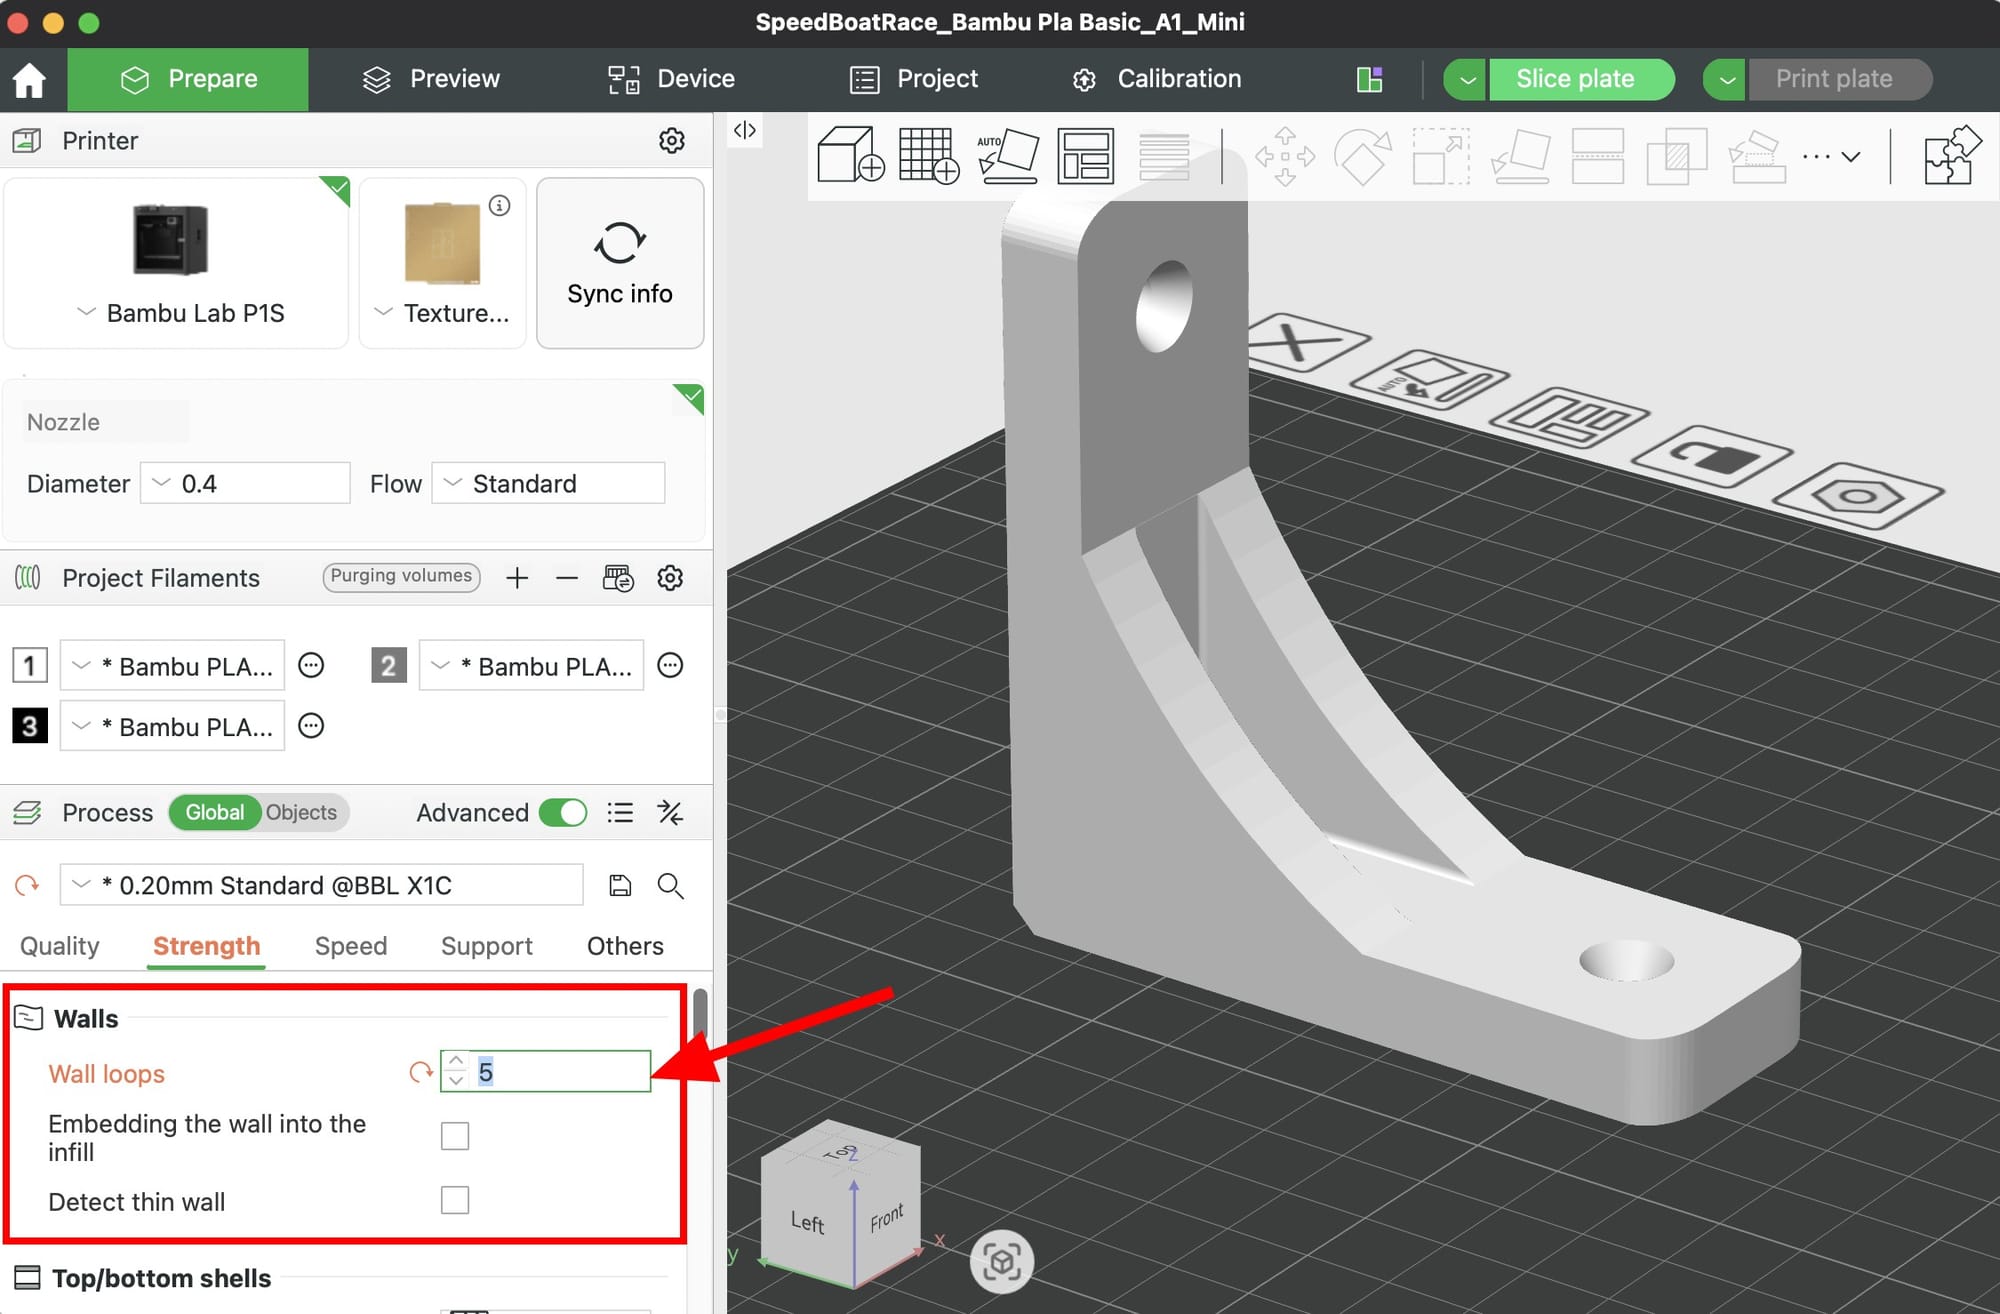
2. Increase Wall Loops to 4 or 5
Wall loops are the single biggest strength multiplier in the slicer. The default is 2. For functional parts, bump Wall loops in the Strength tab to 4 or 5. Thick walls carry load far better than dense infill does, and they add less print time than you might expect.
A part with 5 walls and 10% infill is usually stronger than the same part with 2 walls and 50% infill, and it uses less filament.
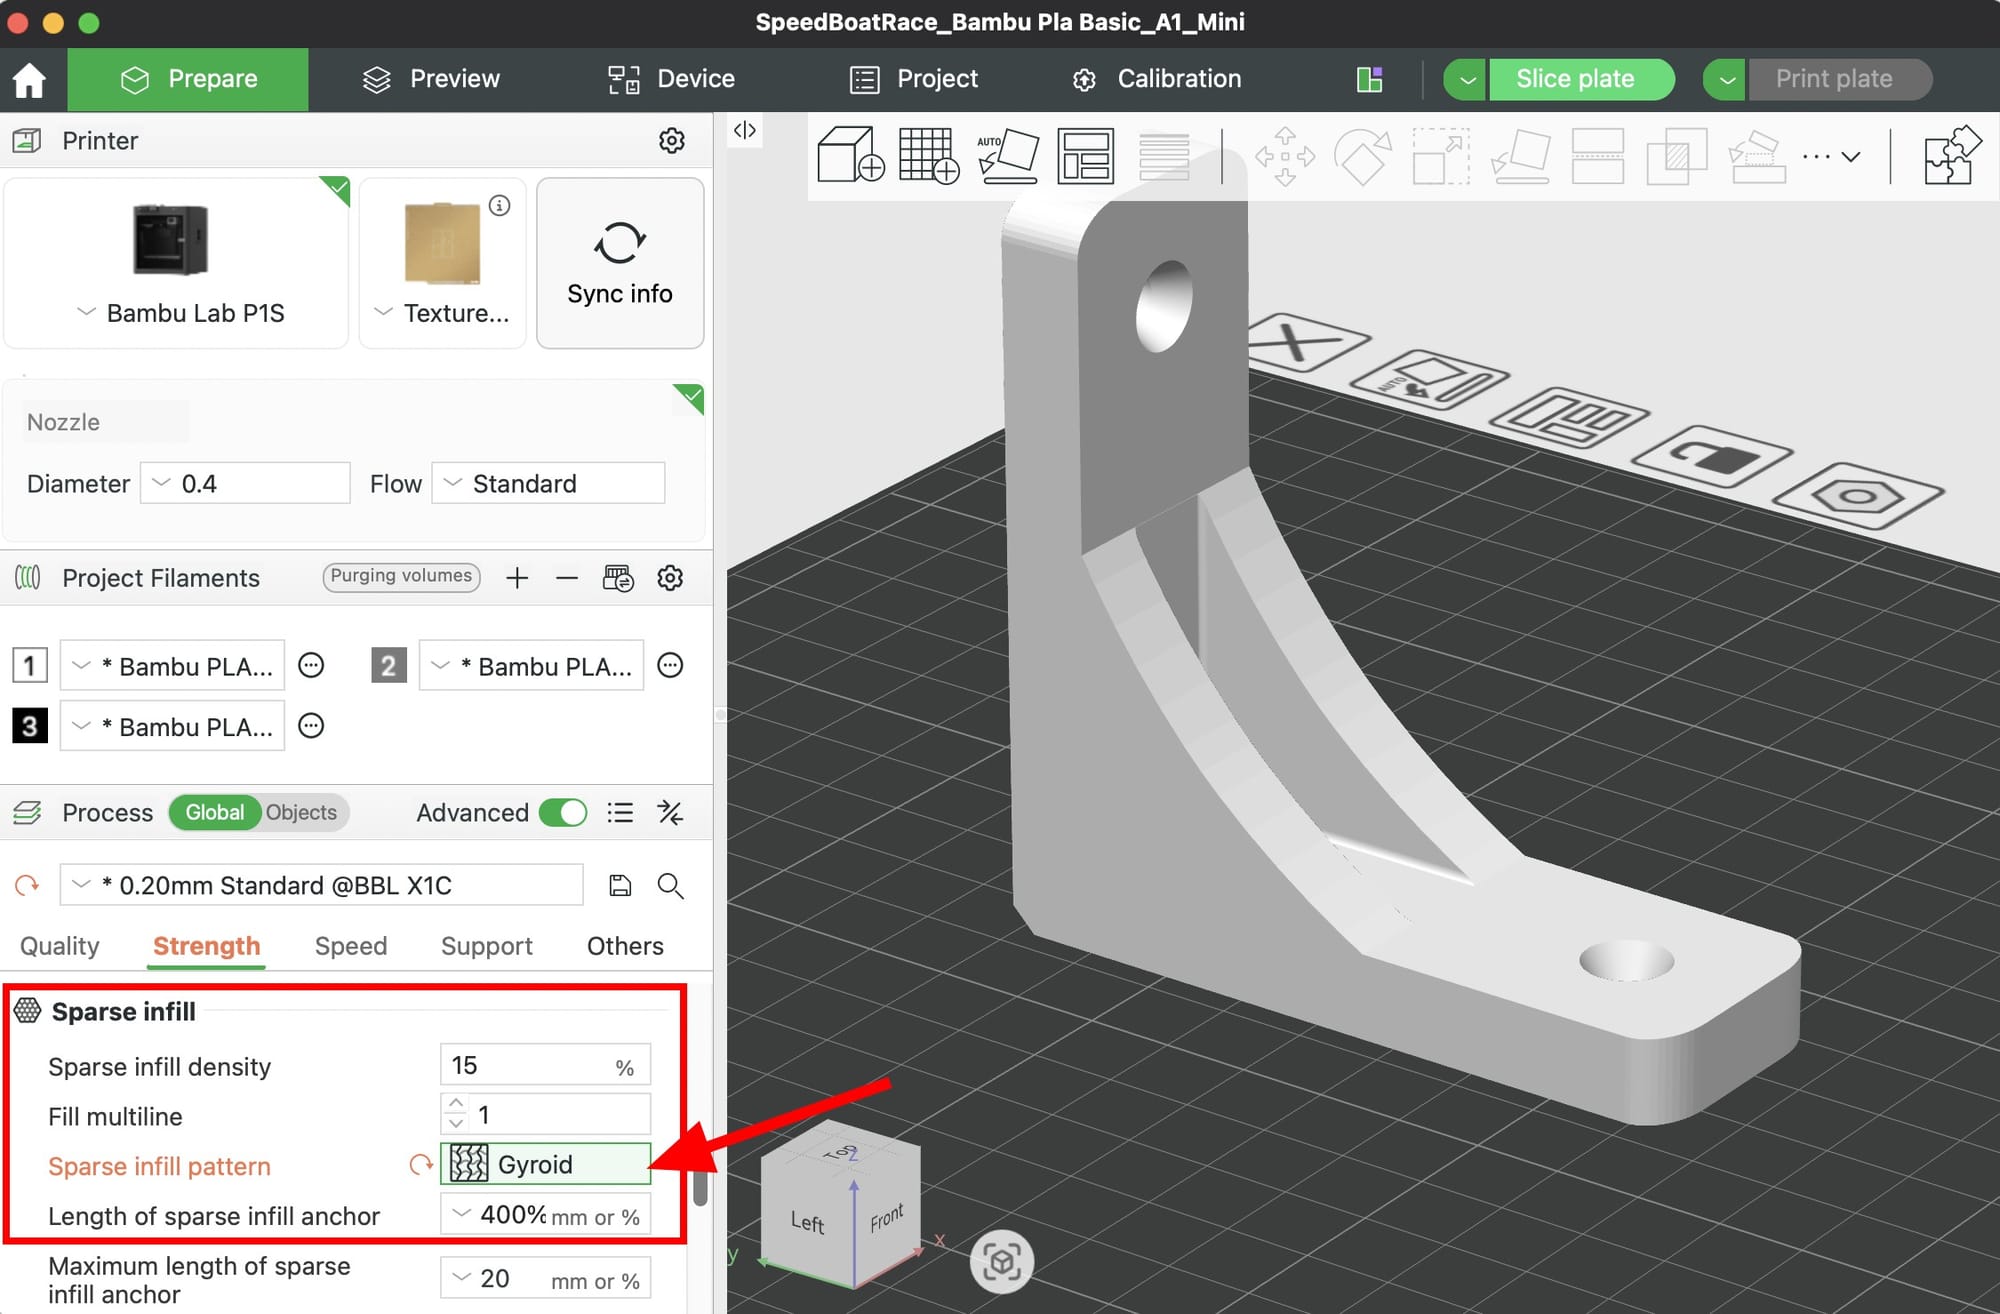
3. Use Gyroid or Honeycomb Infill
The infill pattern matters as much as the percentage. Skip the default and pick based on what the part needs to do:
- Gyroid: best all-around strength in every direction, flexes without snapping
- Honeycomb: highest stiffness, great for flat load-bearing parts
- Cubic: solid middle ground, prints faster than gyroid
- Grid or Lines: avoid for functional parts, weak in one axis
Set this under Strength tab > Sparse infill pattern.
4. Do Not Overdo Infill Density
More infill is not always stronger, it is just heavier. For most functional parts, 25 to 40 percent is the sweet spot. Going above 50 percent wastes filament because the walls are doing the real work. Going above 70 percent actually hurts strength on some geometries because of heat buildup and poor layer cooling.
Rule of thumb:
- Decorative: 10 to 15 percent
- General functional: 25 percent
- High stress: 40 percent
- Solid only when needed: 100 percent
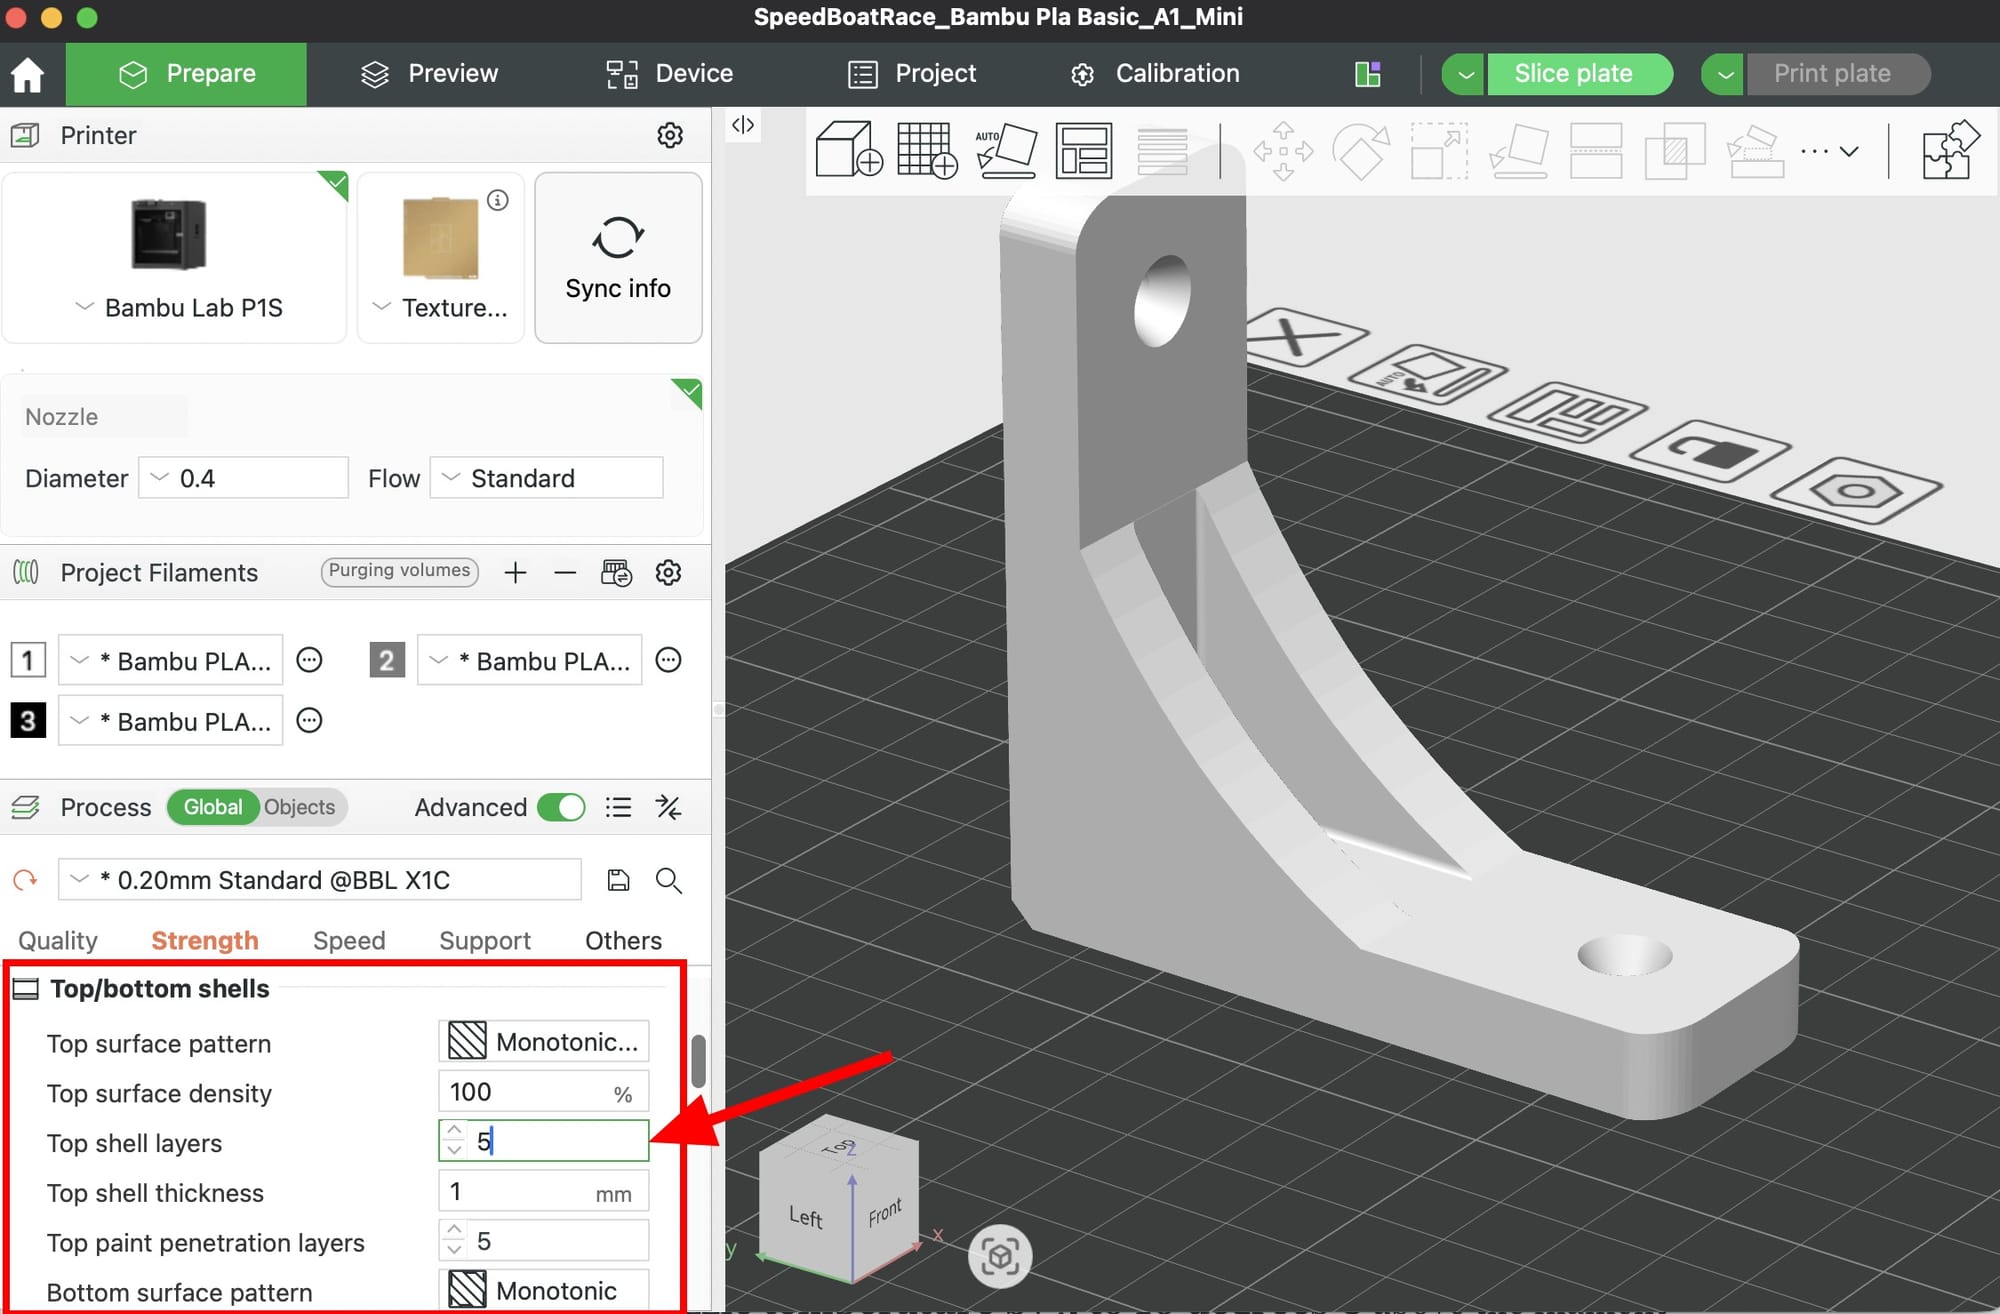
5. Increase Top and Bottom Shells to 5
In the Strength tab, set Top shell layers and Bottom shell layers to 5. Thin top shells are a common weak spot, especially on parts that get sat on, clamped, or drilled. Five layers at 0.2mm gives you a full 1mm of solid top and bottom, which massively improves rigidity.
6. Slow Down and Turn Up the Heat
Layer adhesion is where prints fail. Two settings fix it:
- Raise nozzle temperature by 5 to 10 degrees C above the filament default. Hotter plastic fuses better between layers.
- Slow outer wall speed to 50 mm/s or lower for critical parts. Slower extrusion means more time for layers to bond before the next one lands.
Check your filament tab for temperature limits before pushing it higher. Bambu PLA Basic handles 220C well. PETG loves 245 to 250C for layer bonding.
7. Use Thicker Layers for Functional Parts
This one surprises beginners. 0.28mm layers are often stronger than 0.12mm layers for the same part. Thicker layers mean fewer interlayer bonds to fail, more material flow per layer, and better fusion between lines.
For visible detail parts stay at 0.20mm. For hidden functional parts like brackets and mounts, bump to 0.24mm or 0.28mm. You get strength and speed in one change.
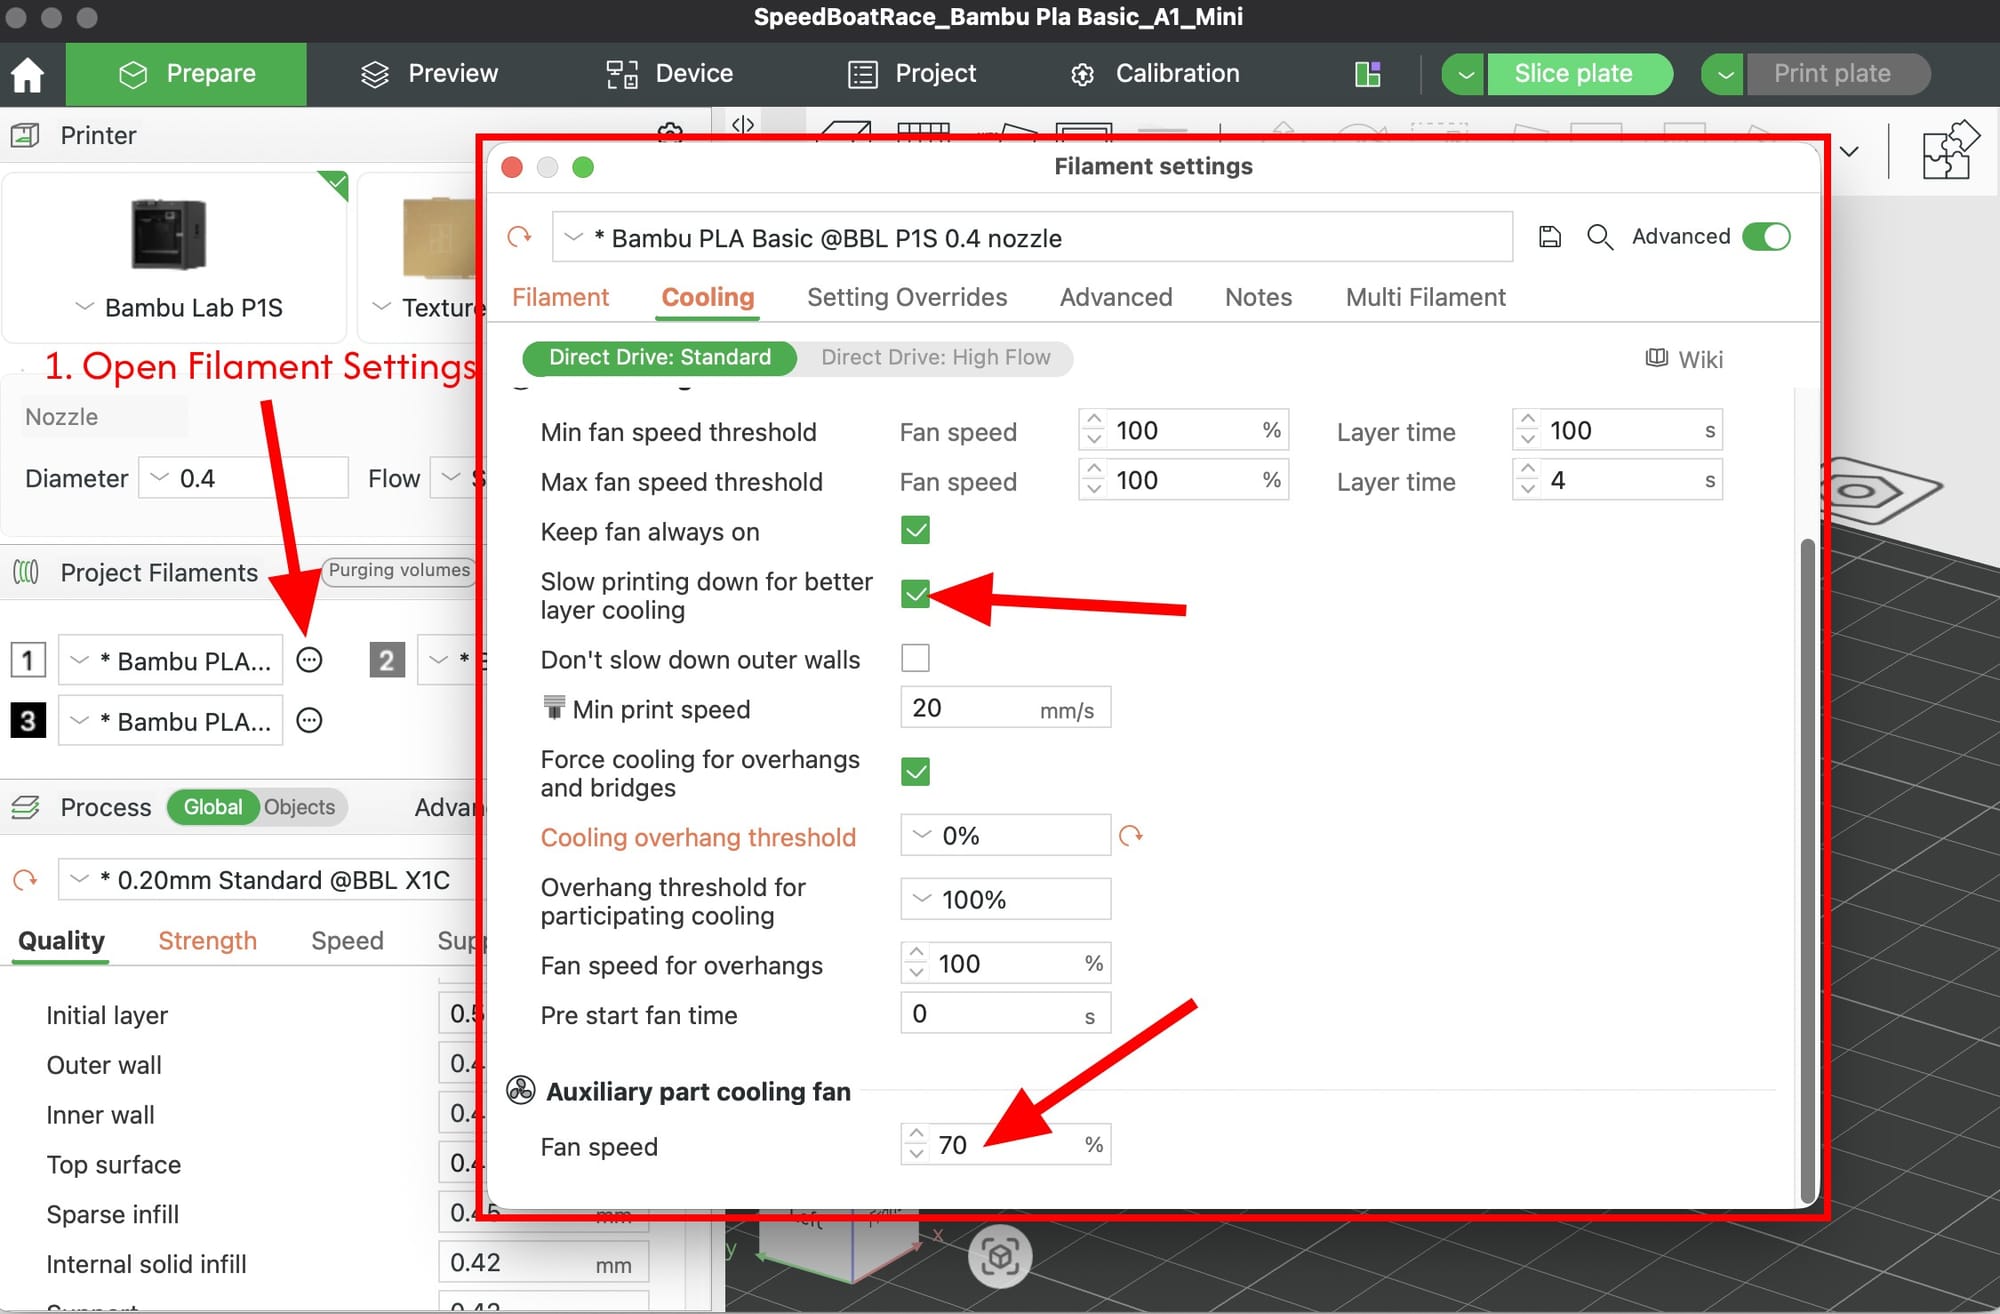
8. Turn Down the Cooling Fan for PETG and ABS
Cooling fans help PLA print clean overhangs, but they actively hurt layer adhesion on PETG, ABS, ASA, and nylon. In the Filament tab under Cooling:
- PLA functional parts: fan at 70 to 80 percent (not 100)
- PETG: fan at 20 to 40 percent
- ABS, ASA, PC: fan at 0 to 10 percent
Less cooling means layers stay hotter longer and fuse more deeply. Your surfaces will look slightly rougher but the part will be far tougher.
9. Dry Your Filament Before Printing
Wet filament is the silent strength killer. Moisture turns to steam in the nozzle, creates micro-bubbles in the extrusion, and weakens every layer bond. A brittle print that should be tough is almost always a wet filament problem.
- PLA: dry at 45C for 6 to 8 hours
- PETG: dry at 65C for 6 hours
- Nylon and PA-CF: dry at 80C for 12+ hours before every print
If you do not have a dryer, store spools in a sealed box with desiccant. The Bambu AMS helps but is not a dryer.
10. Pick the Right Filament for the Job
Settings only take you so far. For truly high-stress prints, upgrade the material:
- PLA+ or Tough PLA: 30 to 50 percent tougher than standard PLA, prints at the same settings
- PETG: flexible, impact resistant, outdoor safe
- PA-CF (carbon fiber nylon): near-metal stiffness, needs a hardened nozzle and dry filament
- ABS or ASA: heat resistant, UV stable, great for automotive parts
Bambu Studio has preset profiles for all of these. Switching from PLA Basic to PETG-HF is often a bigger strength jump than any slicer tweak.
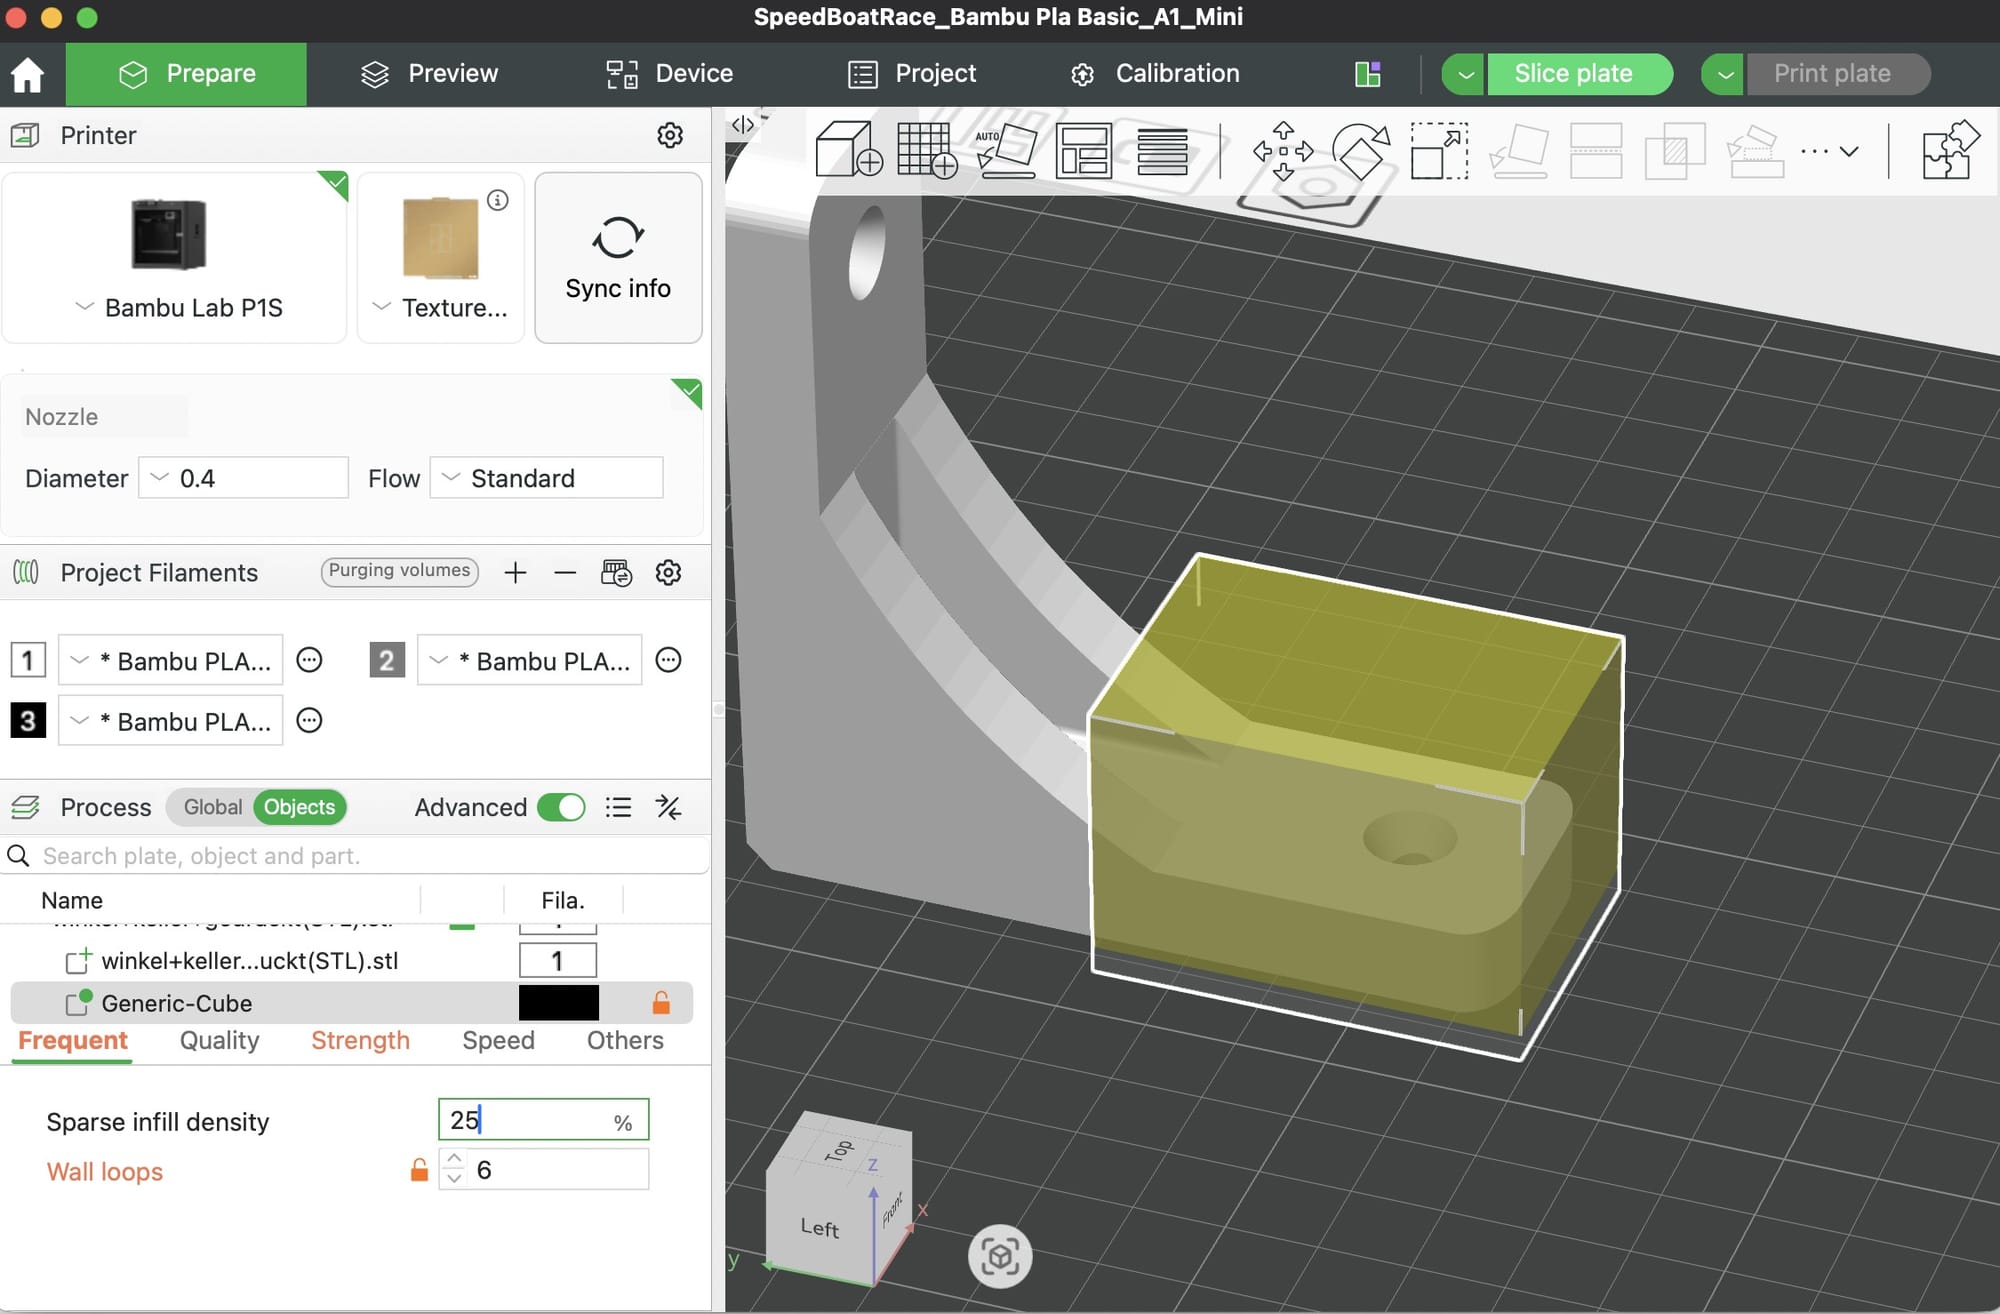
Bonus: Use Modifier Parts for Targeted Strength
Bambu Studio lets you drop modifier cubes onto specific regions of a model. Use them to bump infill to 80 percent only in the stress zone (the hook base, the mounting holes, the thin neck) while keeping the rest of the part at 15 percent. You get the strength of a solid print with the weight and print time of a hollow one.
Right click the model, Add Modifier > Cube, position it over the weak spot, then override the infill density in the object settings.
Final Thoughts
Strong prints are not about one magic setting. They come from layering smart decisions: orient the part right, thicken the walls, pick the right infill pattern, slow down for better layer bonding, and use dry filament that matches the job. Change one variable at a time so you learn what actually moves the needle.
Print a quick torture test after each big change. You will be shocked how much stronger a well-sliced PLA part can be.
Happy printing.