How to Make Your Own Custom Fidget Clicker

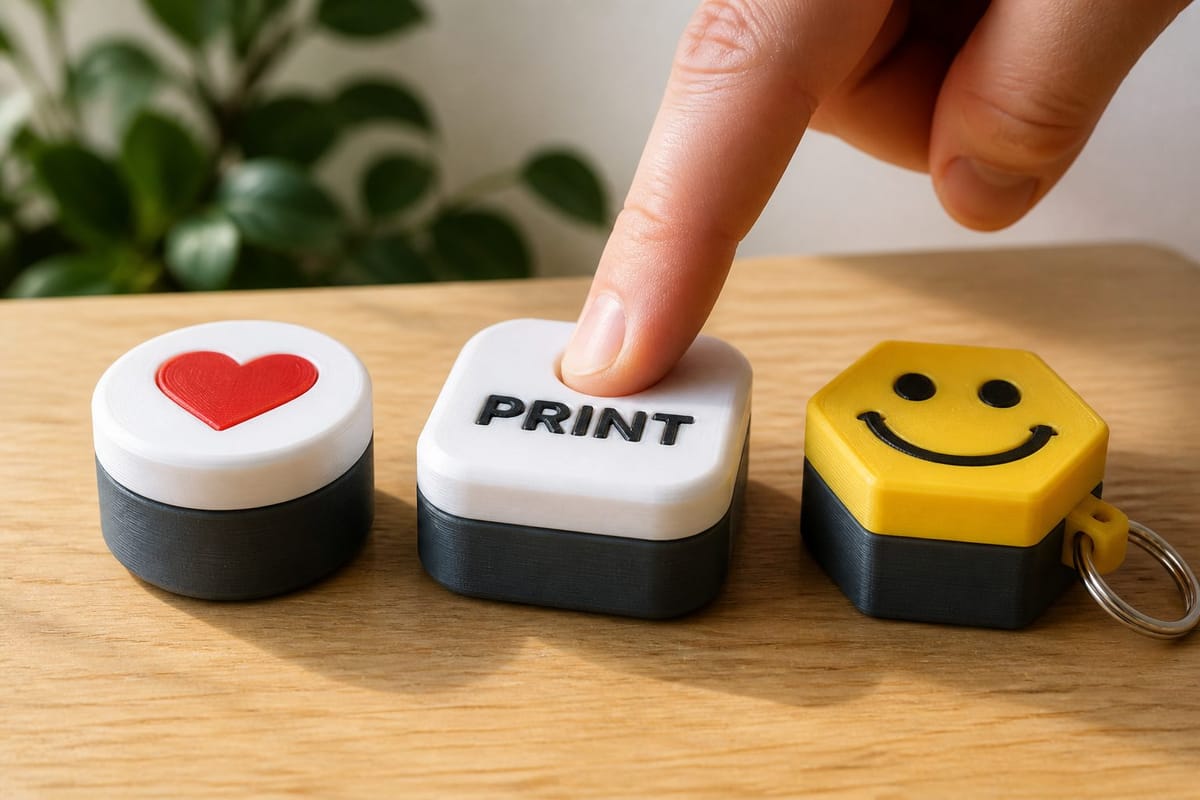
A fidget clicker is the simplest satisfying object you can 3D print: a chunky puck you press with your thumb that goes click. What makes a custom one worth printing is the face on top — your logo, your cat, your team's mascot, or just a word you like pressing.
The PrintPal Fidget Clicker Maker builds that whole object for you from a single piece of artwork. Drop in an image, an SVG, or type a word, and it separates the artwork into flat filament colors, traces every shape, and wraps a two-part pressable shell around a real MX-style mechanical switch. You get a printable cap, a printable housing, and a multi-color 3MF that opens in Bambu Studio or OrcaSlicer with each color already on its own filament slot.
No CAD. No installs. It all runs in your browser.
Two different things called a "fidget clicker"
The tool has two tabs at the top of the sidebar, and picking the right one first will save you a lot of time.
| Build from Scratch | Cut Into a Model | |
|---|---|---|
| You start with | An image, SVG, or word | An STL or OBJ you already have |
| You get | A cap + a housing, in color | Two interlocking halves of your model |
| Hardware needed | One MX-style switch | None |
| The click comes from | The real switch | Printed snap geometry |
| Best for | Logos, icons, names, keychains, badges | Figurines, keycaps, existing designs |
This guide is about Build from Scratch — designing a clicker from nothing but a picture. If you already have a 3D model and just want to split it into a two-part print that clicks, open the Fidget Clicker Maker and switch to the Cut Into a Model tab; that workflow is covered in its own guide.
What you'll need
- A 3D printer. Any FDM machine. Multi-material (AMS / MMU) is nice but not required — see the manual color-swap section below.
- One MX-style mechanical keyboard switch per clicker. Cherry MX, Gateron, Kailh, Outemu, and the rest all use the same footprint. Loose switches cost about $0.30–$0.60 each in packs of ten.
- Artwork, or a word. Anything bold and flat works.
- A PrintPal account. The maker is free to use and preview; downloading print files needs a Pro or Studio subscription.
Quick start: your first clicker in 6 steps
The tool opens with the word PRINT already built on a disk, so there's something to press from the first second. Here's the whole loop.
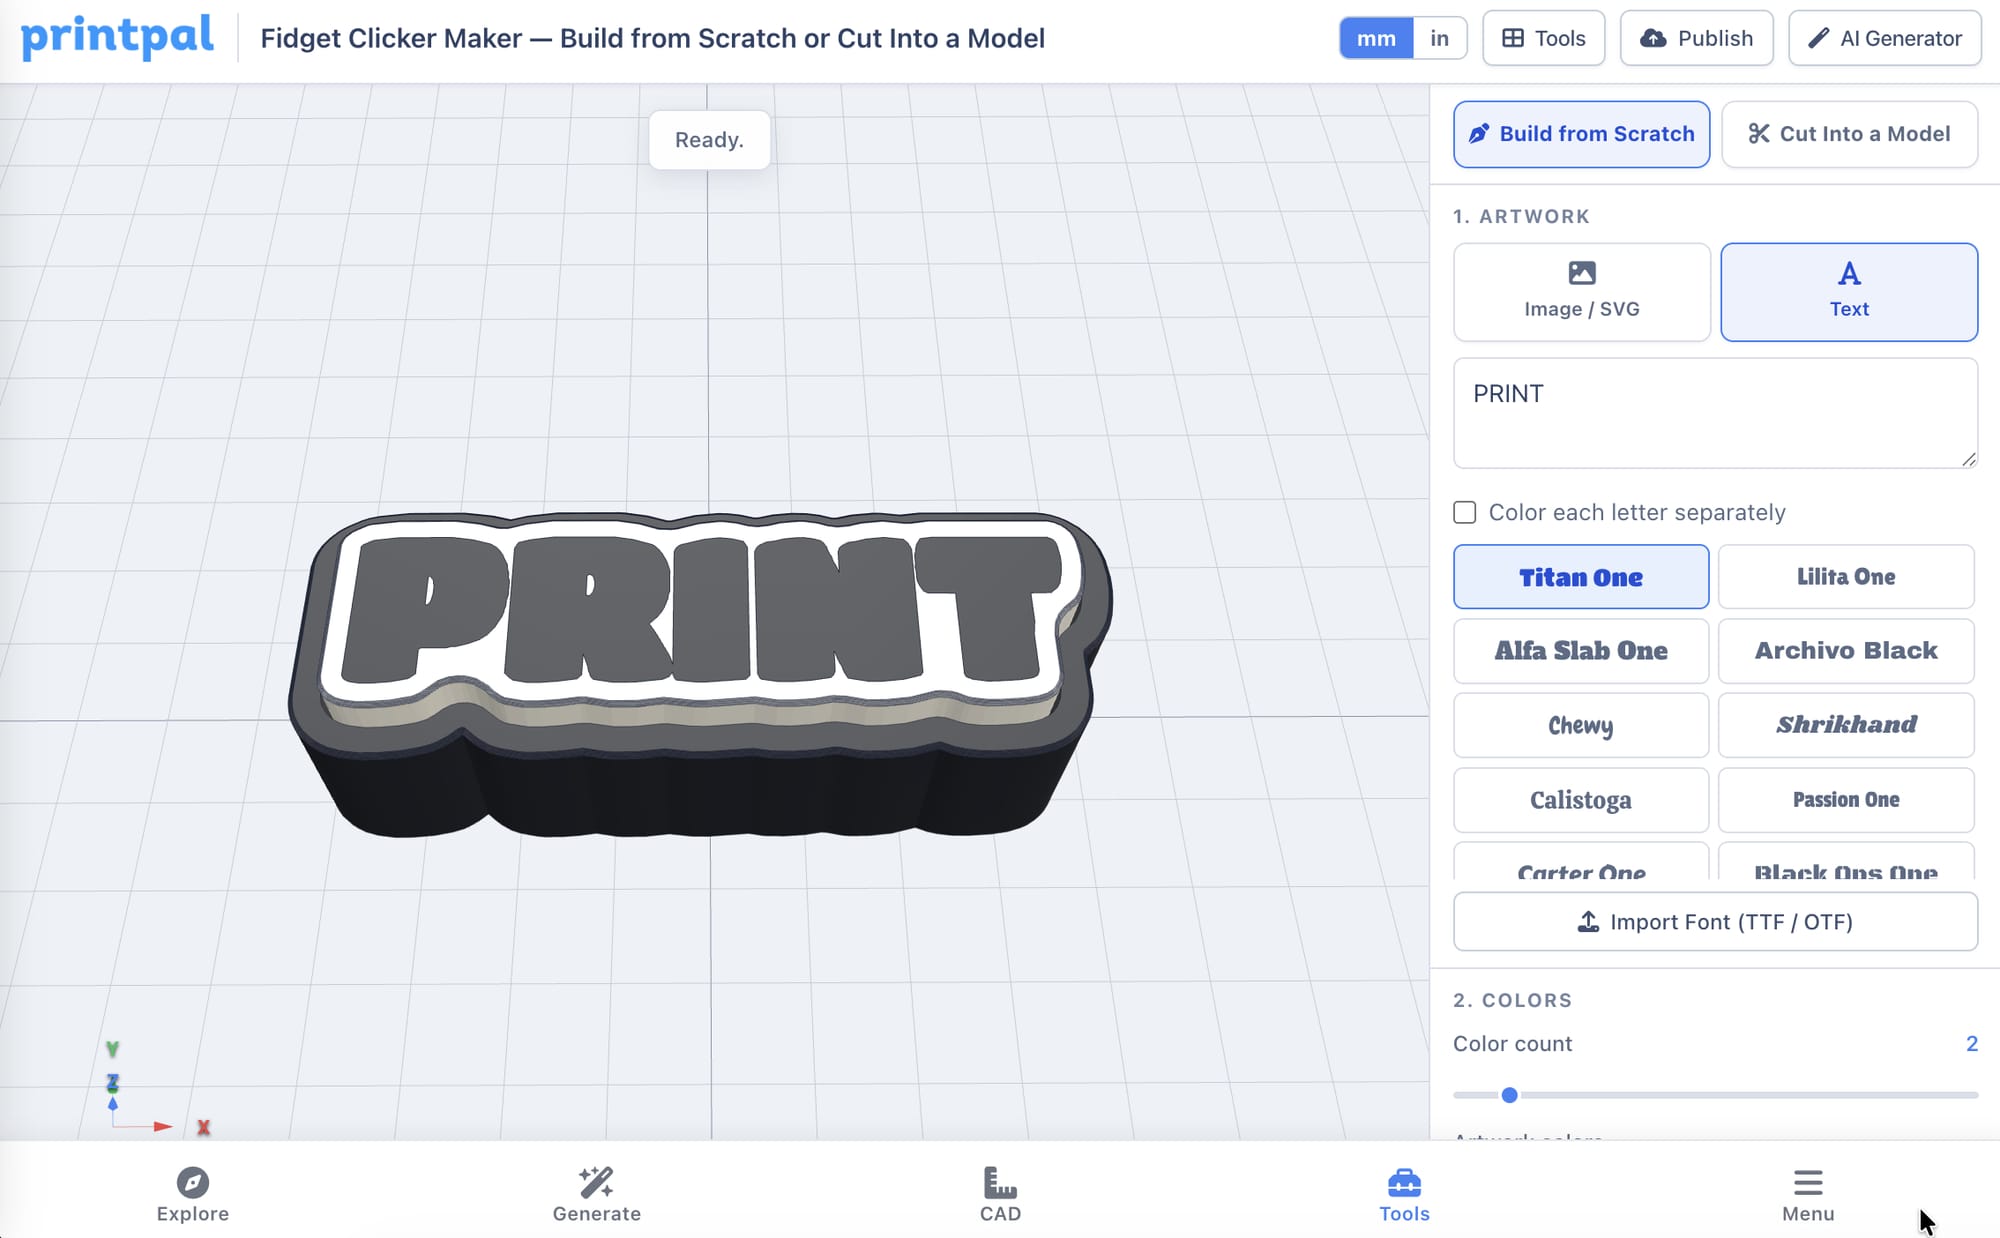
- Open the Fidget Clicker Maker. It lands on Build from Scratch.
- In 1. Artwork, either type over the placeholder text or switch to Image / SVG and drop a file.
- In 2. Colors, set how many filament colors to split the artwork into, then click any color on the 3D model to change it.
- In 3. Outline & Size, pick the body shape and drag the size slider.
- In 5. Preview, switch to Apart to check the cap clears the switch.
- In 6. Export, hit Download 3MF (multi-color).
Print the two parts, snap a switch in, press it.
Step 1: Artwork
Everything downstream is derived from this one input, so it's worth getting right.
Text
The Text panel takes up to 60 characters. Type a word and the preview rebuilds after a short pause.
Under the box, a grid of typefaces renders each name in its own font so you can see what you're picking. Eleven display faces are bundled — Titan One (the default), Lilita One, Alfa Slab One, Archivo Black, Chewy, Shrikhand, Calistoga, Passion One, Carter One, Black Ops One, and Paytone One — plus the usual system faces like Impact and Verdana. Heavy display faces work best; thin letterforms leave walls too skinny to survive a 0.4 mm nozzle.
Import Font (TTF / OTF) loads any font file off your machine, which is how you get a brand's real typeface onto a clicker.
Color each letter separately does what it says: instead of one solid word, each glyph becomes its own recolorable region. Great for a rainbow "HELLO", or for putting one accent letter in a different filament.
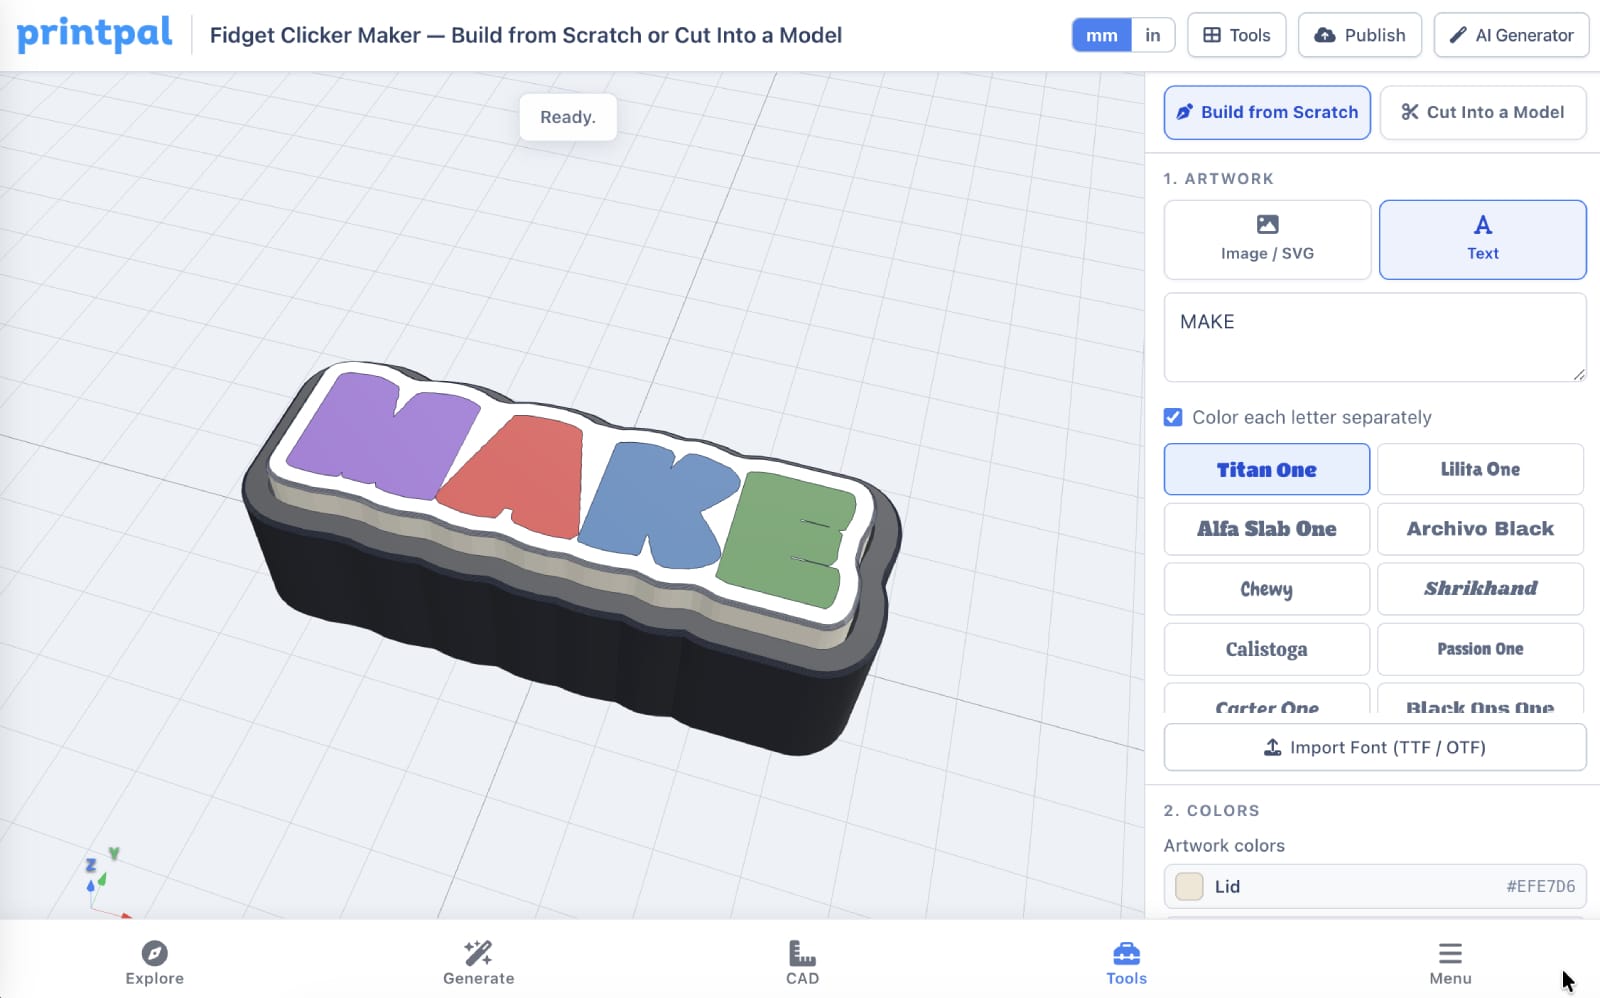
Image and SVG
Switch to the Image / SVG card and drop in a PNG, JPG, WEBP, or SVG. You can drop several at once — they land in a thumbnail gallery so you can click between candidates without re-uploading.
Strip light backdrop (on by default) removes a white or near-white background so your subject doesn't come out sitting on a slab. Uncheck it if the background is part of the design.
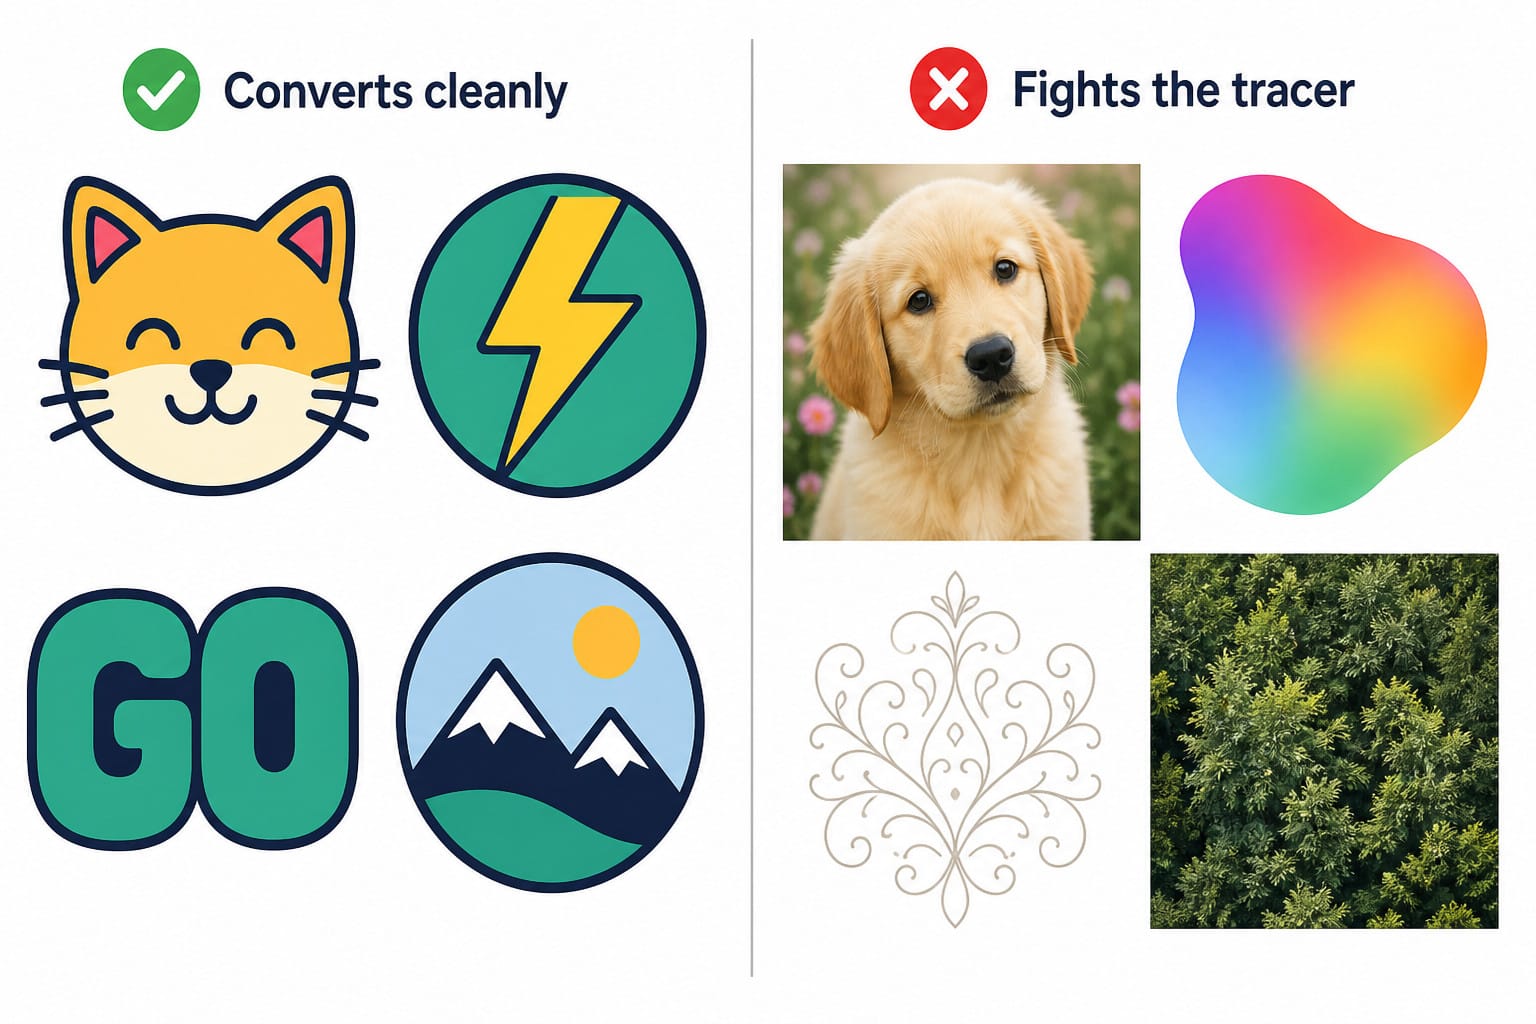
The rule is simple. Bold, flat artwork with a handful of solid fills converts cleanly. Soft photos with gradients usually don't. A logo, a sticker, a game icon, a chunky cartoon face — all fine. A portrait, a photo of foliage, a gradient mesh — the tracer will find hundreds of tiny islands and the result will look like noise.
No artwork? Let an AI make it
There's an AI Prompt button down in the Export section that copies a prompt template tuned for exactly this job:
Design a chunky cartoon emblem of [YOUR SUBJECT] that stays readable at coin size: simple geometry, five paint colors at most, every region one solid tone with crisp closed edges, zero gradients or shadows or fine texture, the subject filling most of a plain white square.
Paste that into any image model, swap in your subject, and drop the result straight back into the tool. The constraints in that prompt aren't decorative — "five colors max", "one solid tone per region", and "plain white square" are precisely what the color separator and the background stripper want.
Step 2: Colors
Color count is a 1–12 slider (default 4). It controls how many filament colors the artwork gets reduced to. Lower is usually better: 3 or 4 colors reads more boldly at 38 mm than 9 does, and it means fewer filament changes on the printer.
Below it, every color the tool found is listed with its name, hex, and roughly what share of the artwork it covers. Housing color is a separate swatch so the body of the clicker can be a completely different filament from the artwork — a graphite housing under a bright cap is the classic look.
Recolor by clicking the model
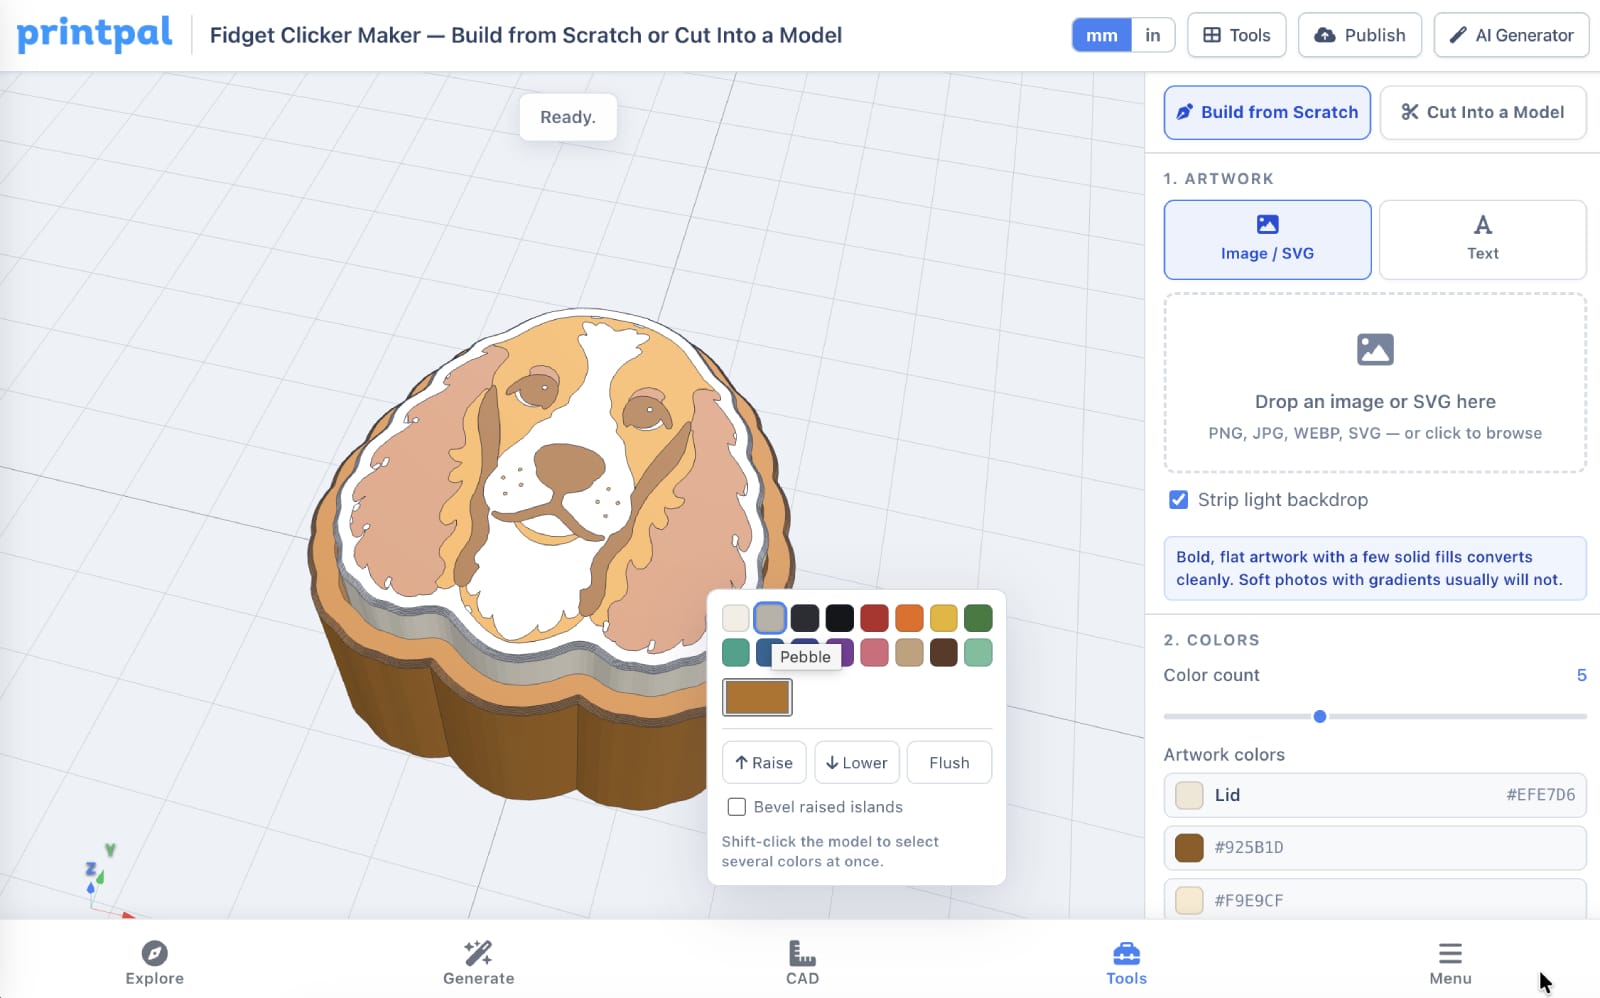
The fastest way to work is to ignore the sidebar and click a color directly on the 3D preview. A popover opens with a 16-swatch PLA palette (Porcelain, Pebble, Graphite, Ink, Crimson, Tangerine, Sunflower, Moss, Seafoam, Harbor, Indigo, Orchid, Rose, Clay, Cocoa, Jade) plus a custom color picker. Every piece sharing that color updates at once.
Raise, lower, and bevel
The same popover has the part most people miss. When you've clicked an artwork color (not the housing), you get three buttons:
- Raise — push that color up 0.8 mm
- Lower — sink it 0.8 mm
- Flush — back to level
Press Raise twice and a shape stands 1.6 mm proud of the face. That turns a flat two-tone graphic into something with real depth, and it's what makes a printed clicker feel designed rather than printed. Bevel raised islands adds a small chamfer to the raised edges so they catch the light.
Shift-click the model to select several colors and move them together.
Cmd/Ctrl+Z undoes, Shift+Cmd/Ctrl+Z redoes, and Esc closes any open popover.
Step 3: Outline and size
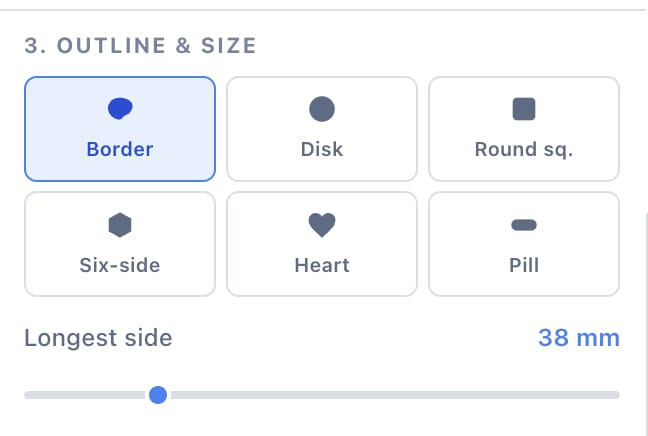
Six body shapes:
| Outline | What it does |
|---|---|
| Border | Hugs the artwork silhouette with a uniform border — a die-cut sticker in plastic |
| Disk | Circle |
| Round sq. | Rounded square |
| Six-side | Hexagon |
| Heart | Heart |
| Pill | Rounded capsule, good for words |
Longest side runs 24–90 mm, default 38 mm. That default is deliberate: an MX switch needs about 15 mm of keepout in the middle, so below roughly 28 mm there isn't much face left for artwork. 38 mm is a comfortable thumb target; 50–60 mm makes a desk object; 24 mm makes a tight keyring fob.
The tool guarantees the outline always covers the switch. If you pick a shape that's too small or too skinny for the seat, it grows the silhouette until the switch fits inside, so you can't accidentally export a body with a hole in it.
Step 4: Hang tab (optional)
Tick Add a hang tab and a loop grows out of the housing rim, blended into the body rather than glued on. Three controls steer it:
- Around the rim — the bearing, in degrees. 90° puts it at the top.
- Slide along edge — nudges it sideways along the rim once you've picked a bearing, for when the loop lands on an awkward corner of a heart or a hex.
- Hole size — 6.0 mm by default, which clears a standard split ring comfortably.
If you're making keychains, this is the whole reason to use Build from Scratch over anything else: the loop is part of the housing, so there's no glued-on tab to snap off in a pocket.
Step 5: Preview before you commit
Three view modes:
- Together — the assembled object.
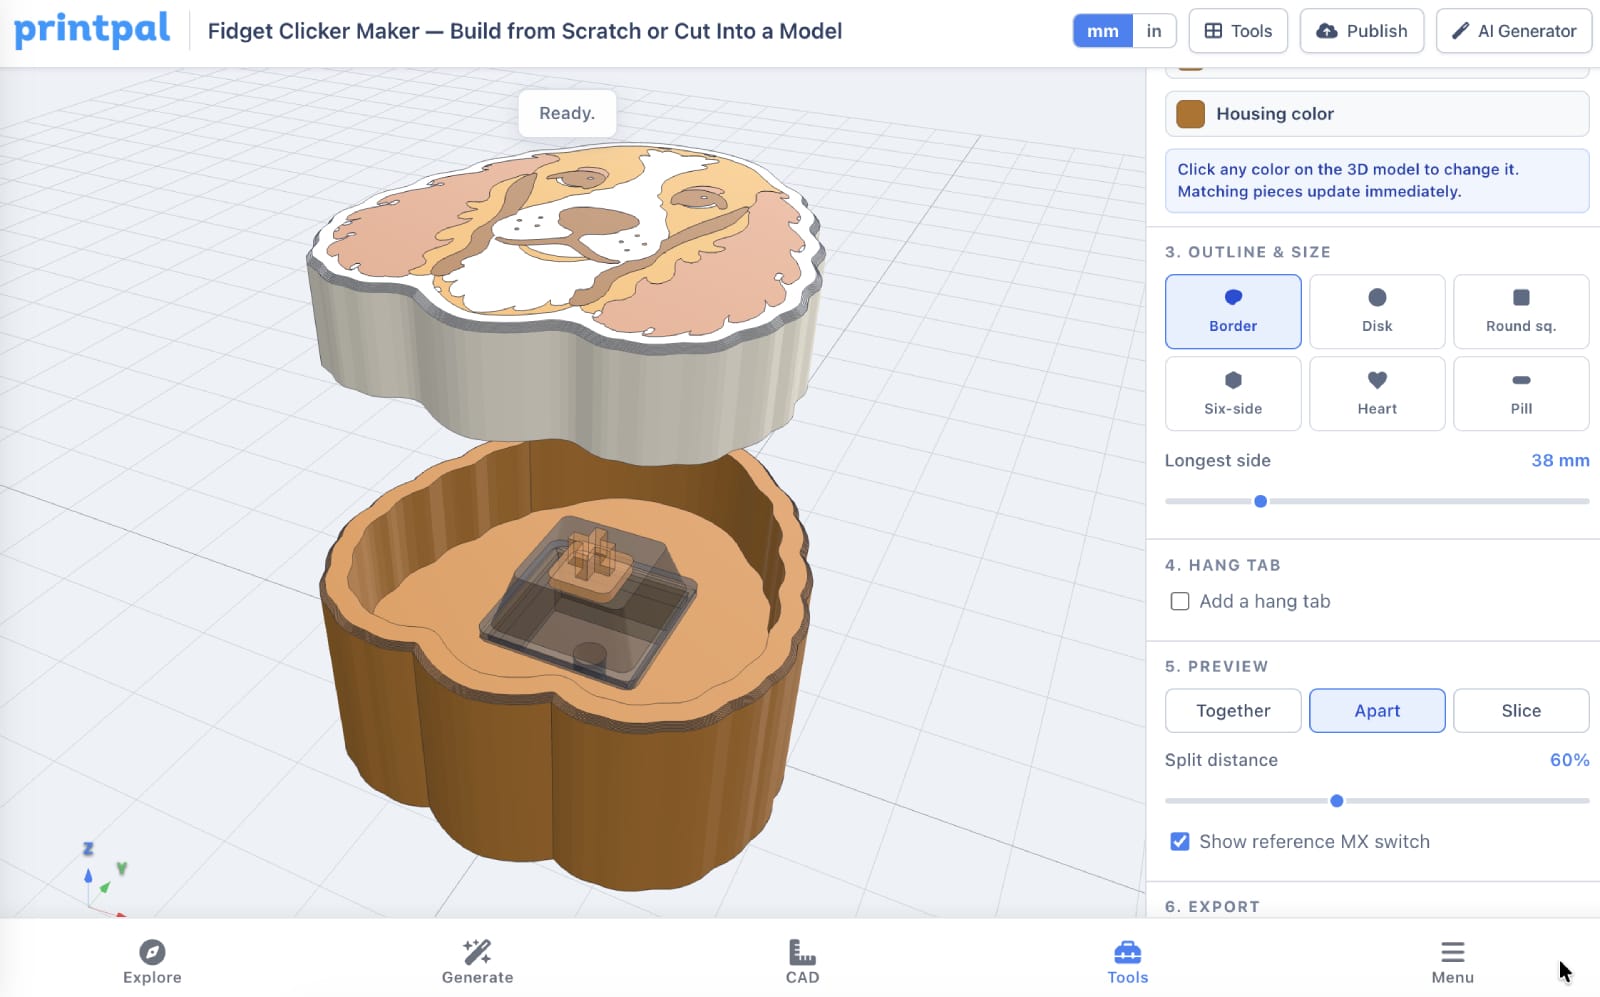
- Apart — pulls the cap off the housing, with a split distance slider (0–150%). This is the one to use before every export. Check that the artwork sits inside the cap and that nothing collides with the switch.
- Slice — cuts a section plane through the model on X, Y, or Z with a position slider. Use it to confirm the wall thickness and see how deep your raised islands actually go.
Show reference MX switch (on by default) drops a ghost switch into the scene at the exact position the real one will occupy. Leave it on. It's the fastest way to see whether your artwork is about to collide with the seat.
What actually gets printed
Understanding the three-piece stack makes every other decision obvious.
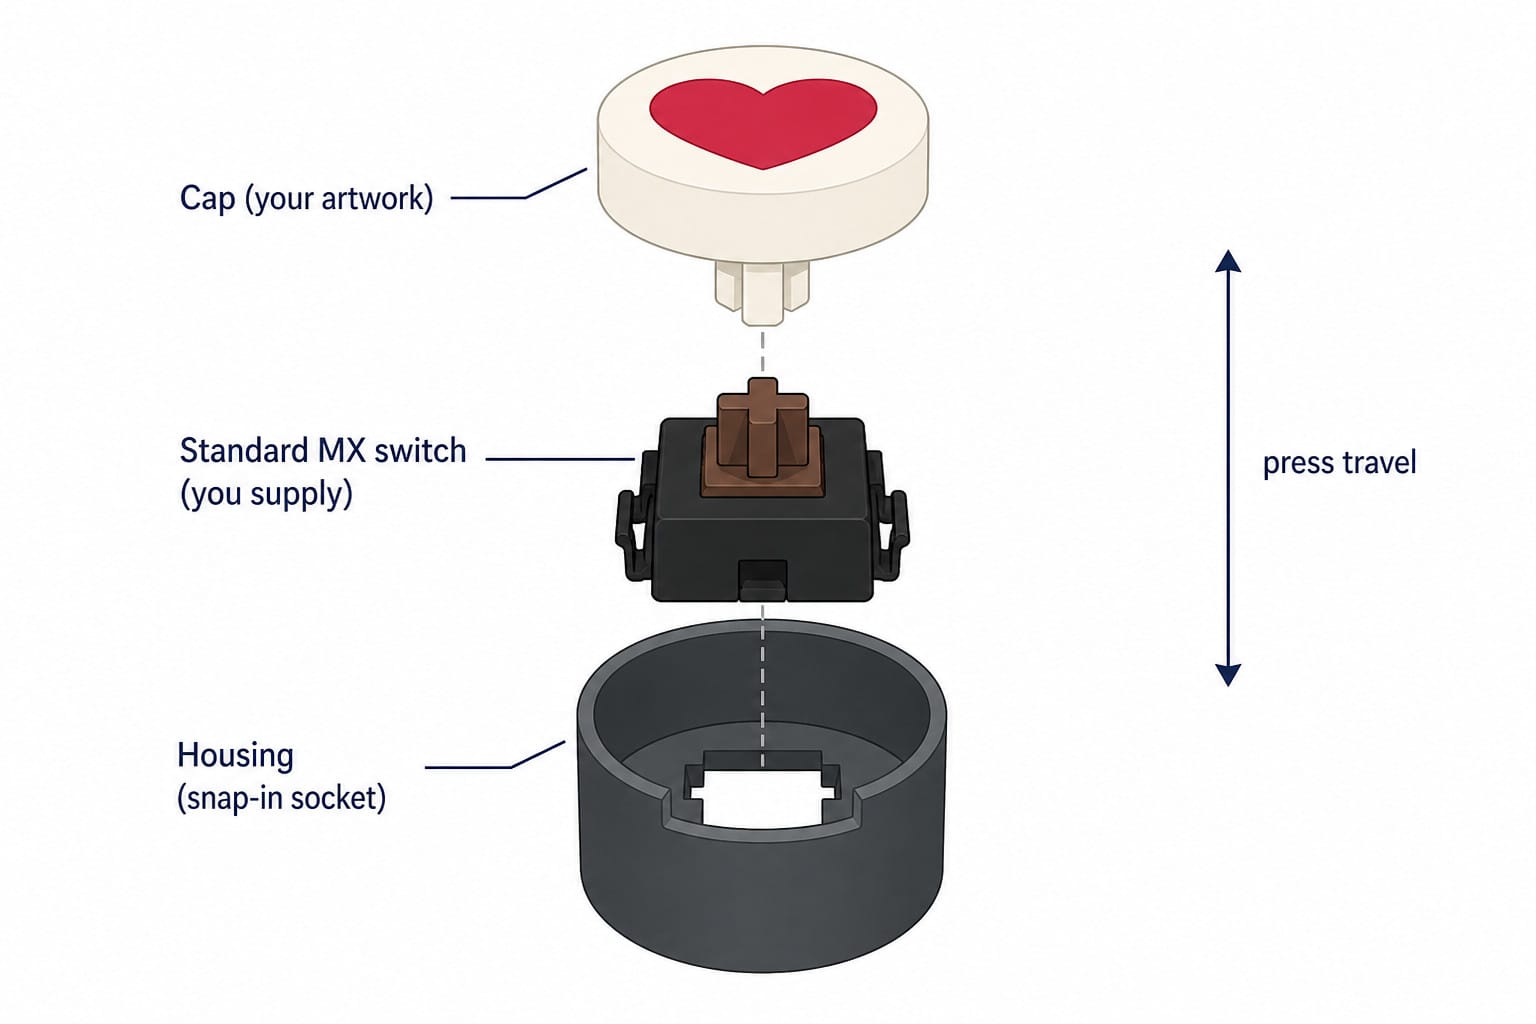
The cap is the pressable top. Your artwork is inlaid into its face as separate solid bodies, each one its own color. Underneath, a cross-shaped post grabs the switch stem, and a thin skirt around the rim keeps the cap from tipping in its well.
The switch is the only part you buy. It clips into a standard plate-mount cutout in the housing floor. This is why a built clicker feels so much better than a printed snap mechanism — you're pressing a real switch with a real click leaf, not a plastic detent that wears out.
The housing is the body: a chunky outer wall, a socket cavity for the switch, an open well the cap slides into with about a third of a millimetre of clearance, and the hang tab if you added one.
Some numbers worth knowing, since they drive the print settings:
| Feature | Size |
|---|---|
| Housing wall | ~2.4 mm for images and SVGs, ~3.2 mm for text |
| Cap face thickness | ~1.65 mm plus ~0.75 mm of artwork relief |
| Raise / Lower step | 0.8 mm |
| Cap-to-well sliding clearance | ~0.32 mm |
| Press travel | ~3.75 mm |
| Switch cutout | 13.97 mm plate-mount standard |
| Overall height | ~23 mm, fixed by the switch inside |
Step 6: Export
| Button | What you get |
|---|---|
| Download 3MF (multi-color) | Clicker Housing and Clicker Cap laid out side by side on a 256 mm plate, with every color pre-assigned to a filament slot. Opens straight into Bambu Studio or OrcaSlicer with colors intact. |
| Download STLs (cap + housing ZIP) | printpal-clicker-stl.zip containing Clicker-Housing.stl and Clicker-Cap.stl as plain single-color meshes. |
| PNG | A render of the current view — handy for listings and social posts. |
| AI Prompt | Copies the artwork prompt template described above. |
| Save / Load | Writes the whole session to a JSON file — artwork, colors, lifts, outline, hang tab, everything — so you can reopen a design later or hand it to someone else. |
| Tour | Replays the eight-step walkthrough. |
Use the 3MF unless you have a reason not to. The STL zip throws away all the color information; you'd have to reassign every filament by hand in the slicer.
Both export buttons need a Pro or Studio subscription. Everything up to that point — loading artwork, recoloring, previewing, saving sessions — is free.
Print settings
| Setting | Value |
|---|---|
| Material | PLA (crispest detail and color), PETG (tougher, slightly looser fit), no TPU |
| Layer height | 0.16–0.20 mm |
| Walls | 3 perimeters — at ~2.4 mm the housing wall is almost all perimeter anyway |
| Infill | 15–25%, mostly for weight in the hand |
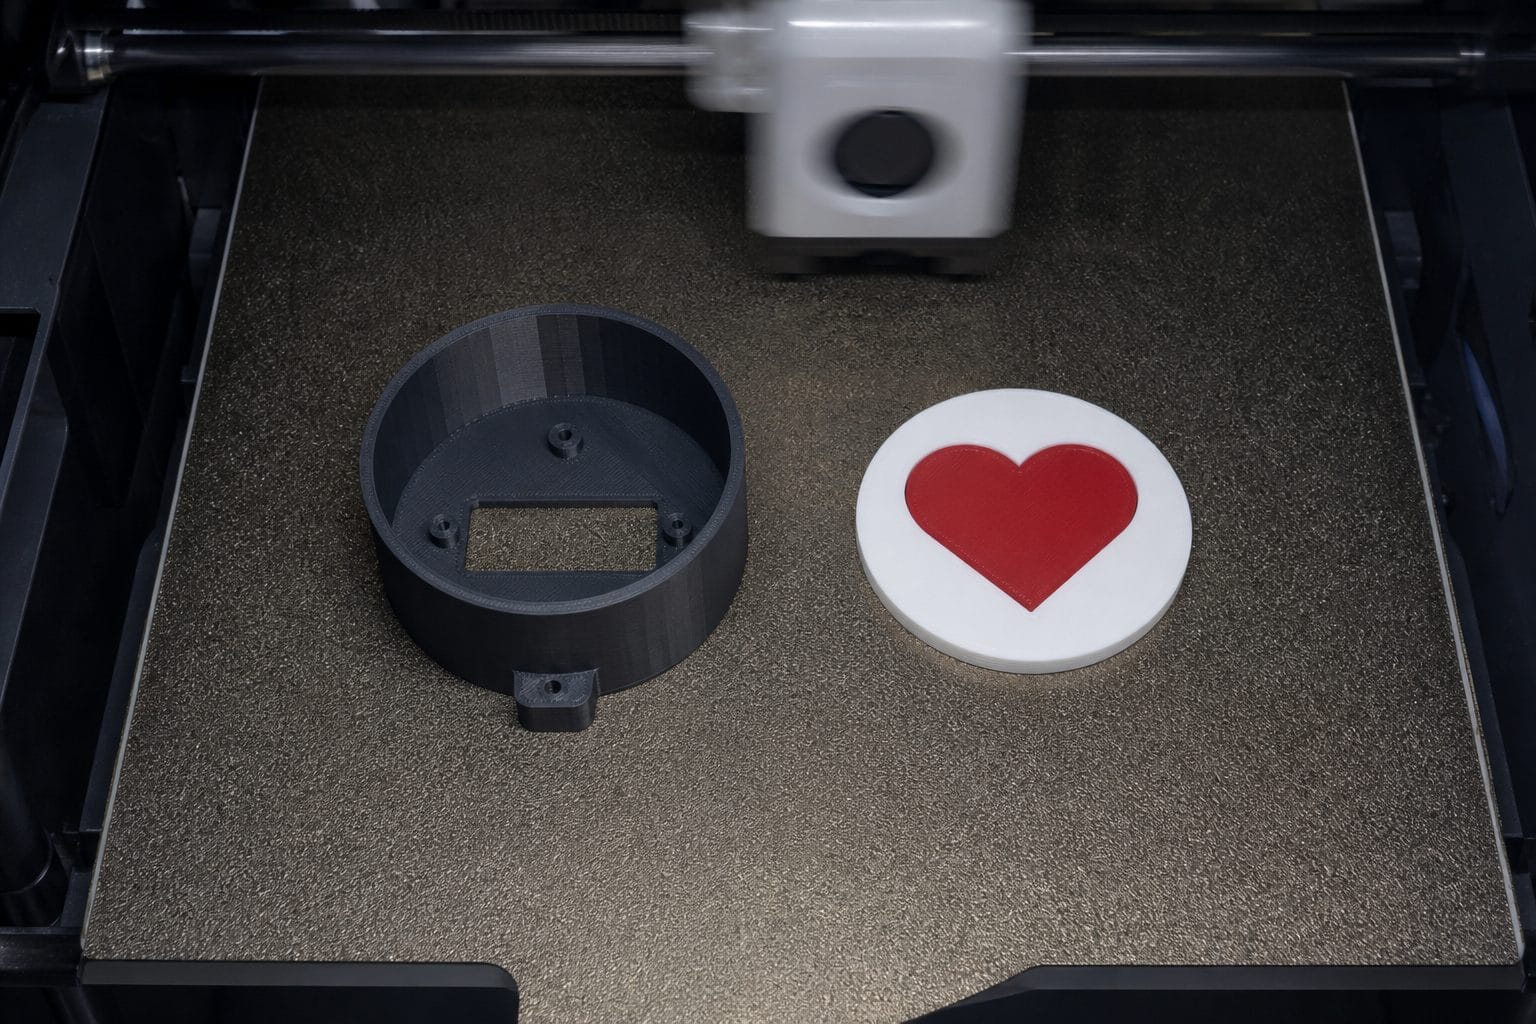
| Housing orientation | Open side up, cavity facing the sky |
| Cap orientation | Artwork face down on the plate |
| Supports | None |
| Brim | Only if the housing curls at a corner |
The cap orientation is the important one. Printing the artwork face-down against a smooth or textured plate gives you a clean, sharp color boundary with no top-surface ironing artifacts and no visible layer stepping across the graphic. It's the single biggest quality difference between a good clicker and a mediocre one.
If the cap comes out too tight in its well, sand the outside of the cap's skirt lightly rather than the inside of the housing — it's a much easier surface to reach.
Multi-color without an AMS
You don't need a multi-material unit. The cap is a flat plate with the artwork inlaid into its top face, and since you're printing it face-down, all the color changes happen in the first few layers.
In your slicer, add manual color change / pause commands at the layer where the artwork ends and the base plate begins — usually somewhere between layer 4 and layer 10 depending on your layer height and how much relief you added. Load the artwork color first, swap to the base color at the pause, then let it finish.
Two practical limits with this approach: it only works for artwork colors stacked in height, not side by side in the same layer, and each raised island adds another pause. If your design has four colors all sitting flush on the same plane, an AMS or MMU is the only clean way to do it. Design for that constraint if you're printing on a single-extruder machine: one accent color, raised, on a solid base looks great and needs exactly one pause.
Choosing your switch
The switch determines the feel entirely, and swapping it later takes about two seconds.
| Switch type | Feel | Good for |
|---|---|---|
| Clicky (blue, Kailh Box Jade, Box Navy) | Loud, sharp click | Maximum satisfaction, worst office etiquette |
| Tactile (brown, Boba U4T, Holy Panda) | A firm bump, quiet | The best all-round fidget |
| Linear (red, black, Gateron Ink) | Smooth, no bump | Rapid-fire pressing, quietest |
| Heavy springs (Box Navy, 80 g+) | Deliberate, weighty | Stress relief |
Box Jades are the loudest thing you can put in one of these. Boba U4Ts are the best-feeling. If you're making a batch to give away, blues are the safe default.
Project ideas
Brand logo desk clickers for a booth giveaway · team mascot keychains · a "SHIP IT" button for the office · streamer channel-point clickers · pet portrait keyrings (trace the silhouette, not the photo) · Etsy custom-name clickers · switch testers that actually look like something · wedding favors with the couple's monogram · classroom reward buttons · a clicker per D&D character · gym locker fobs · a row of them on a desk, one per project.
Troubleshooting
The traced artwork looks like confetti. Too many colors or too much photographic detail. Drop the Color count to 3 or 4. If that isn't enough, flatten the source image first — posterize it, or bump contrast hard — and re-drop it.
My image came out sitting on a white slab. The Strip light backdrop checkbox got turned off, or the background isn't light enough to detect. Turn it back on, or crop the subject out in any image editor first.
Thin parts of my logo disappeared. Features narrower than about 1 mm can't survive tracing at print scale. Increase Longest side, or simplify the artwork.
The letters look mushy. You're on a thin typeface. Switch to Titan One, Archivo Black, or Alfa Slab One — display weights are there for exactly this reason.
The cap rattles. Some switch brands have marginally slimmer stems. A wrap of tape on the stem fixes it, or reprint the cap with a hair more flow.
The cap won't go down all the way. Something in the housing well is catching. Check the seam for elephant's foot on the first layer and scrape it flat.
Colors are wrong after importing the 3MF. You opened the STL zip instead. The zip is intentionally colorless — re-export as 3MF.
Summary
| Goal | Action |
|---|---|
| Turn a logo or icon into a clicker | Fidget Clicker Maker, Build from Scratch, Image / SVG |
| Make a word clicker | Build from Scratch, Text, pick a display typeface |
| Add depth to a flat graphic | Click the color on the model, then Raise (0.8 mm per press) |
| Make it a keychain | 4. Hang Tab → Add a hang tab, 6 mm hole |
| Keep the colors in the slicer | Download 3MF (multi-color), not the STL zip |
| Print in color on one extruder | Cap face-down, one raised accent color, one manual pause |
| Add a click to a model you already have | The Cut Into a Model tab — no switch needed |
| Generate a 3D model from text or a photo | AI 3D Generator |
| Browse the rest of the tools | All PrintPal tools |
Drop the artwork, pick your colors, raise the accent, export the 3MF, print, snap in a switch. Then try not to press it for the rest of the afternoon.