How to Turn a Map Screenshot into a 3D Printable Model

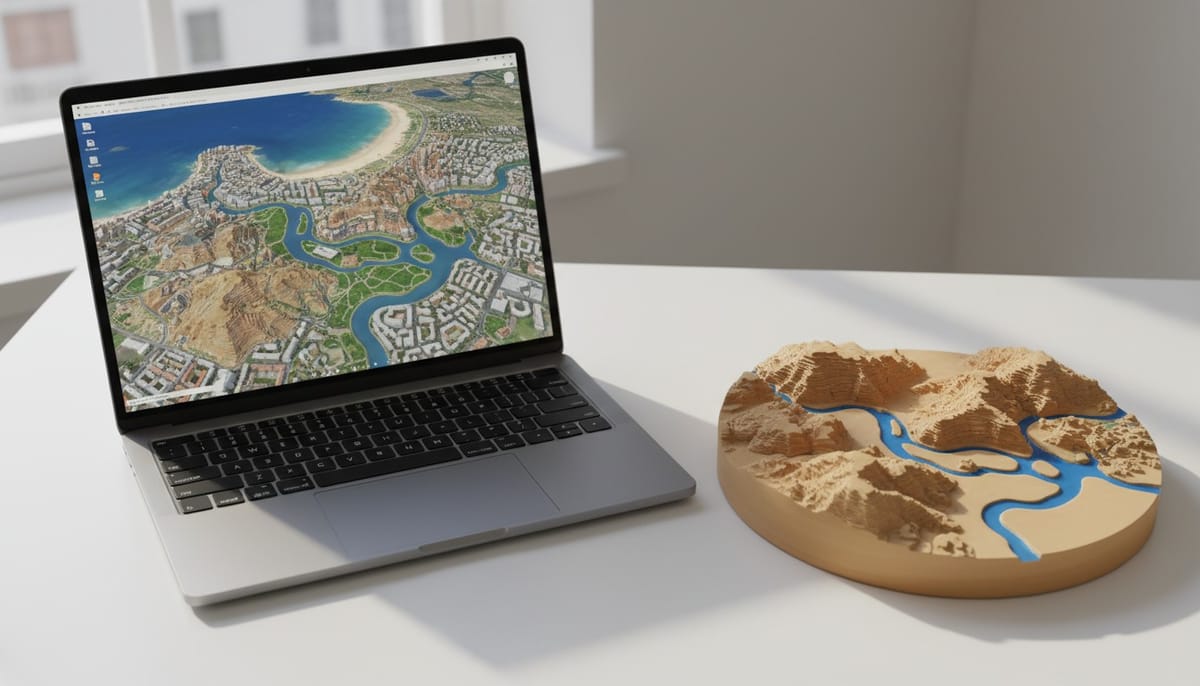
You can turn any region on a digital map into a physical 3D printed model. Pick a neighborhood, a city block, a coastline, an island, or an entire metro area from Google Maps, Apple Maps, or Google Earth, take a screenshot, and convert it into a detailed 3D diorama using PrintPal's 3D Map Maker. The AI re-styles your map screenshot into a clean diorama image and then generates a 3D model you can download as STL, OBJ, or GLB.
This guide covers exactly how to capture the best map screenshots, which map sources produce the best results, and how to get a high-quality 3D print from start to finish.
What Map Sources Work?
The 3D Map Maker accepts any image you upload, but some map sources consistently produce better 3D models than others. Here is how they rank.
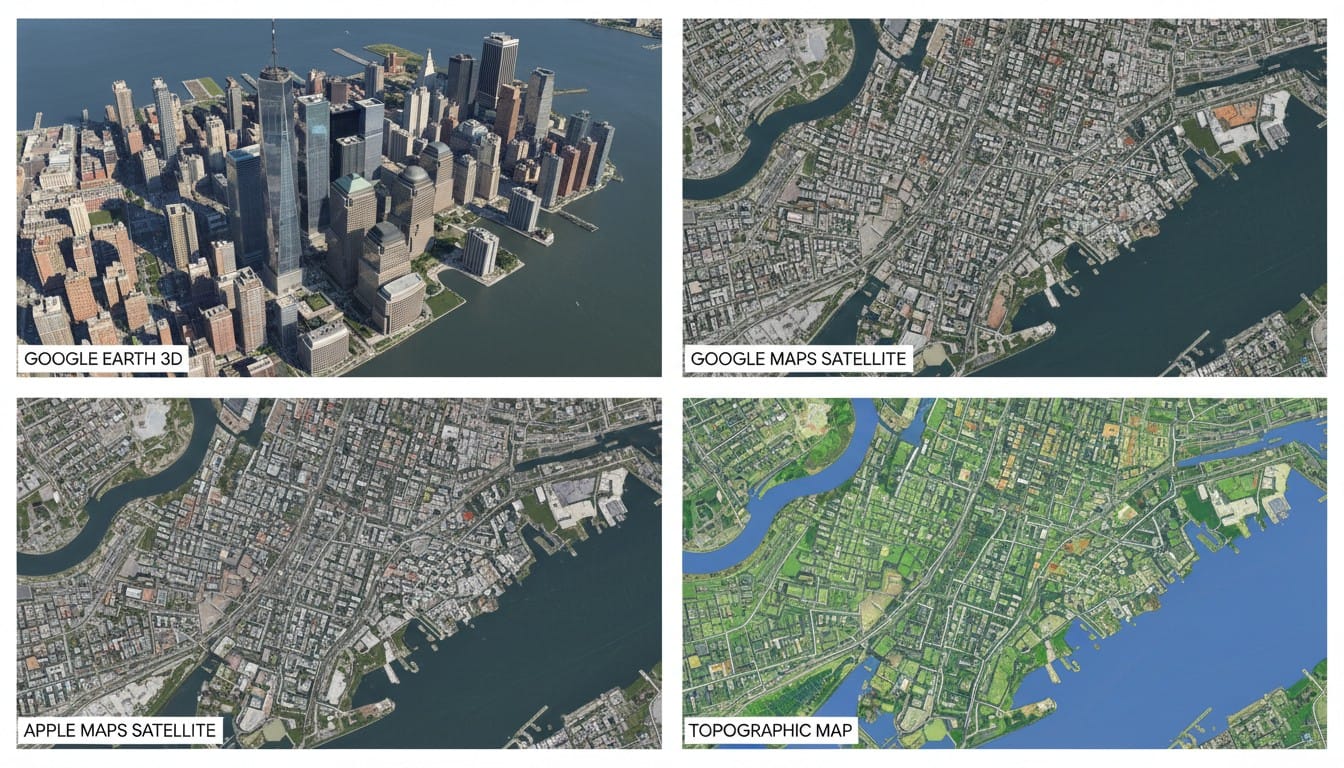
Google Earth (Best)
Google Earth is the top choice for map-to-3D conversion. Its 3D terrain mode shows buildings, elevation, and geographic features from any angle. You can tilt and rotate the camera to get exactly the perspective you want before screenshotting.
Why it works best:
- Full 3D terrain with elevation data visible in the image
- Buildings rendered in three dimensions
- Camera angle control lets you capture tilted views that show height
- High resolution imagery worldwide
Google Maps Satellite View (Great)
Google Maps satellite view provides sharp overhead imagery with clear building outlines, road networks, parks, and water features. It lacks the 3D tilt of Google Earth, but the image quality is consistently high.
Why it works well:
- Extremely high resolution in urban areas
- Clear distinction between buildings, roads, vegetation, and water
- Simple to capture on any device
Apple Maps (Great)
Apple Maps offers excellent satellite imagery and a 3D Flyover mode in supported cities. The Flyover mode is comparable to Google Earth for capturing angled perspectives with visible building heights.
Why it works well:
- High resolution satellite imagery
- 3D Flyover mode available for major cities
- Clean visual style with good contrast
Other Sources That Work
- Bing Maps satellite view: Similar quality to Google Maps for most regions
- Mapbox satellite tiles: High resolution global coverage
- Drone aerial photos: Excellent if you have your own imagery of a specific area
- Topographic maps with elevation shading: The AI interprets color-coded elevation and translates it into 3D geometry
- Hand-drawn or illustrated maps: The AI can re-style artistic maps into 3D dioramas
How to Capture the Best Screenshot
The quality of your screenshot directly affects the quality of the 3D model. Here is how to get the best capture from each source.
Google Earth Desktop App
- Open Google Earth Pro (free desktop app) or earth.google.com
- Search for your location and navigate to the area you want
- Enable 3D Buildings in the layers panel if not already on
- Tilt the camera by holding the middle mouse button and dragging, or use the tilt slider. Aim for roughly 30-45 degrees above the horizon
- Zoom until your target area fills the frame with a small margin of surrounding context
- Take a screenshot using your system screenshot tool and crop to a square
Google Maps in a Browser
- Go to maps.google.com
- Search for your location
- Click the Satellite toggle in the bottom-left corner
- Zoom to frame the area you want
- Screenshot and crop to a square
Google Earth Mobile App
- Open the Google Earth app on your phone or tablet
- Navigate to your area and pinch to zoom
- Use two fingers to tilt the view for an angled perspective
- Screenshot and crop
Apple Maps
- Open Apple Maps on Mac, iPhone, or iPad
- Navigate to your area
- Switch to Satellite view
- For supported cities, enable 3D/Flyover mode for angled building views
- Screenshot and crop

Screenshot Tips That Make a Difference
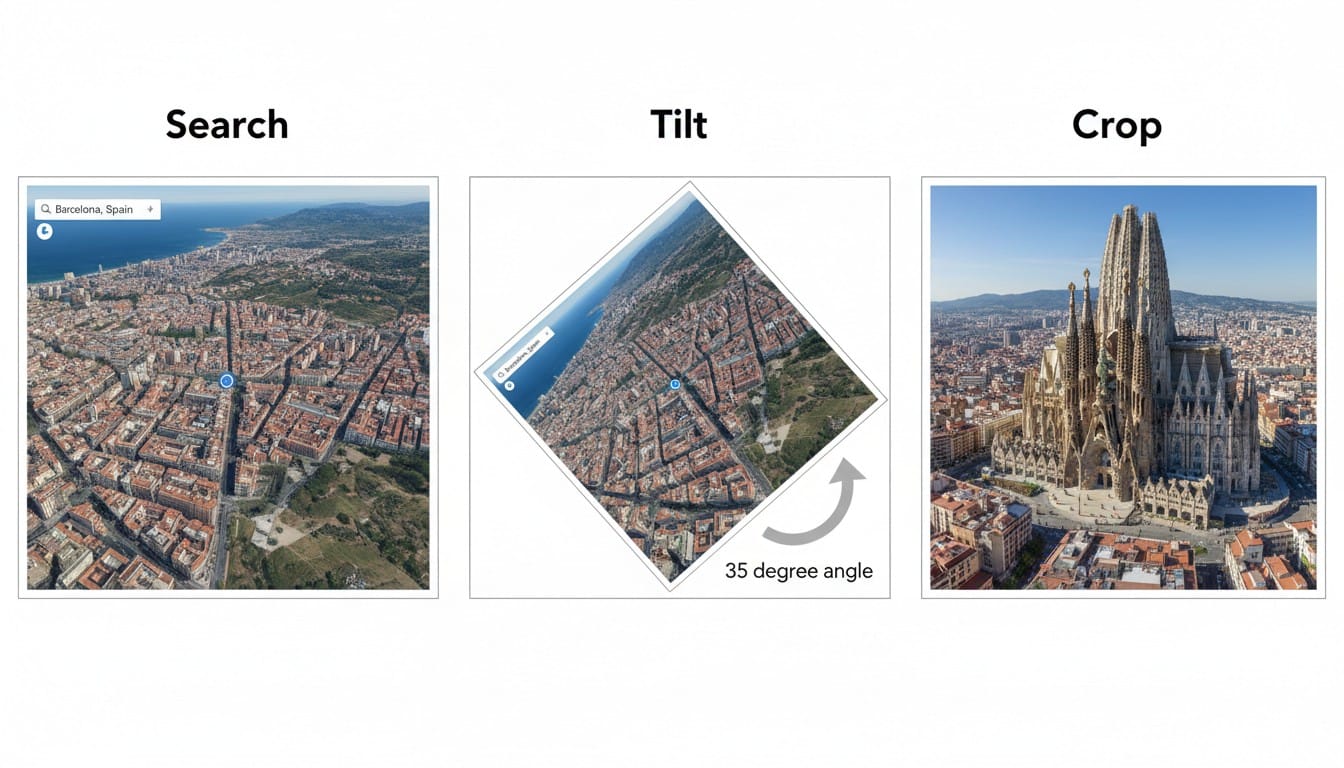
Crop to a Square
The AI processes square images most consistently. After taking your screenshot, crop it to a 1:1 aspect ratio in your system image editor, Photos app, or any quick crop tool. Center the most important area of the map in the middle of the frame.
Include Context Around Your Subject
Do not crop too tightly around a single building or block. The AI needs surrounding context (roads, neighboring buildings, nearby water or parks) to understand the geographic layout and produce a coherent diorama. A good rule of thumb: include at least 2-3 blocks of surrounding area beyond your main subject.
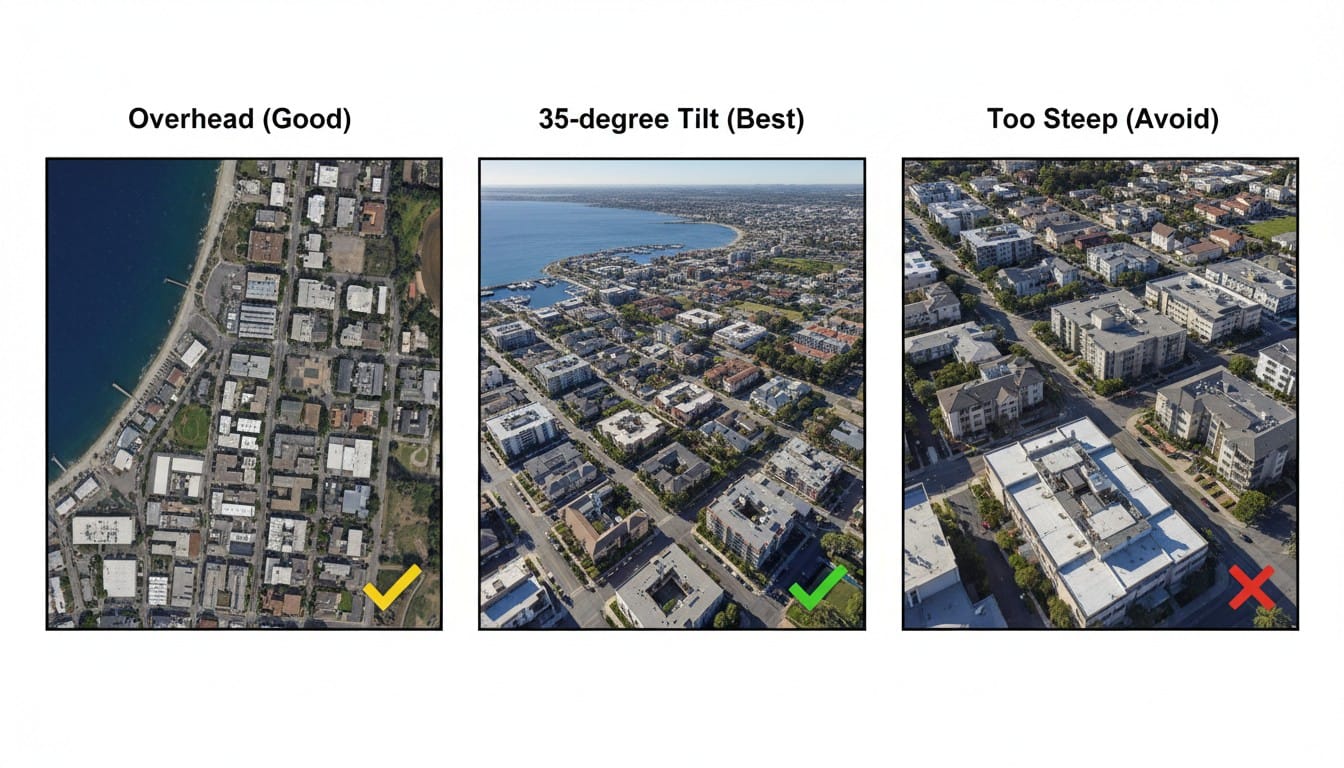
Get the Angle Right
Tilted/angled views (30-45 degrees) produce the most dramatic 3D models because the screenshot already contains visible height information. The AI can see how tall buildings are relative to each other and how terrain slopes.
Flat overhead views still work well, especially for neighborhood-scale areas, coastlines, and river systems where the plan layout matters more than building height. The AI infers elevation from building shadows and geographic features.
Too steep an angle (nearly ground-level) makes it hard for the AI to capture the full area. Avoid angles below 20 degrees.
Use the Highest Resolution Available
Zoom into Google Earth or Maps until the area you want fills your screen, then take the screenshot at your display's native resolution. Avoid screenshotting a tiny portion of the screen and then enlarging it, as this reduces image quality. If you are on a high-DPI/Retina display, your screenshots will naturally be higher resolution.
Avoid Overlays and Labels
Google Maps sometimes overlays street names, business names, and transit icons on the satellite view. These text labels can confuse the AI. To minimize them:
- In Google Maps, zoom in closer (labels thin out at higher zoom levels)
- In Google Earth, turn off the Labels layer in the sidebar
- After screenshotting, you can crop out areas with heavy label clusters at the edges
Watch Out for Clouds
Satellite imagery occasionally has cloud cover, especially over coastal and tropical areas. Clouds appear as white blobs that the AI may interpret as flat terrain or structures. If you see clouds in your target area, try a different zoom level or check if Google Earth has a historical imagery option with clearer skies.
Walkthrough: Screenshot to 3D Print
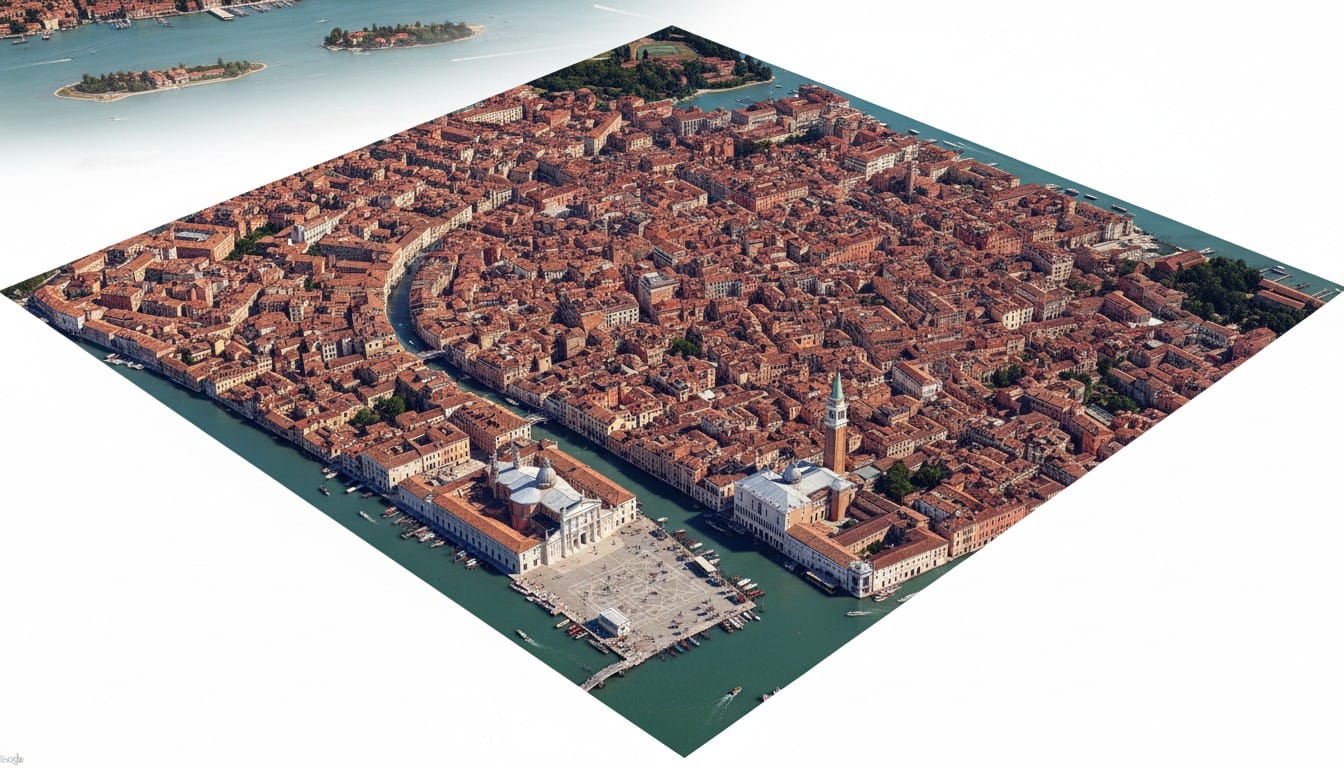
Let's walk through a full example converting a Google Earth screenshot of Venice, Italy into a 3D printed model.
1. Capture the Screenshot
Open Google Earth and search for Venice. Tilt the camera to about 35 degrees to show the building heights and canal structure. Zoom until the main island fills the frame with a bit of lagoon visible around the edges. Screenshot and crop to a square.
2. Upload to the 3D Map Maker
Go to the 3D Map Maker and click the image upload area. Select your cropped Venice screenshot. The image loads into the upload panel.
3. Configure Settings
- City name: Leave blank or type "Venice" (the image is the primary input)
- Style: Miniature (the charming diorama style suits Venice's dense colorful architecture)
- Type: City (Venice is urban, not terrain-focused)
- Landmarks: "Grand Canal, St. Mark's Basilica, Rialto Bridge" (optional, but helps the AI emphasize key features)
4. Generate
Click Generate 3D Map. The process runs in two phases:
Phase 1: Image re-styling (1-2 minutes). The AI takes your satellite screenshot and re-renders it in your chosen style. For Miniature, this means the raw satellite photo becomes a charming toy-like isometric diorama image with soft colors and clean shapes.
Phase 2: 3D model generation (3-5 minutes). The re-styled image is converted into a full 3D model at SuperPlus resolution with up to 1 million polygons.
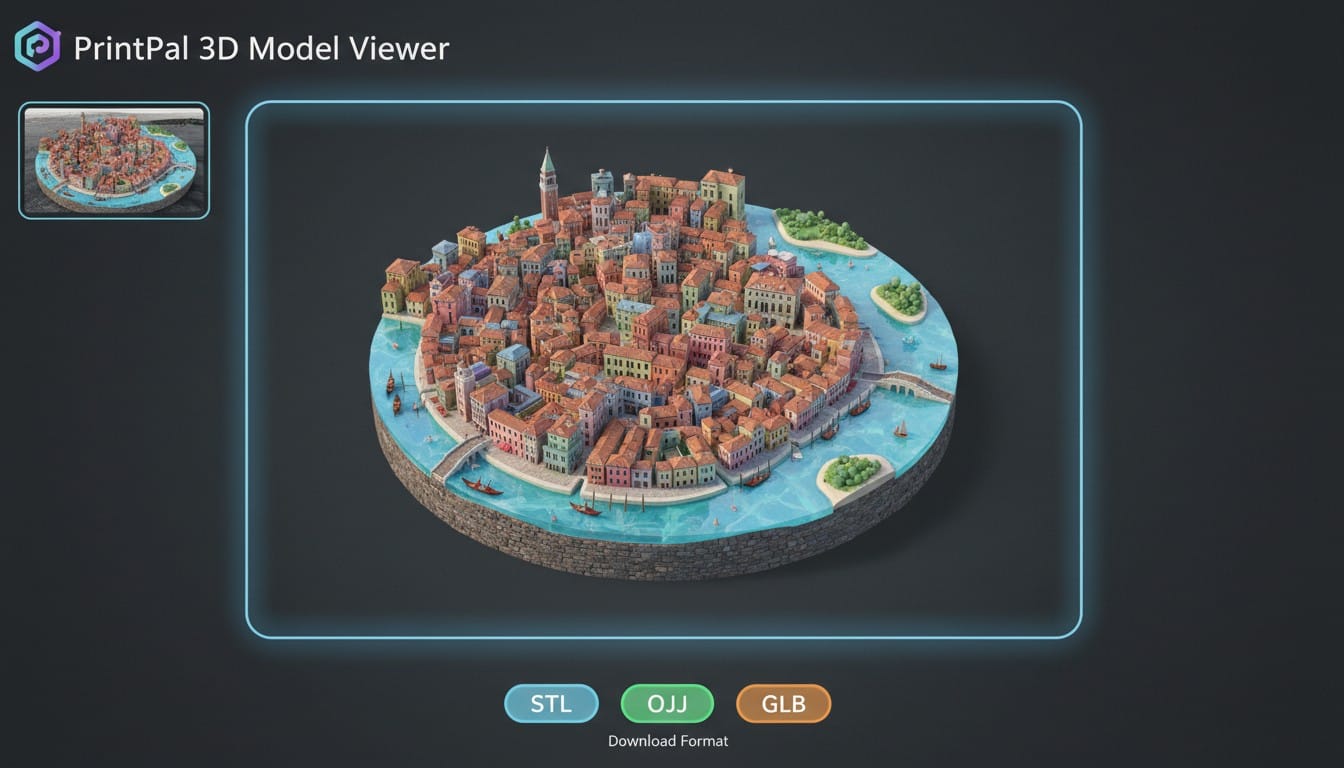
5. Inspect and Download
The finished model appears in the 3D viewer. The re-styled source image is shown in the top-left corner of the viewer so you can compare. Rotate the model to check that the canals, building clusters, and landmarks look correct. Download as STL for 3D printing.
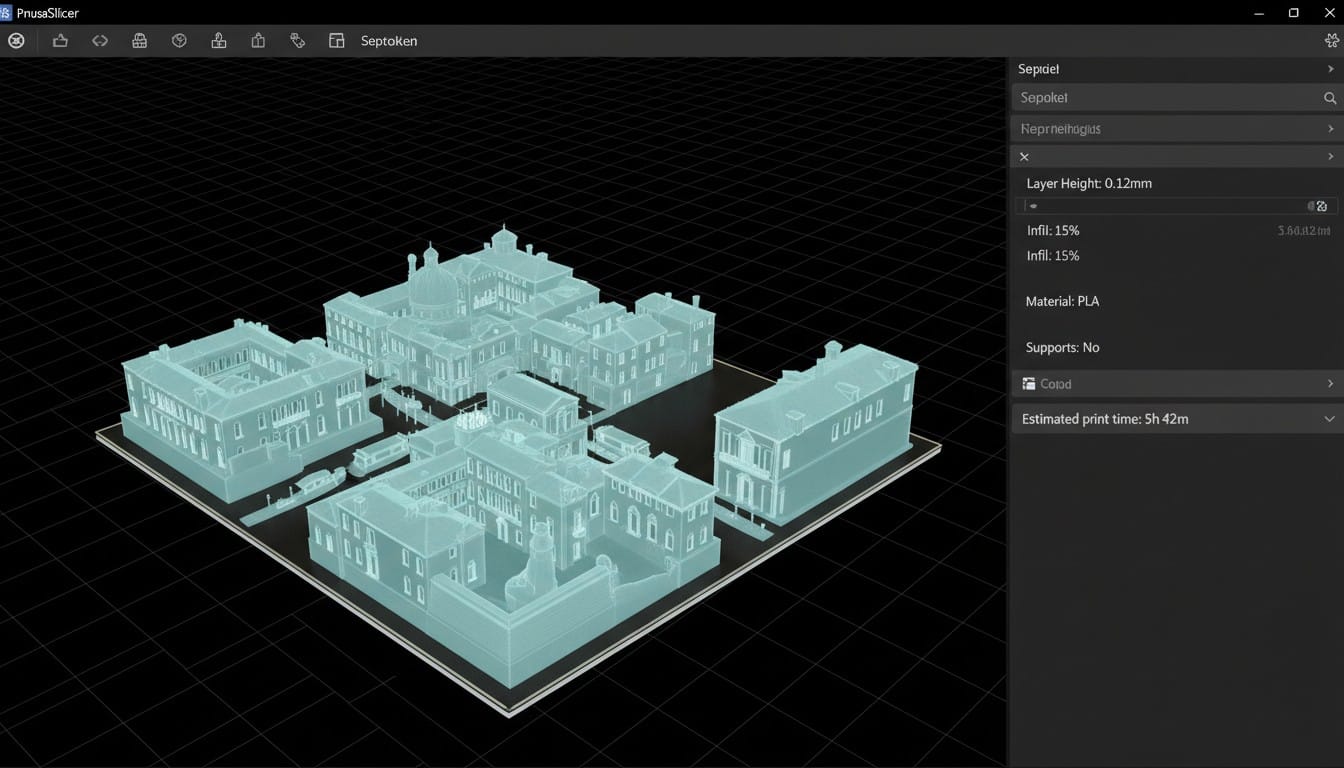
6. Slice and Print
Open the STL in your slicer (Cura, PrusaSlicer, Bambu Studio, or similar). Scale to your desired size. A 15cm print captures good canal and building detail. Slice with 0.12mm layer height and 15-20% infill. Print time is typically 4-8 hours depending on your printer speed and the scale you chose.
Ideas: What to Screenshot and Print
Here are specific ideas for map regions that make excellent 3D prints.
Your Own Neighborhood
Screenshot your block, your street, or your entire neighborhood. Seeing your own home as part of a 3D diorama is surprisingly satisfying. Makes a great housewarming gift or a personal keepsake.
A Specific City Block You Love
Favorite restaurant district, the college campus, the block where you grew up. Zoom in close on Google Earth to capture a single block or small cluster of blocks with maximum detail.
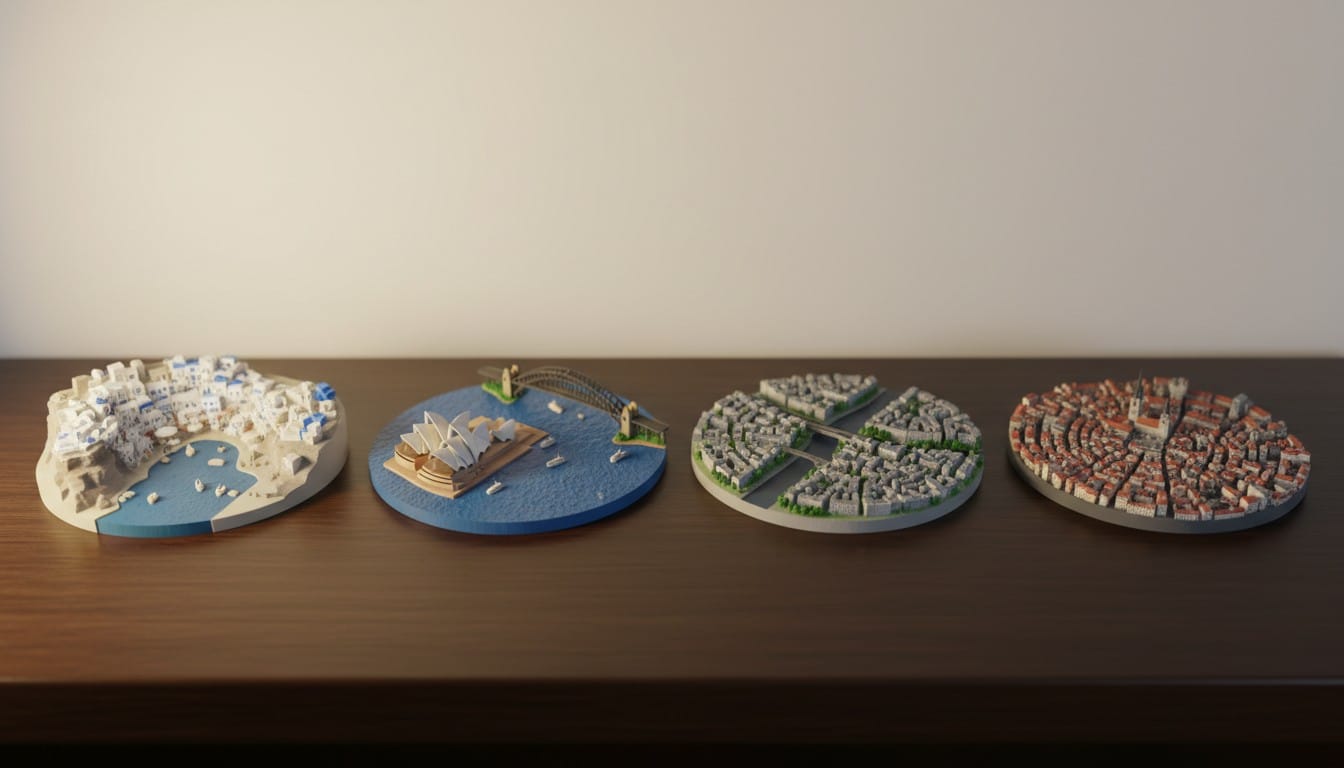
Islands
Islands are perfect subjects because the water boundary gives the model a natural clean edge. Try:
- Manhattan Island, New York
- Alcatraz Island, San Francisco
- Mont Saint-Michel, France
- The Palm Jumeirah, Dubai
- Santorini, Greece

Coastal Cities and Harbors
The coastline creates a natural visual boundary that makes models look clean and dramatic. The contrast between dense urban areas and open water is visually striking. Try:
- Sydney Harbor, Australia
- Rio de Janeiro coastline, Brazil
- Hong Kong harbor, China
- Naples waterfront, Italy
- San Francisco Bay, California
River Cities
Cities built around rivers produce models with natural channels cutting through the urban fabric. The river provides depth and visual interest. Try:
- Paris along the Seine
- London along the Thames
- Budapest split by the Danube
- Prague and the Vltava
- St. Petersburg canal system
University Campuses
College campuses have a distinct layout with large buildings, open quads, sports fields, and clear boundaries. These make great graduation gifts or alumni memorabilia.
Sports Stadiums and Surrounding Areas
Screenshot the area around a stadium for a model that captures both the venue and its neighborhood context. Works well for:
- Wrigley Field and Wrigleyville, Chicago
- Camp Nou and the Les Corts district, Barcelona
- Melbourne Cricket Ground and surrounding parkland
Historic City Centers
Dense historic city centers with narrow streets, old building footprints, and landmark churches or towers produce incredibly detailed dioramas. Try:
- Old Town Prague
- Medieval Bruges, Belgium
- Historic center of Rome
- The Medina of Marrakech
- Old City of Dubrovnik
Common Issues and How to Fix Them
The Model Looks Too Flat
Cause: You used a flat overhead screenshot with no visible building heights or terrain elevation.
Fix: Re-capture your screenshot from Google Earth with a 30-45 degree tilt so that building heights and terrain slopes are visible in the image. The AI generates more dramatic elevation when it can see height differences in the source.
The Model Has Blurry or Undefined Areas
Cause: The screenshot resolution was too low, or the area was zoomed out too far.
Fix: Zoom in closer to the specific area you care about and take the screenshot at full display resolution. Crop rather than resize. If you are capturing a large metro area, consider capturing just the most interesting district instead.
Water Areas Look Bumpy Instead of Smooth
Cause: The satellite image showed wave textures, boat wakes, or reflections on the water surface.
Fix: The AI sometimes interprets water surface texture as terrain. Try a screenshot at a different zoom level where the water appears more uniformly colored. Alternatively, use the Sleek style which tends to flatten water areas more aggressively.
Buildings Are Not Recognizable
Cause: The screenshot was taken from too far away, or the buildings in that area do not have 3D data in Google Earth.
Fix: Zoom in closer and add the specific building names in the landmarks field. For areas without 3D building data in Google Earth, the AI infers building shapes from the flat satellite view, which produces simpler block forms.
Labels and Text Appear in the Model
Cause: Street names or business labels from the map overlay were visible in the screenshot.
Fix: Use Google Earth with the Labels layer turned off, or use satellite view in Google Maps at a high zoom level where labels are minimal. Crop out any edges that have heavy text overlays.
Printing Settings Quick Reference
| Setting | Recommended Value |
|---|---|
| Layer height | 0.12 mm (FDM) or 0.04 mm (resin) |
| Infill | 15-20% |
| Supports | Not needed (flat base) |
| Material | PLA, PETG, or resin |
| Print scale | 10-20 cm for most models |
| Nozzle | 0.4 mm standard, 0.2 mm for fine detail |
Start Converting Your Map Screenshots
Pick a location that means something to you. Open Google Earth, tilt the camera, zoom in, and take a screenshot. Upload it to the 3D Map Maker, choose your style, and generate a 3D model in minutes. Five minutes of setup, a few hours of print time, and you have a physical 3D map of any place on Earth sitting on your desk.