How to Create 3D Printable Maps of Any City or Landscape with AI

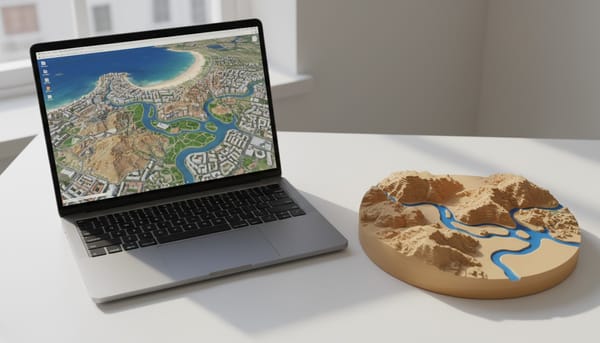
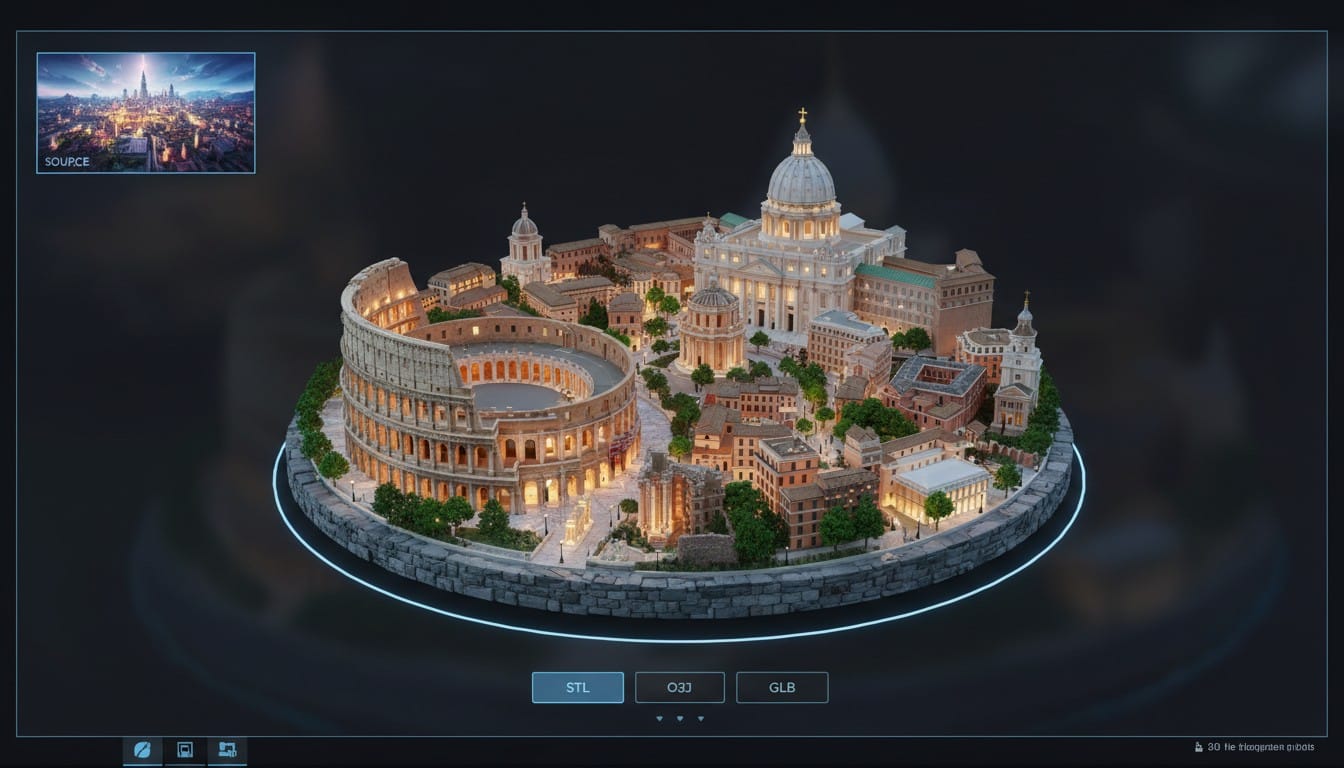
Imagine holding a physical 3D map of your favorite city in your hands. Every skyline silhouette, every landmark, every terrain contour captured in a model you can touch and display. With PrintPal's 3D Map Maker, you can generate a 3D printable map of any city or landscape in minutes. Just type a location name, pick a style, and our AI creates a detailed diorama model ready to download as STL, OBJ, or GLB. This guide walks you through every step, from your first generation to a finished 3D print on your shelf.
What Is the 3D Map Maker?
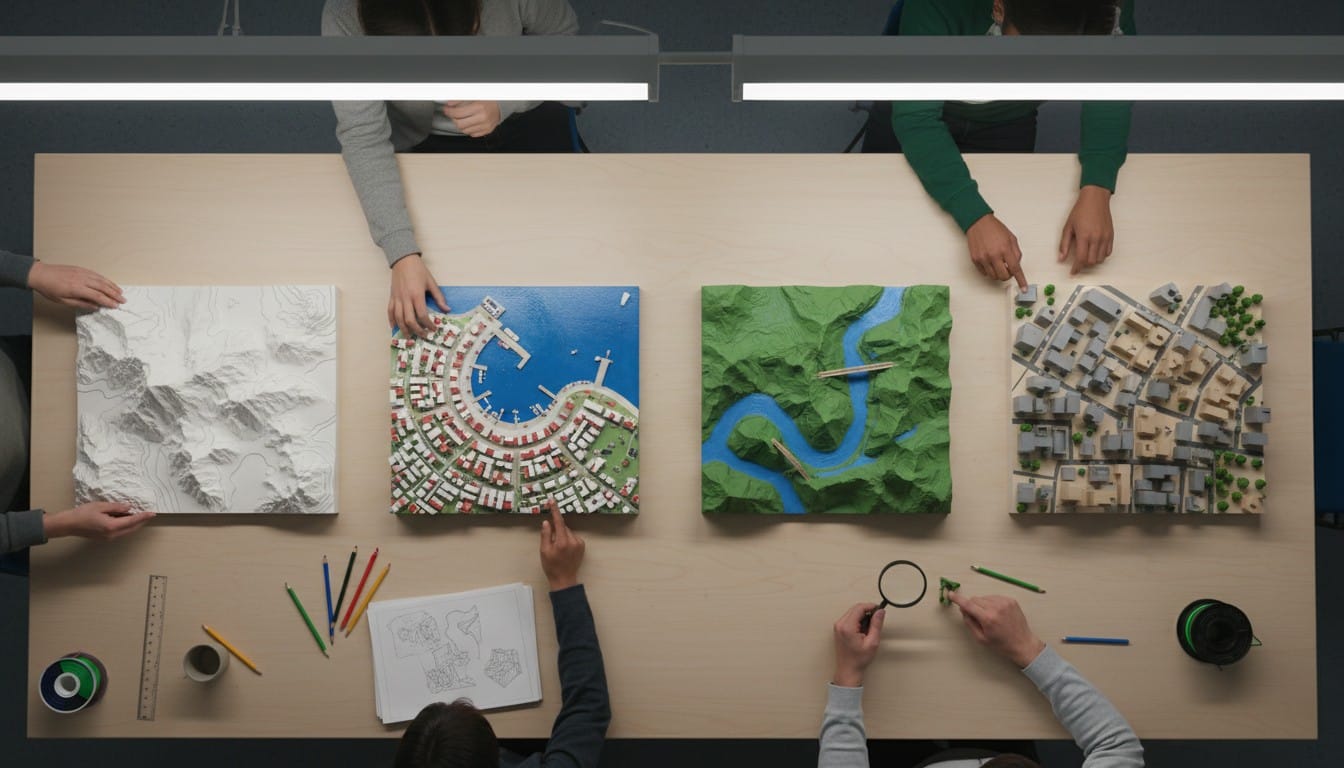
PrintPal's 3D Map Maker is an AI-powered tool that converts any city or landscape into a 3D printable diorama model. Unlike traditional GIS-based terrain tools that export raw elevation data, the 3D Map Maker uses generative AI to create stylized, print-optimized models complete with buildings, landmarks, roads, and terrain, all designed to look stunning as a physical object.
Two Ways to Generate
The tool supports two input methods:
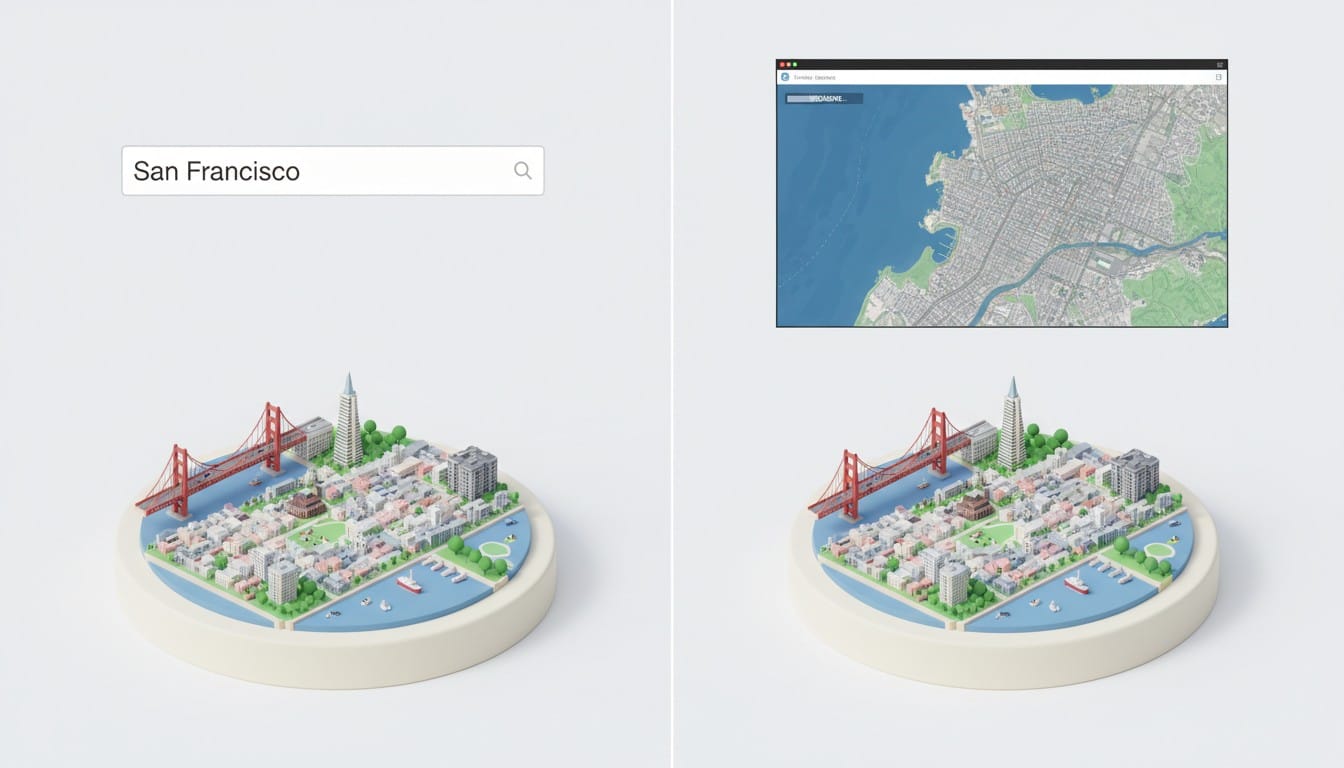
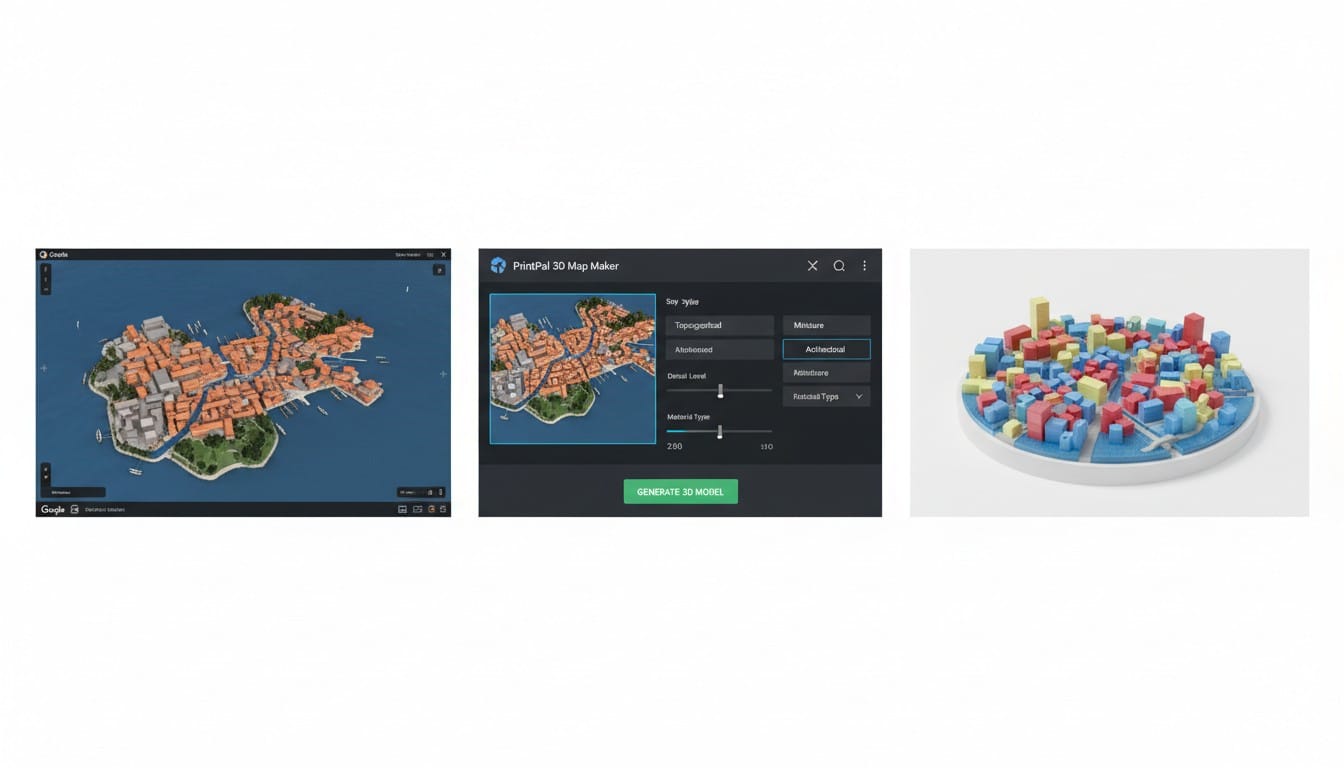
Text to 3D: Type any city, town, or geographic location. The AI generates an original stylized map image and then converts it into a 3D model. Perfect when you want a complete AI-generated diorama of a place.
Image to 3D: Upload a screenshot from Google Maps, Apple Maps, or any aerial/satellite image. The AI re-styles the image according to your chosen preset and then converts it to 3D. Ideal when you want the model to match a specific area, neighborhood, or viewpoint.
Step-by-Step: Your First 3D Map
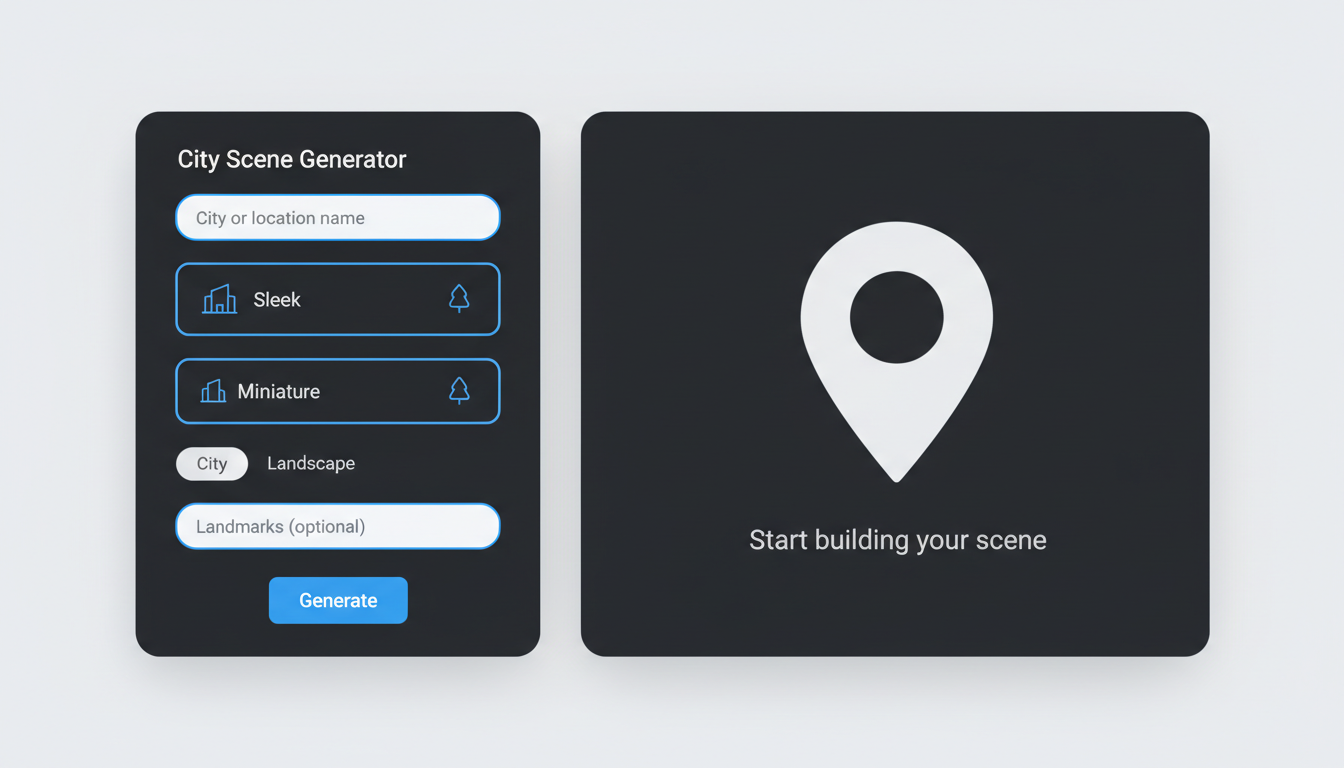
Step 1: Choose Your Location
Navigate to the 3D Map Maker and enter a city or location name. Be specific for best results. "Downtown Manhattan, New York" produces a more focused model than just "New York."
You can also skip the text input and upload a map screenshot directly. This gives you precise control over which area appears in the model.
Step 2: Pick a Style
Choose between two distinct aesthetics:
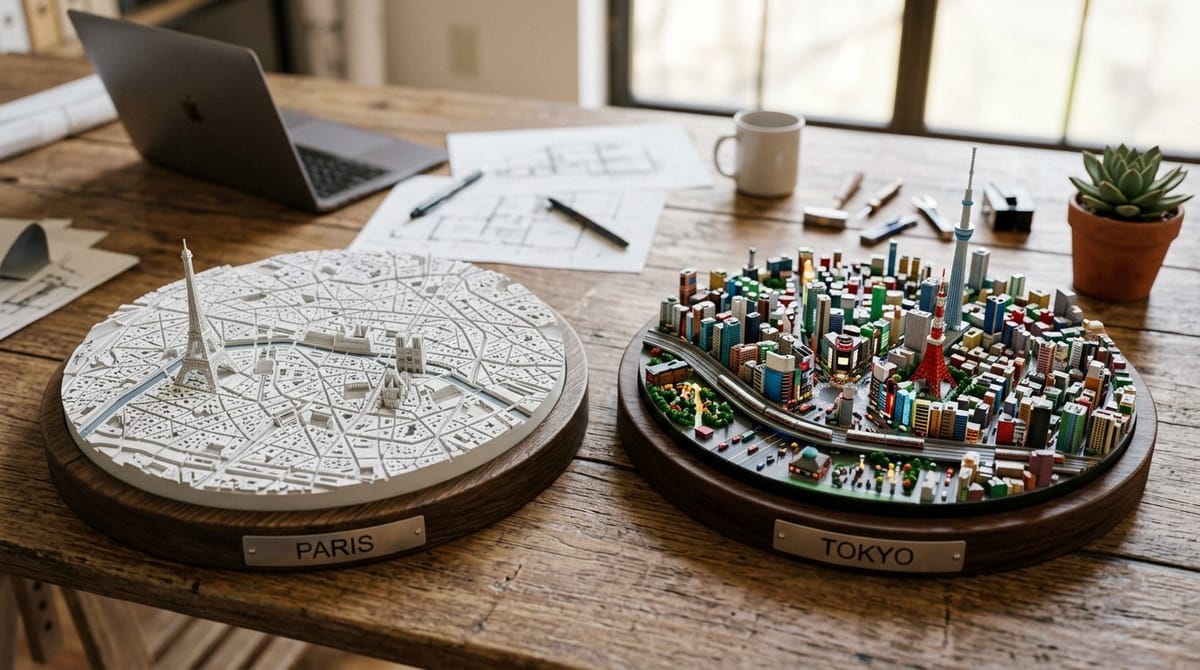
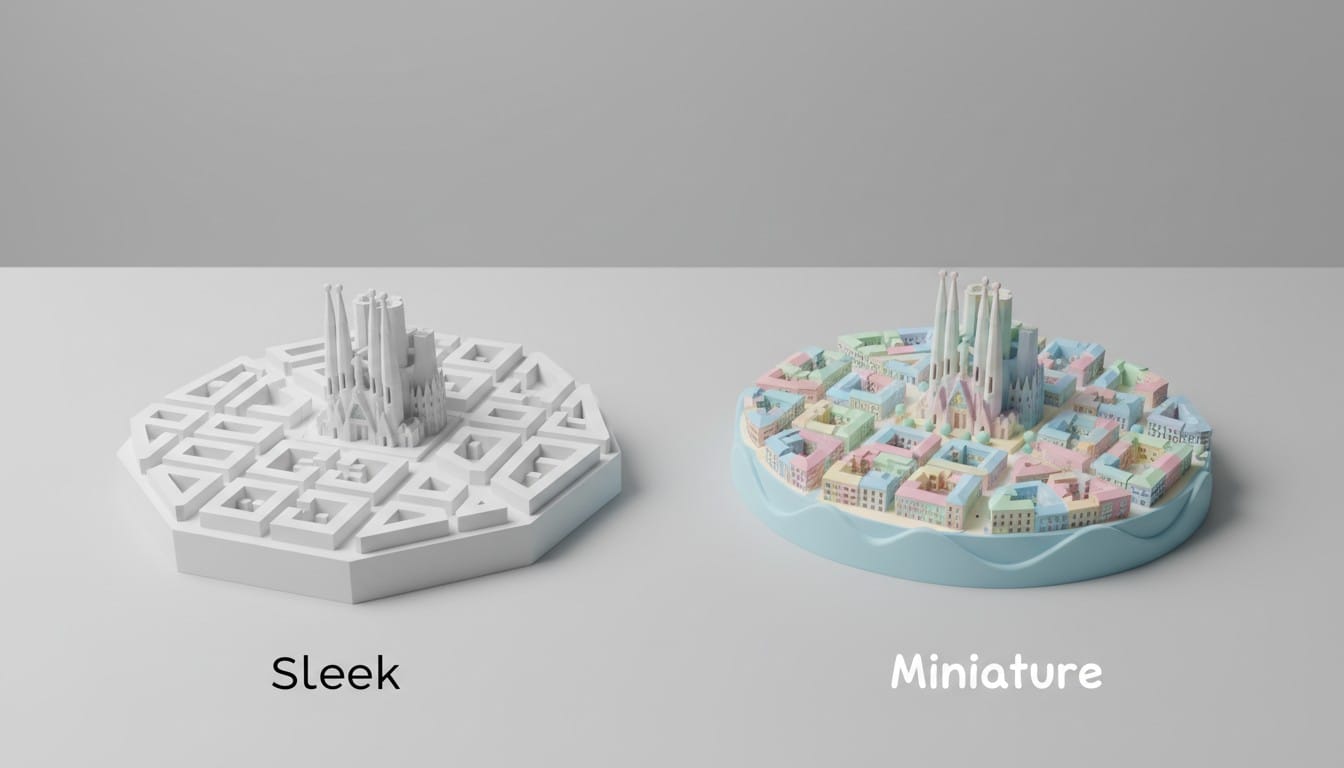
Sleek: A clean, monochrome architectural maquette style. Buildings are simplified into bold geometric blocks rising from a flat base. Roads and boundaries are clearly defined. The result looks like a professional physical scale model you would see in an architecture firm. Best for modern cities, clean presentations, and architectural displays.
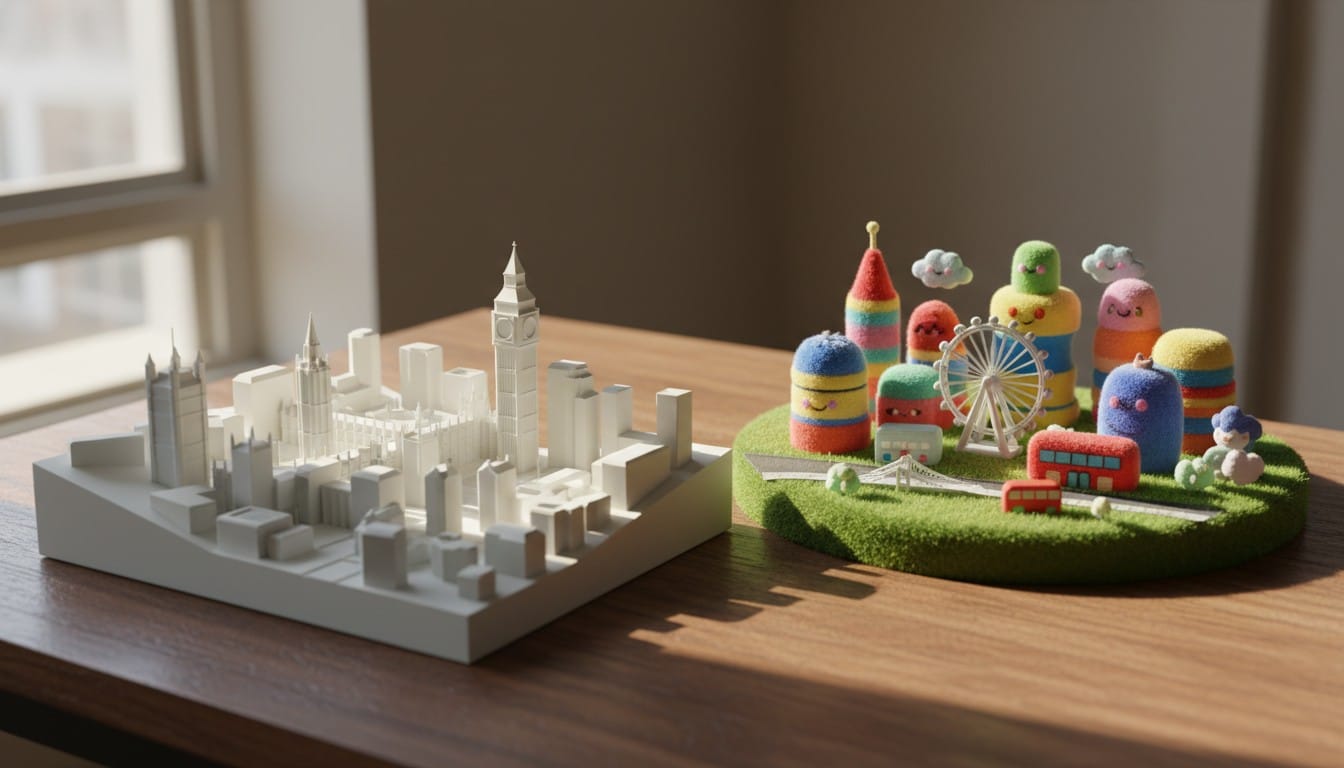
Miniature: A charming, toy-like isometric diorama. Think premium weather-app city icons or collectible city miniatures. Landmarks are recognizable but simplified into chunky, colorful forms on a rounded platform. Roads, parks, and water are clean shapes. Best for gifts, souvenirs, display pieces, and anyone who wants a playful aesthetic.
Step 3: Select Generation Type
City: Optimized for urban areas. Emphasizes buildings, skylines, roads, and architectural landmarks.
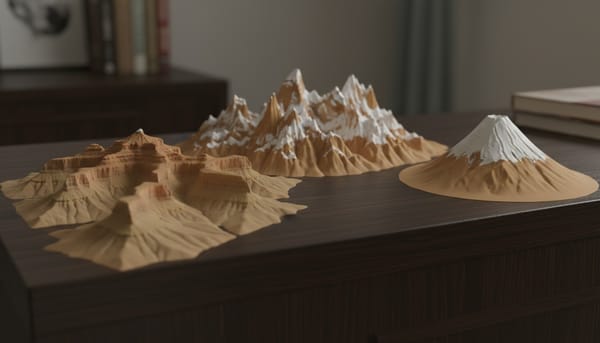
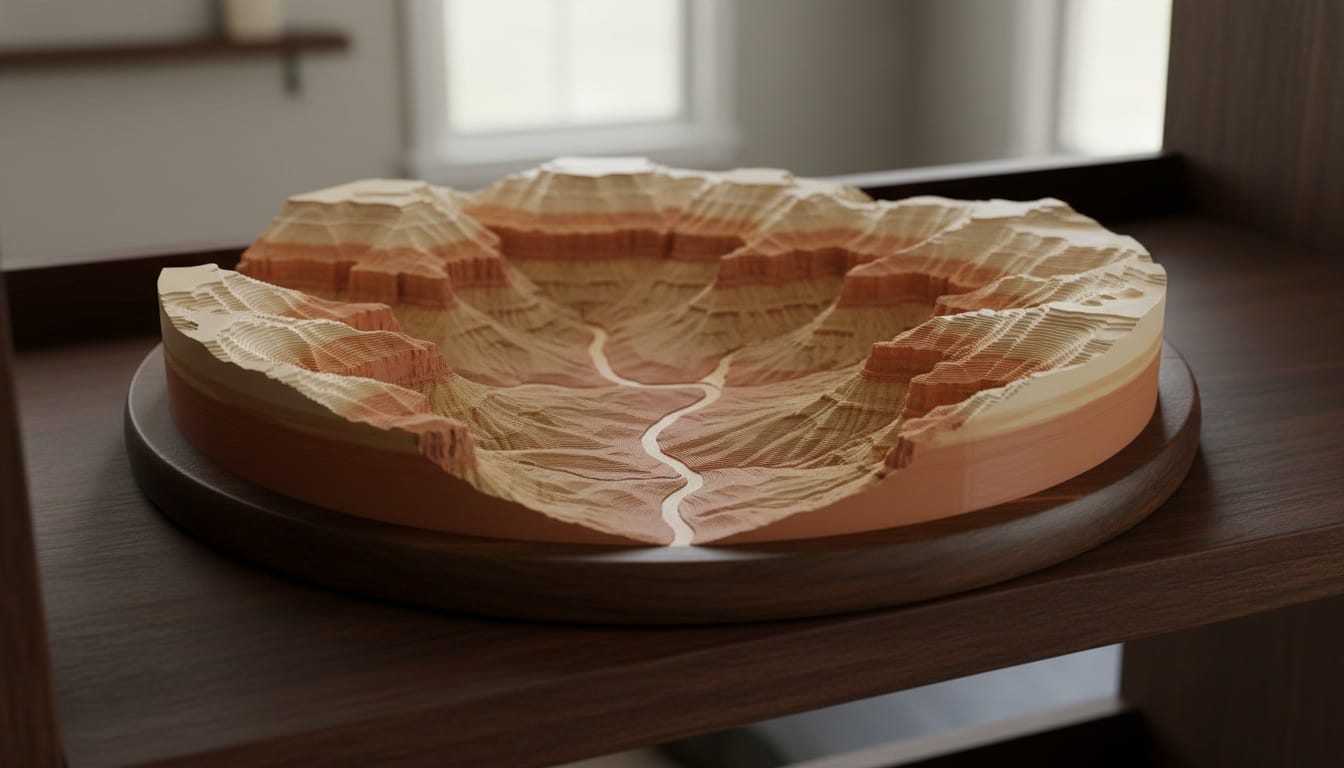
Landscape: Optimized for natural terrain. Emphasizes topography, elevation changes, mountains, rivers, valleys, and coastlines. Choose this for national parks, mountain ranges, island geography, or any location where terrain matters more than buildings
Step 4: Add Landmarks (Optional)
Use the landmarks field to guide the AI. Entering specific monument names helps ensure they appear prominently in your model.
Examples:
- For Paris: "Eiffel Tower, Arc de Triomphe, Notre-Dame"
- For New York: "Statue of Liberty, Empire State Building, Brooklyn Bridge"
- For Rome: "Colosseum, St. Peter's Basilica, Trevi Fountain"
The AI will emphasize these structures and make them recognizable focal points in the diorama.
Step 5: Generate and Download
Click Generate 3D Map and wait for the two-step process:
- Image Generation (~1-2 minutes): The AI creates a stylized map image of your location
- 3D Model Generation (~3-5 minutes): The image is converted into a high-detail 3D model using SuperPlus resolution
Once complete, the 3D model loads in the interactive viewer. Rotate, zoom, and inspect it from every angle. Download in your preferred format:
- STL: Best for 3D printing (recommended)
- OBJ: Versatile format for 3D software
- GLB: Ideal for web viewers and AR applications
Using Image-to-3D: Upload a Map Screenshot
The image upload option is powerful when you want your 3D model to represent a specific neighborhood or geographic area precisely.
How to Capture the Best Map Screenshots
- Open Google Maps, Apple Maps, or Google Earth
- Navigate to your target area
- Switch to satellite or terrain view for best results
- Zoom to frame the area you want in the model
- Take a screenshot and crop to a square
Pro tip: Slightly angled 3D views from Google Earth produce more dramatic models than flat top-down screenshots.
Best Practices for Image Uploads
- Square crops work best because the AI processes square images most consistently
- Include surrounding context so the AI does not lose geographic context from tight crops
- Higher resolution is better, so use full-resolution screenshots rather than compressed thumbnails
- Satellite view gives better results than the standard map view with labels and roads drawn on
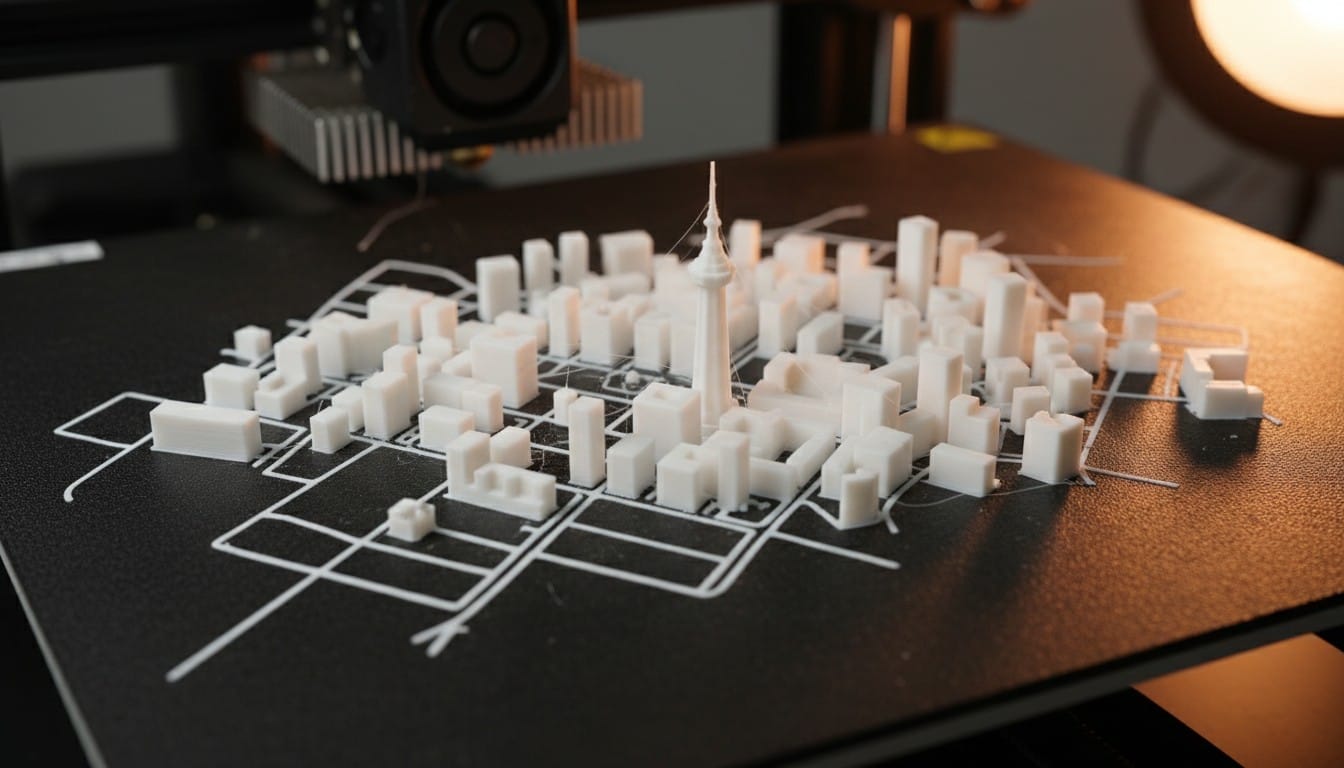
3D Printing Your Map Model
Recommended Print Settings
The models generated by the 3D Map Maker are optimized for FDM and resin 3D printing right out of the box.
FDM Printing:
- Layer height: 0.12-0.16 mm for best detail
- Infill: 15-20% (models are designed as solid-feeling dioramas)
- Supports: Usually not needed since models have stable flat bases
- Material: PLA works great, PETG for durability
- Nozzle: 0.4 mm standard, 0.2 mm for extra fine detail on small prints
Resin Printing:
- Layer height: 0.03-0.05 mm
- Produces the sharpest building and terrain details
- Ideal for small-scale city models where every window matters
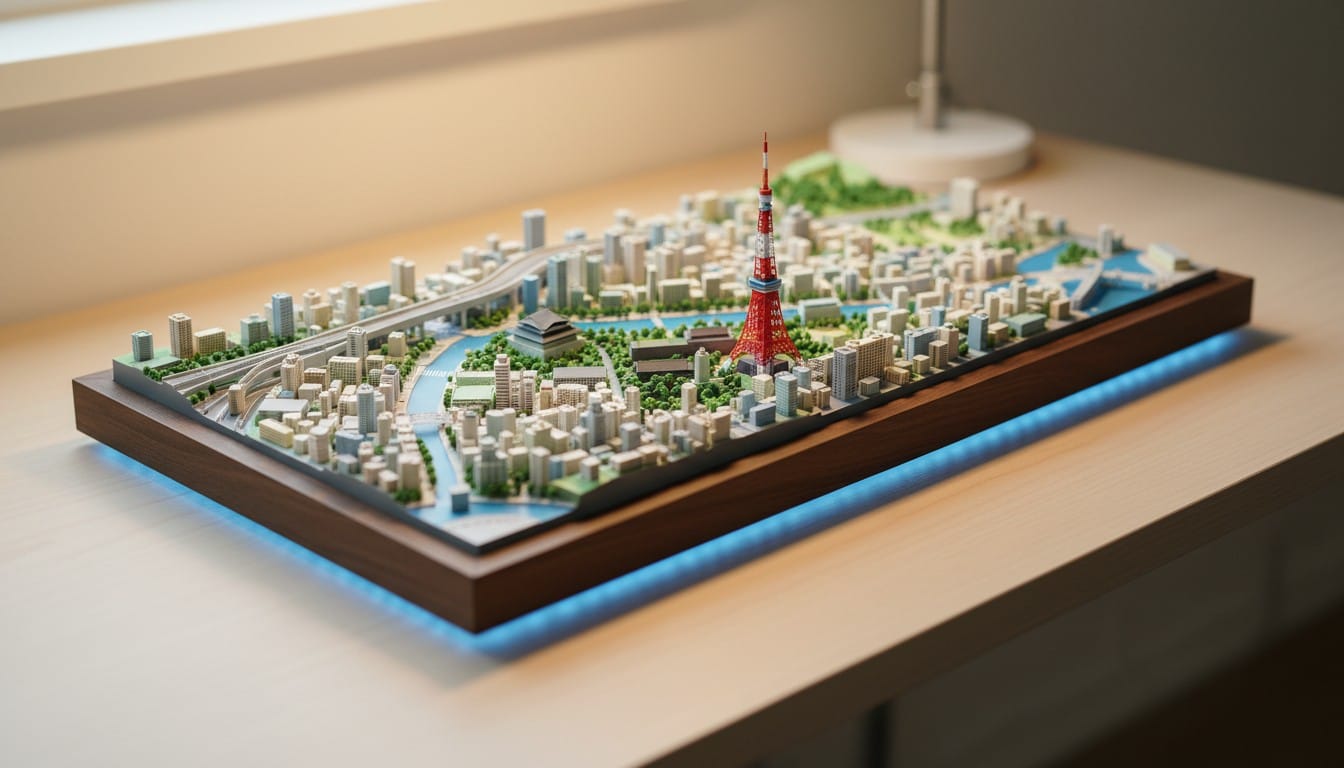
Scaling Your Model
STL files from the 3D Map Maker can be scaled to any size in your slicer software:
- Desk display (8-12 cm): Compact souvenir size, prints in 2-4 hours on FDM
- Shelf piece (15-20 cm): Good balance of detail and print time
- Statement piece (25-40 cm): Maximum impact, shows off every building and terrain feature
- Multi-part large (50+ cm): Split the model in your slicer and assemble after printing
Post-Processing Ideas
- Spray primer in gray or white for a clean maquette look
- Acrylic paint on miniature-style models to add color to buildings, parks, and water
- Clear coat for durability and a polished finish
- Wooden base or acrylic stand for a professional display presentation
- LED backlighting under a translucent base for a dramatic display effect
Creative Uses for 3D Printed Maps
Travel Memorabilia and Gifts
Turn vacation destinations into permanent keepsakes. Print the city where you got engaged, the mountain you climbed, or the island where you honeymooned. These make deeply personal gifts that no store sells.
Education and Geography
Teachers can use 3D printed terrain models to teach topography, urban planning, and geography. Students can hold mountain ranges, trace river systems, and understand elevation in ways that flat maps never convey.
Architecture and Urban Planning
Use the Sleek style to quickly generate massing models of city blocks. Useful for site context models, urban studies, and design presentations where you need a physical representation of surrounding buildings.
Board Games and Tabletop Gaming
Custom terrain pieces based on real locations add incredible immersion to tabletop RPGs and wargames. Generate a medieval European city for your D&D campaign or a Pacific island chain for a naval strategy game.
Real Estate and Property Development
Create physical models of neighborhoods for property presentations. Show clients the surrounding area, nearby landmarks, and terrain features around a development site.
Art and Home Decor
3D printed city maps make striking wall art when mounted in shadow box frames or displayed on floating shelves. Create a collection of cities you have lived in or places on your travel bucket list.
Tips for the Best Results
Be specific with location names. "Historic center of Prague" generates a more interesting and focused model than just "Prague." Include neighborhood names or districts for large cities.
Name 2-4 key landmarks. This ensures the most recognizable structures appear prominently. Without landmark guidance, the AI may emphasize less notable buildings.
Use Landscape mode for terrain-heavy locations. National parks, mountain towns, coastal areas, and island nations look dramatically better with the Landscape generation type that emphasizes topography.
Try both styles. The Sleek and Miniature presets produce surprisingly different models of the same location. Generate both and decide which you prefer before committing to a long print.
Upload reference images for precision. When you need a model of a specific neighborhood or viewpoint, uploading a map screenshot gives you much more control than text-only generation.
How It Compares to Other 3D Map Tools
If you have searched for ways to 3D print maps before, you may have encountered tools like Terrain2STL or TouchTerrain. Here is how PrintPal's 3D Map Maker differs:
| Feature | PrintPal 3D Map Maker | Terrain2STL / TouchTerrain |
|---|---|---|
| Buildings and landmarks | Yes, AI generates buildings, landmarks, roads | No, terrain elevation only |
| Styles | Sleek maquette + Miniature diorama | Raw terrain heightmap |
| Input method | Text or image | Coordinates / map selection |
| Print readiness | Optimized for 3D printing, flat base | May need cleanup and base added |
| Detail level | SuperPlus AI resolution with up to 1M polygons | Resolution depends on elevation data |
| Best for | City souvenirs, gifts, displays, landmarks | Scientific terrain analysis, hiking maps |
For stylized city and landscape dioramas that look beautiful on a shelf, the 3D Map Maker is the better choice. For precise real-world elevation data for scientific or geographic analysis, dedicated GIS tools remain more appropriate.